
 Book Free Consultation

Flow, Sub Flow and Private Flow in Mulesoft
This blog explains Flow, Sub Flow, and Private Flow in MuleSoft, their differences, and how to use them in real-time scenarios.
By Pradeepa Singaravelan
Associate Salesforce Developer
Flow, Subflow, and Private Flow in MuleSoft
This blog explains how to create flows, subflows, and private flows in Mulesoft. It also describes the differences between flows, subflows, and private flows and how to connect APIs and how to consume those APIs. If you are new to this blog, please refer to the previous blog from Aintiram Web Tech.
Mule 4 - Message Structure
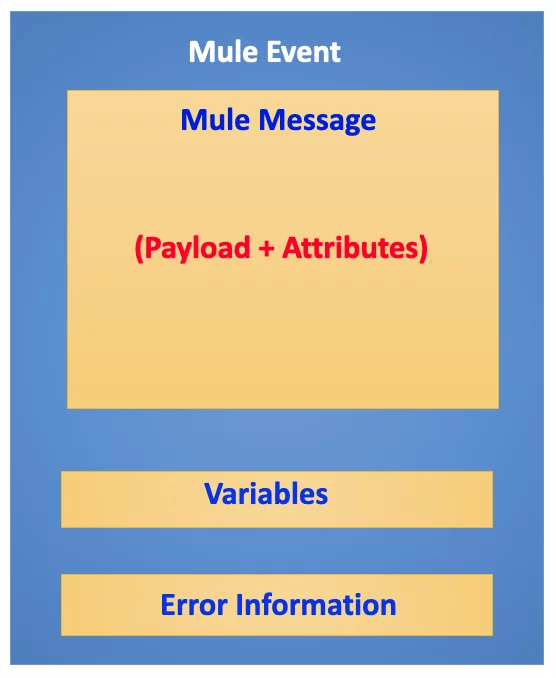
Before understanding a Mule flow, it is important to understand how data is processed in MuleSoft. This structure helps us clearly see how data moves and changes inside a Mule application.
In Mule 4, a message acts as a container that moves through the flow, carrying all the information required for processing. The payload holds the actual business data, attributes provide additional details about that data, variables store temporary values used during execution, and error information captures details whenever an error occurs.
Mule Flows
Mule application process data by passing messages through different components such as connectors, modules, and processors. These components are organized inside flows and subflows. which define how data moves and gets processed in a Mule app. Flow types are,
Flow,
Sub-Flow,
Private Flow.
Flow
A Mule Flow is the main building block of a Mule Application. It defines the Completed path of message processing from receiving data to sending the response.
Flow Structure:
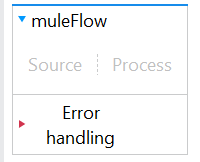
A Flow defines how a message is received , processed and handled in case of error. Each flow has three main parts,
Source: The Source is the entry point of a Mule flow that triggers execution by receiving data from external systems such as HTTP requests, schedulers, files, or messaging queues.
Process: The Process section contains the core business logic where Mule transforms data, validates inputs, calls APIs, interacts with databases, and routes messages as required.
Error Handling: Error Handling ensures the flow responds gracefully to failures by managing exceptions using mechanisms like On Error Continue and On Error Propagate, instead of stopping the application.
Business Scenario: Create an Account Using Mule Flow
Step 1: Open Anypoint Studio. If you do not have Anypoint Studio installed, first install it and then follow the steps below.
Step 2: Create a new Mule project and drag-and-drop the Flow element onto the canvas.
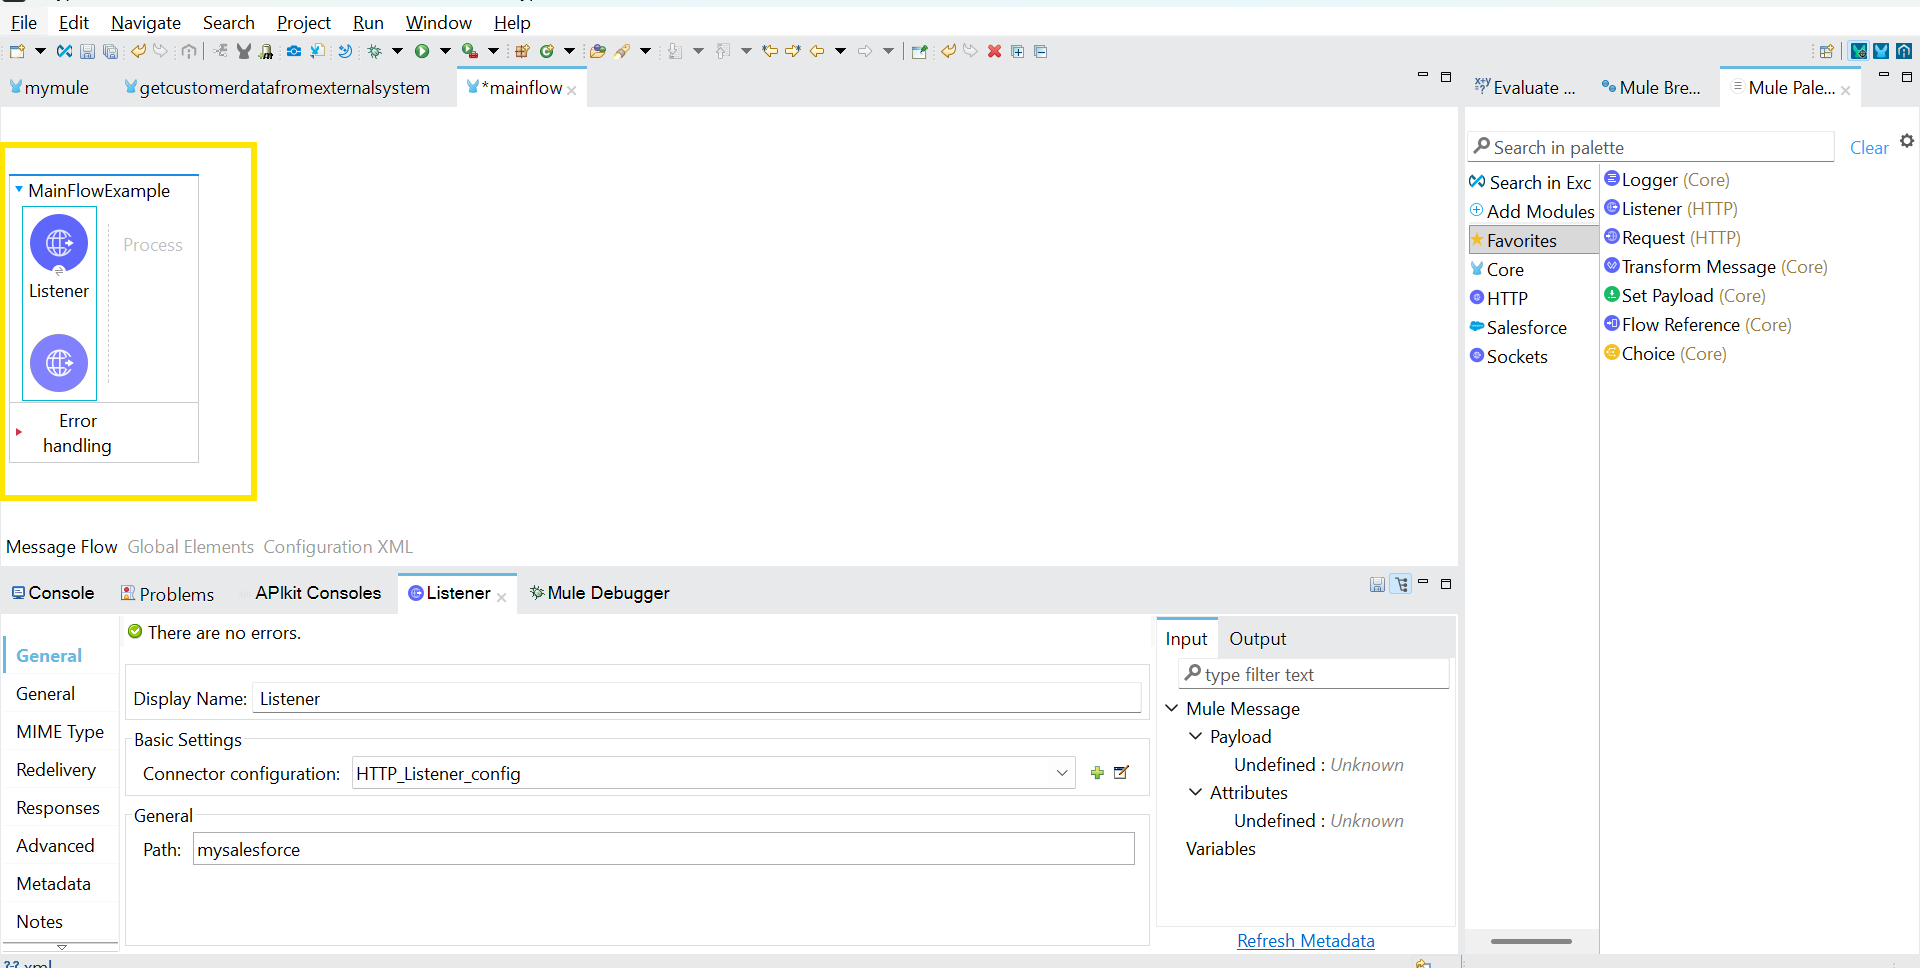
Step 3: Add an HTTP Listener component to receive incoming API requests.
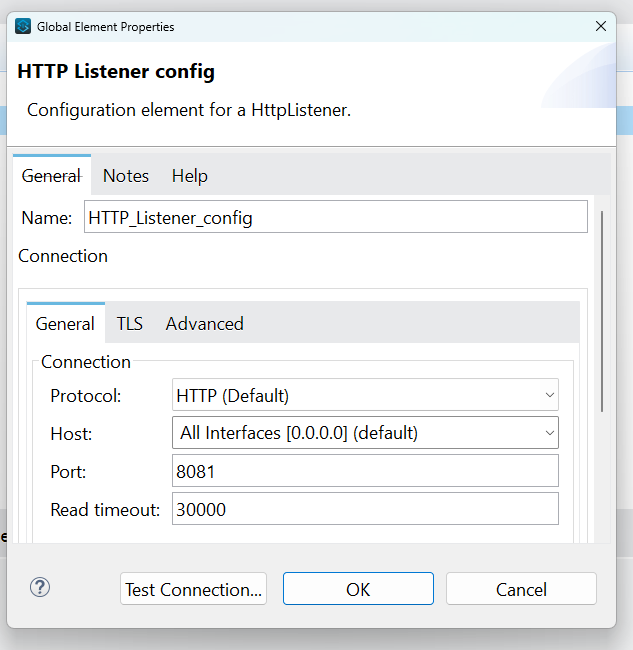
Step 4: Configure the HTTP Listener host, port, and path details.
Step 5: Add the Transform Message component to transform the request payload.
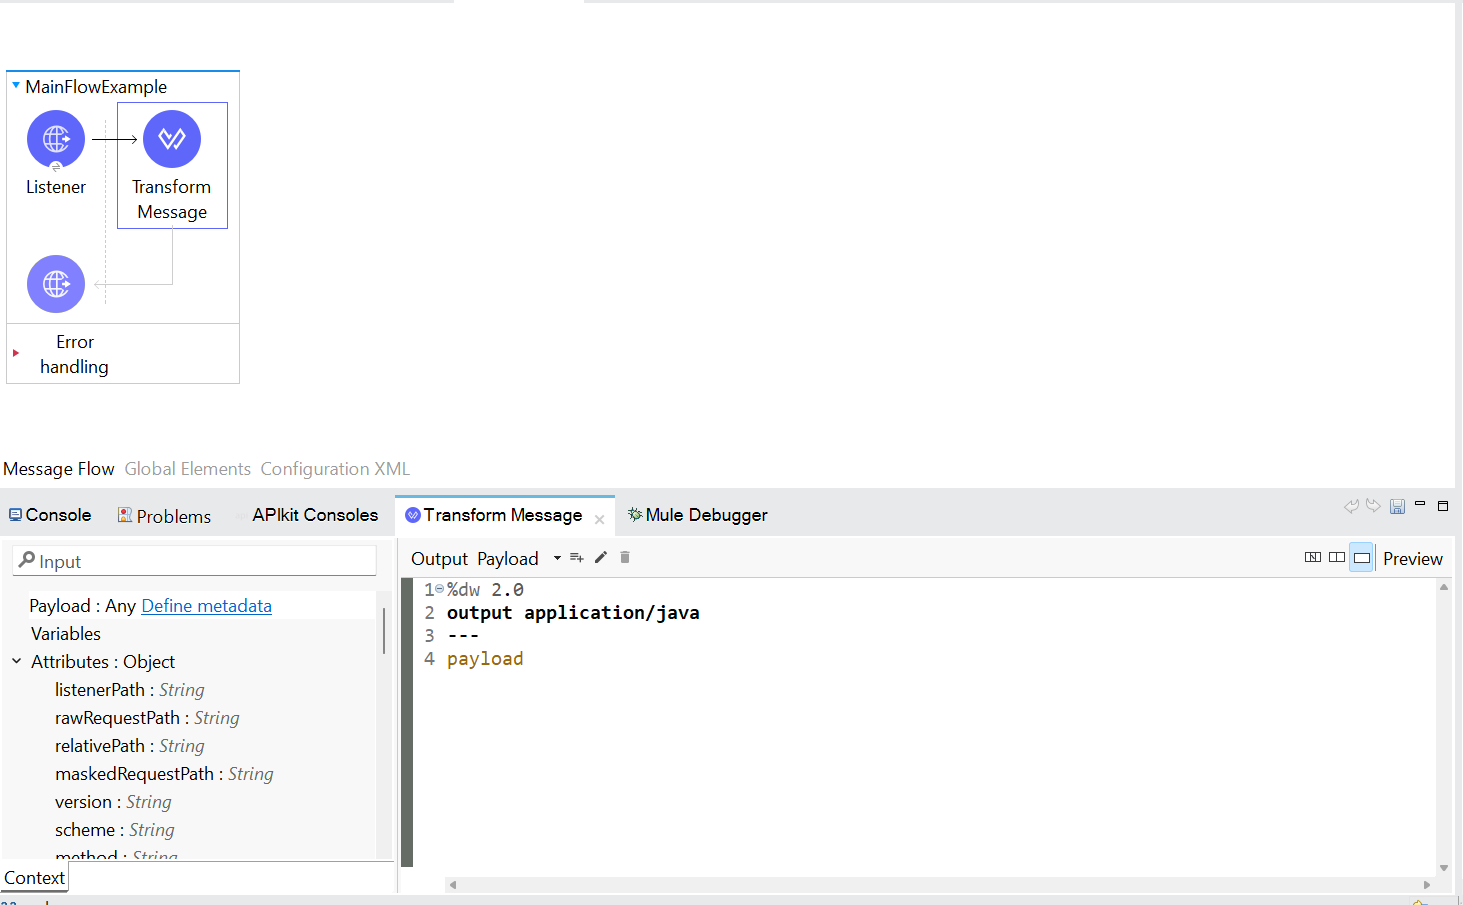
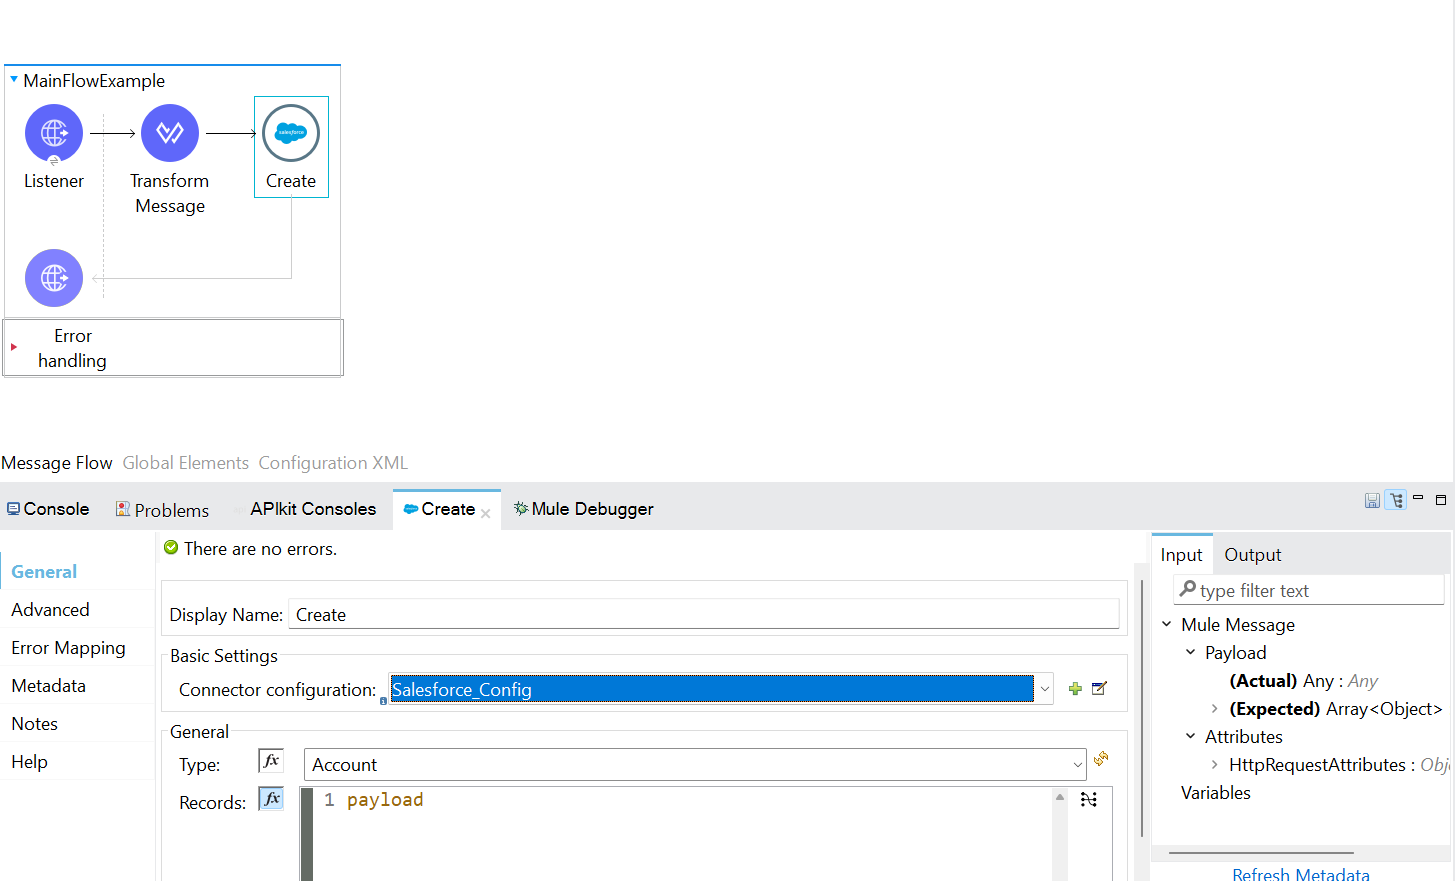
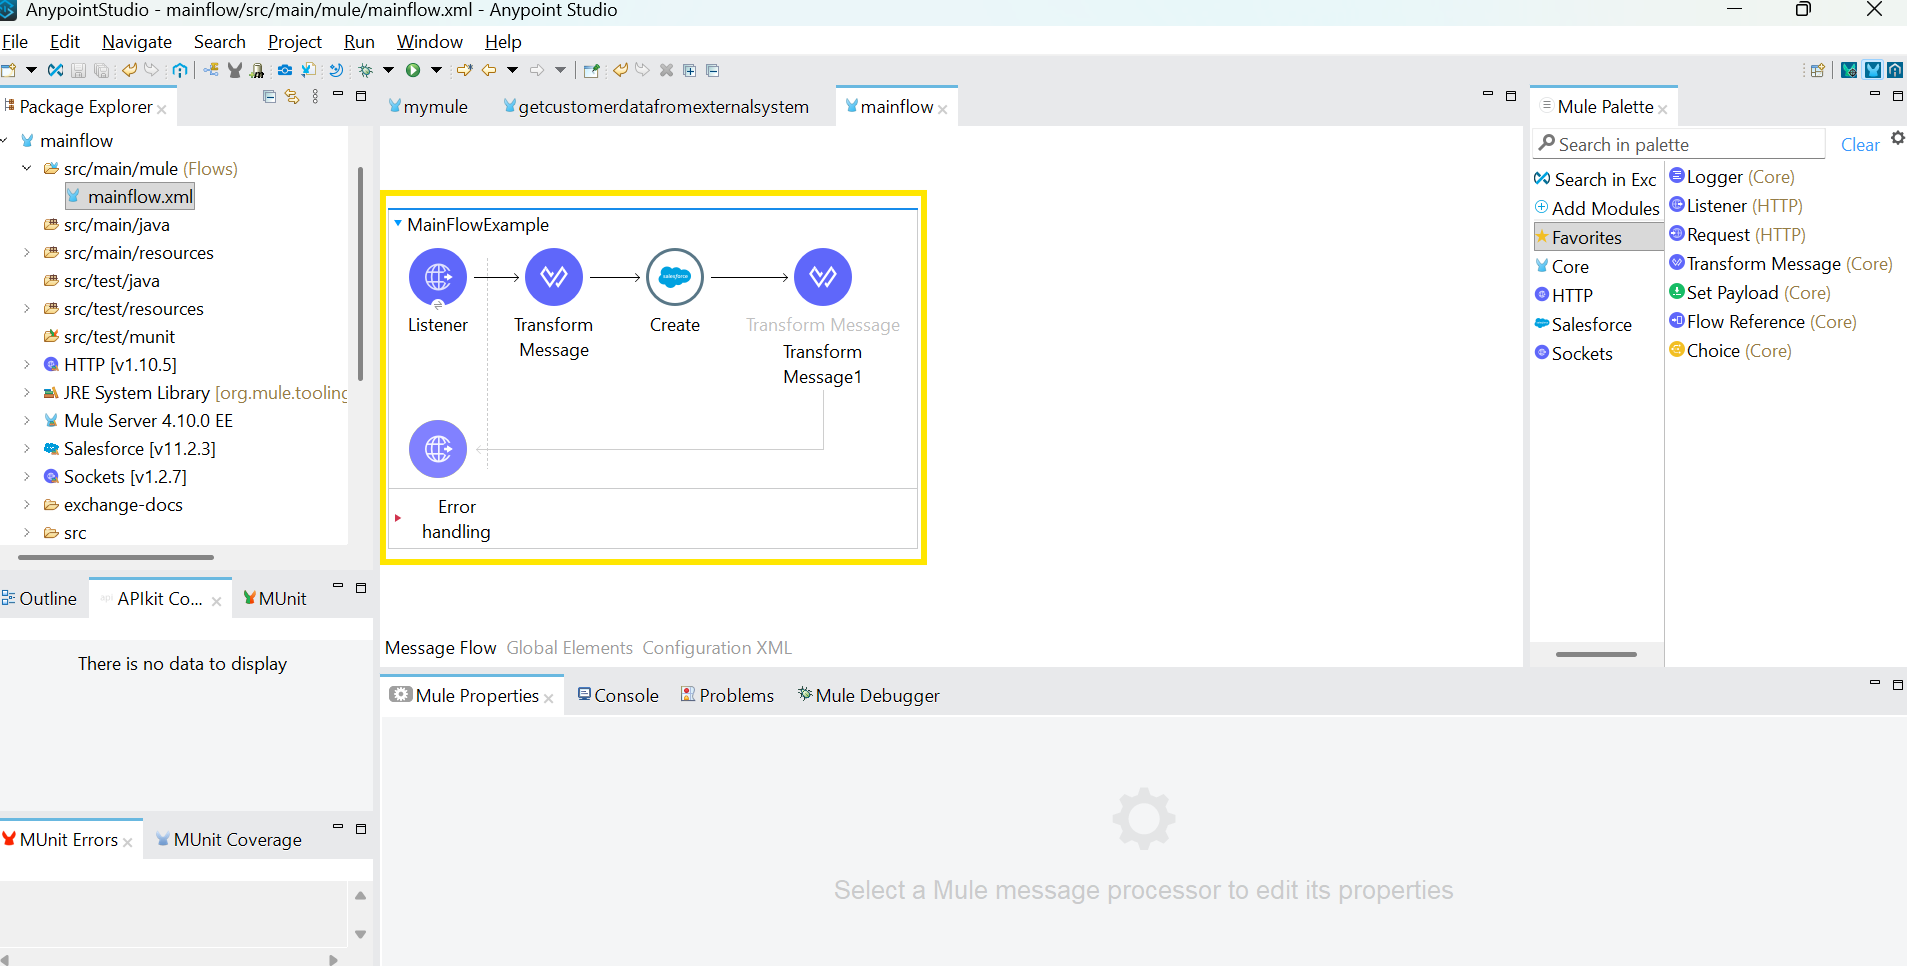
Step 6: Add the Salesforce Create element onto the canvas and configure the Object Type and record details as shown in the image below.
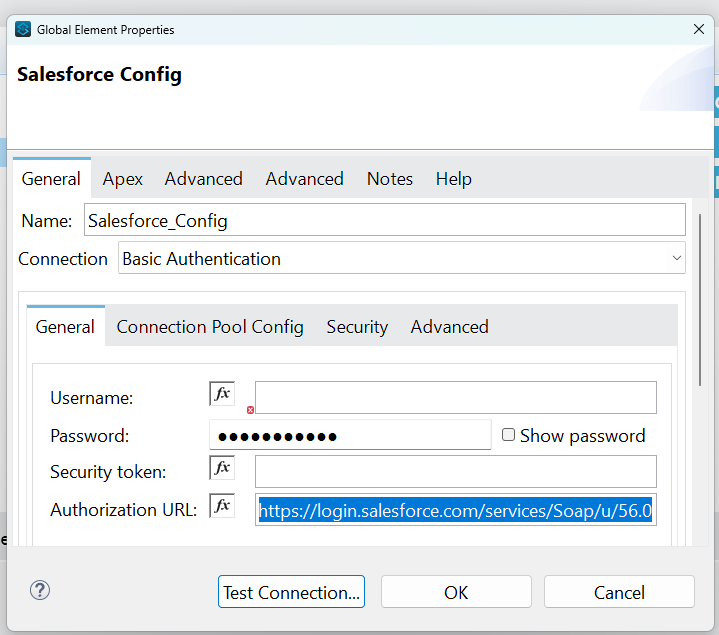
Step 7: Configure the Salesforce Org by clicking the + icon in the Connector Configuration section of the Create element. Enter the Username, Password, Security Token, and Authorization URL details.
Step 8: Add another Transform Message component to transform the response payload and return the response in JSON format.
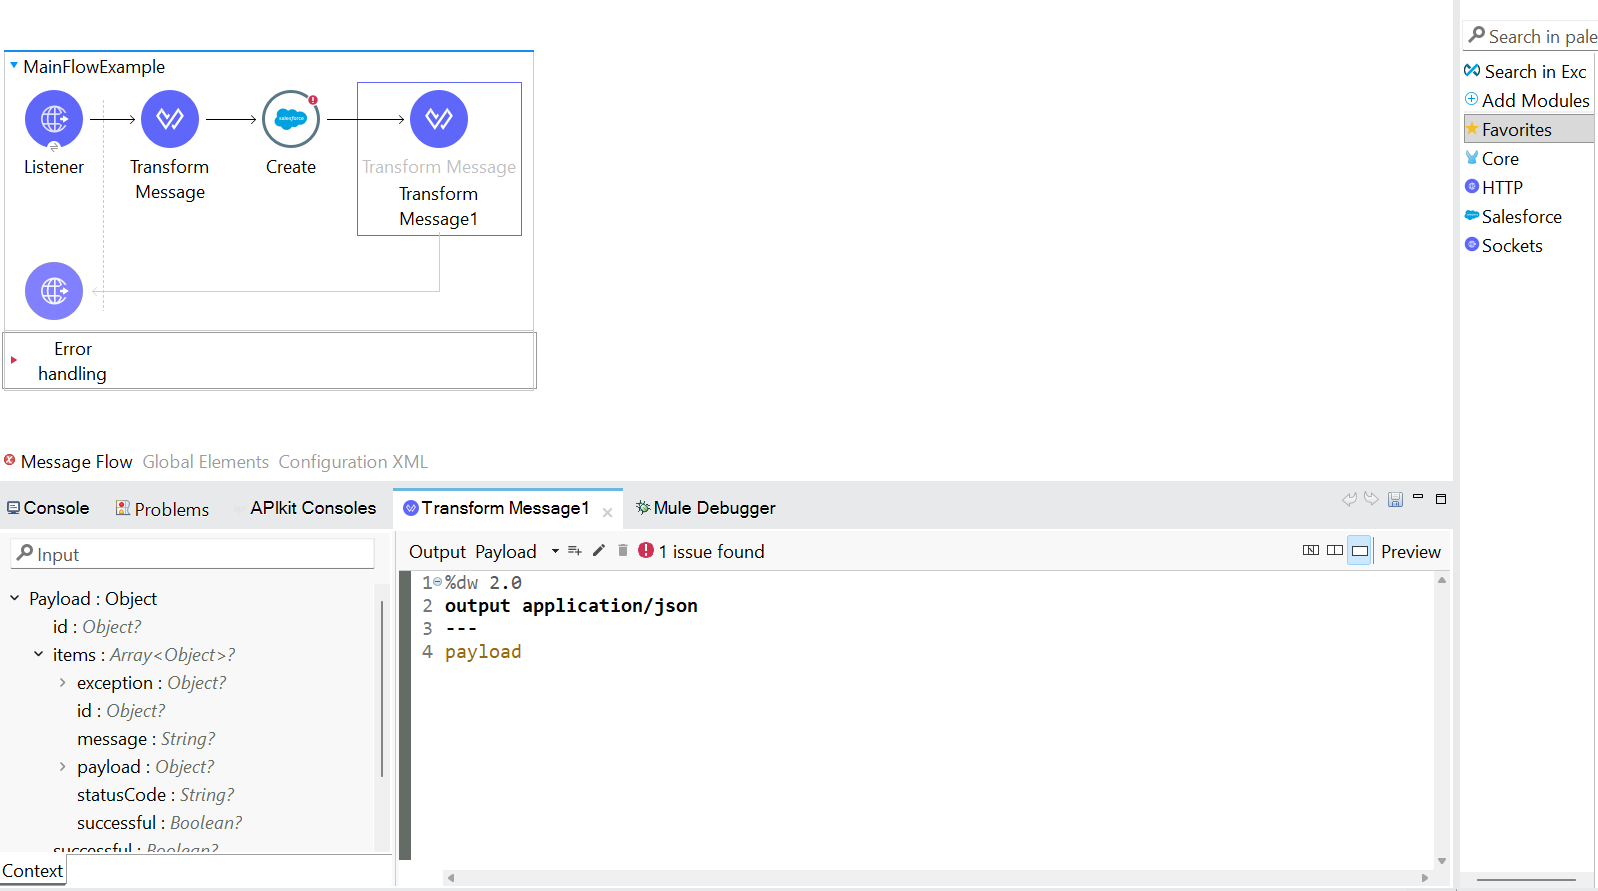
Step 9 :Finally, connect all the required elements properly on the canvas to complete the Mule flow.
Test the API in Postman by Following the Below Steps
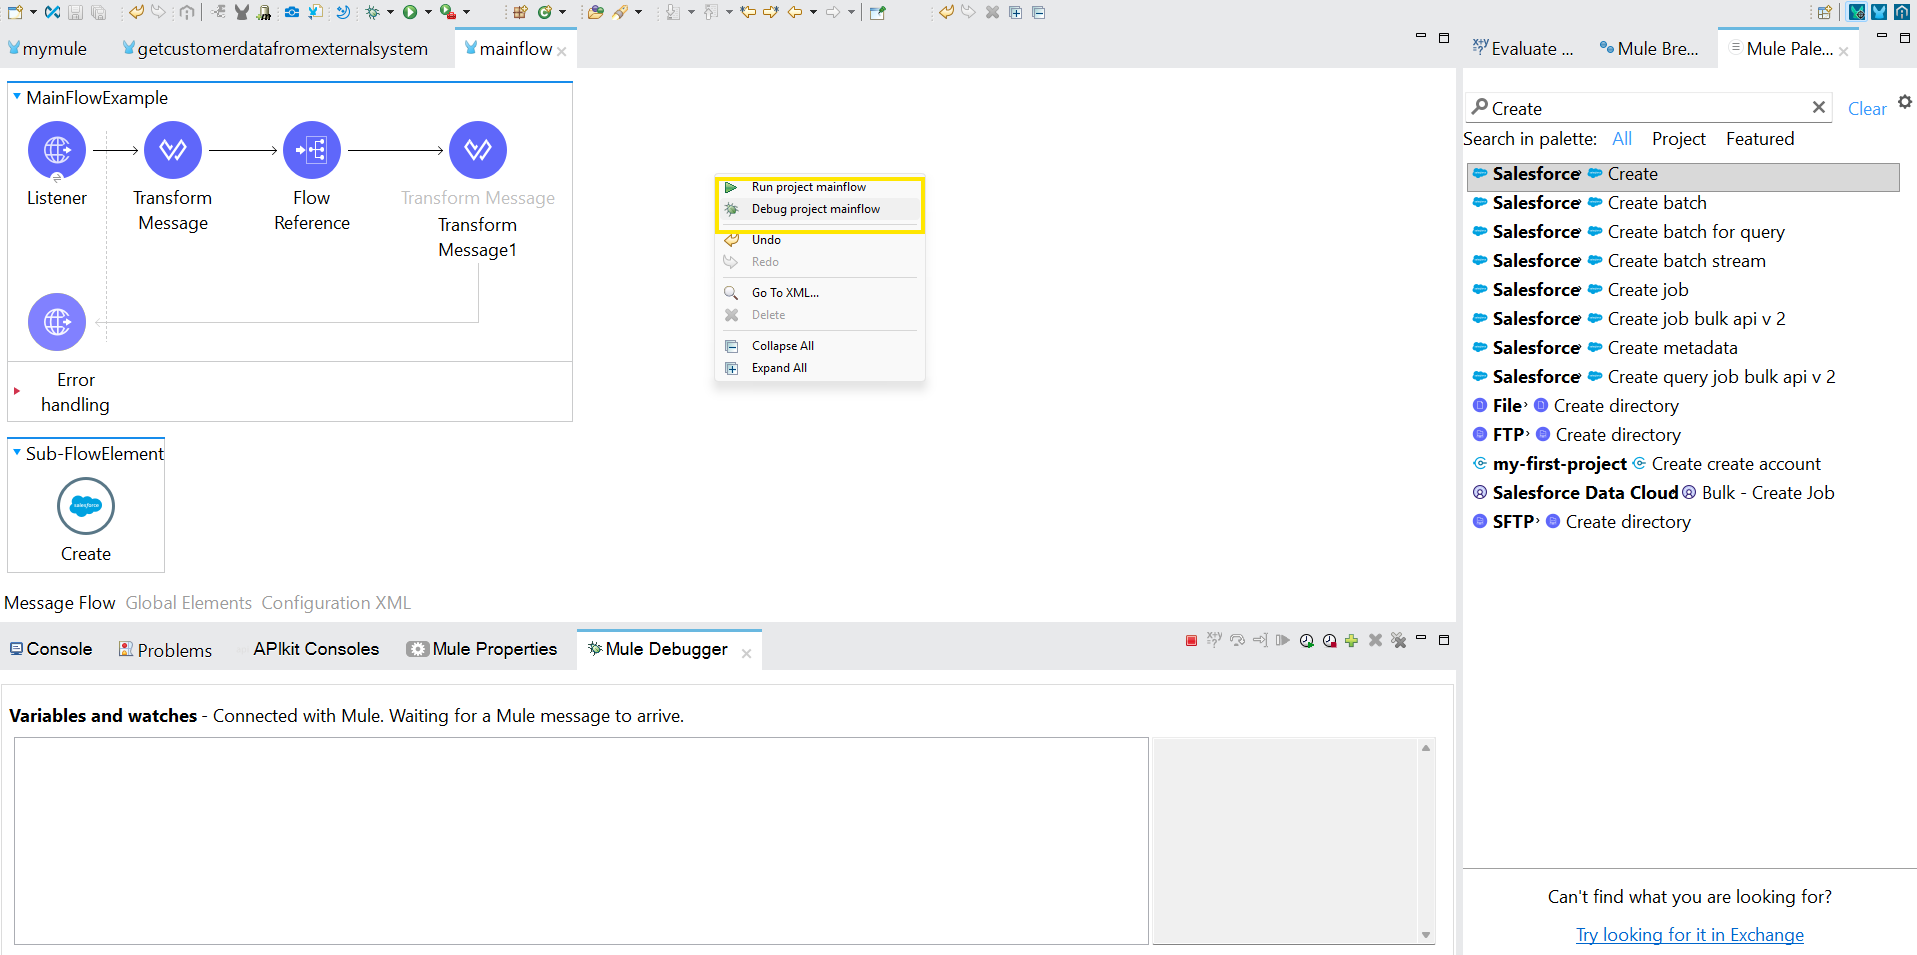
Step 1 : Complete the project, then right-click the project and select Debug Project (Main Flow) to run the Mule application.
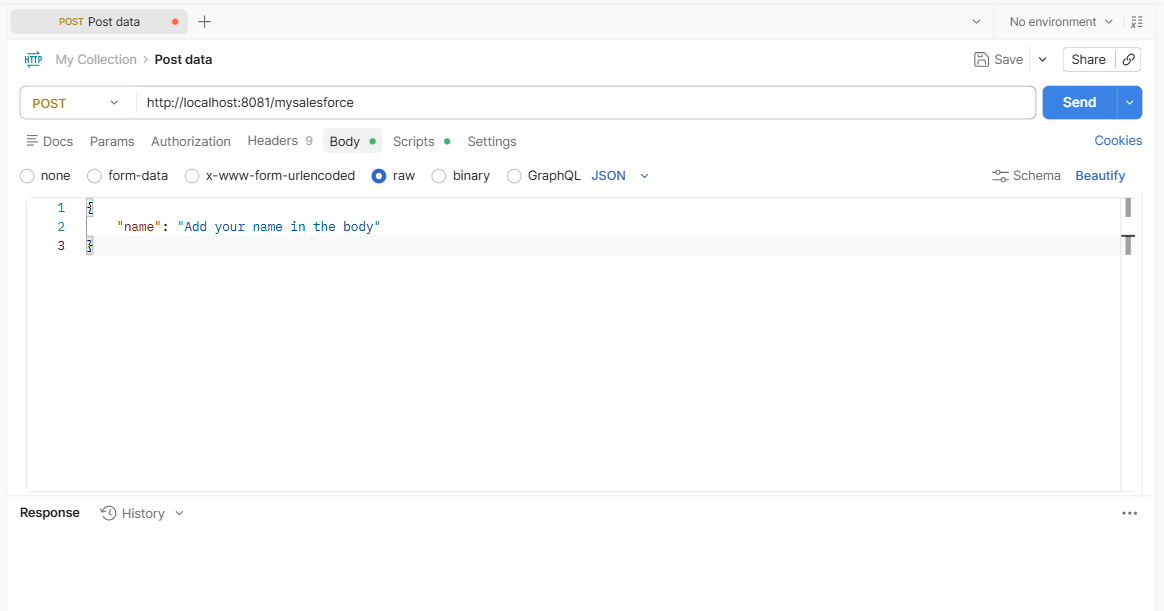
Step 2: Open Postman in the browser as shown in the image below and enter the API URL, Request Method, and Request Body details to test the project.
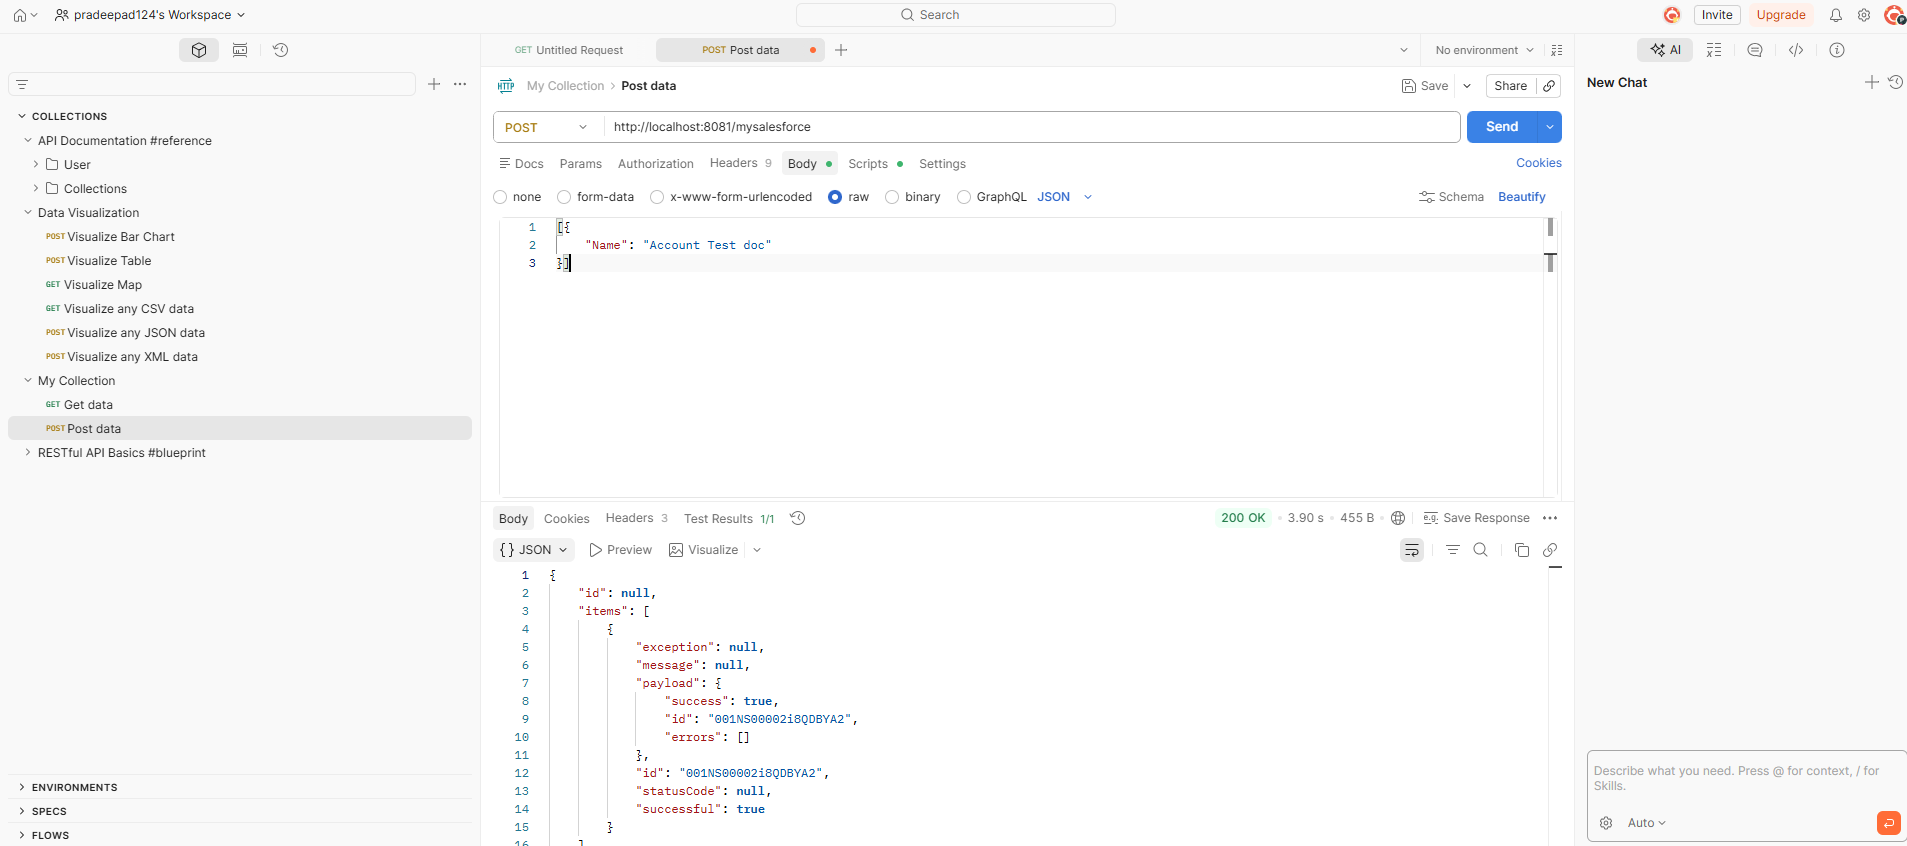
Step 3: Click the Send button in Postman and return to Anypoint Studio to check whether the flow has any errors. If any errors occur, resolve them and continue the testing process.
Step 4 : After successful debugging, the response will be displayed as shown in the image below.
Sub-Flow
A Sub-flow is a reusable component that is used to organize and simplify logic within a Mule application. It does not have its own trigger or event source and cannot run independently. A Sub-flow is called from a Flow or another Sub-flow using a Flow Reference. It receives the same Mule event processes the data, and then returns the updated data back to the calling flow.
Sub-Flow Structure:
A Sub-flow receives data from the main Flow, processes it using processors, and then returns the processed data back to the main Flow.
Process: In a Sub-flow, data is received from the main Flow through a Flow Reference. The Flow Reference passes the data to the Sub-flow, where it is modified or processed, and then the updated data is returned back to the main Flow.
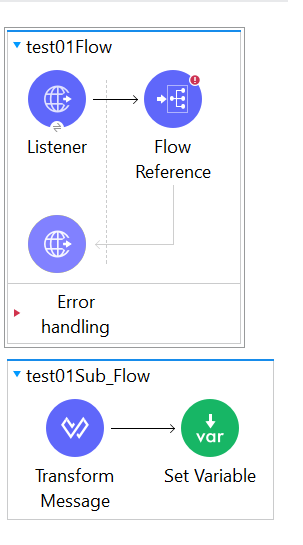
Business Scenario: Create Contact Using Sub-Flow in MuleSoft
Step 1: Create a new Mule project and drag-and-drop the Flow element onto the canvas.
Step 2: Add an HTTP Listener component to receive incoming API requests.
Step 3: Configure the HTTP Listener host, port, and path details.
Step 4: Drag-and-drop the Sub-Flow element onto the canvas and provide a sub-flow name.
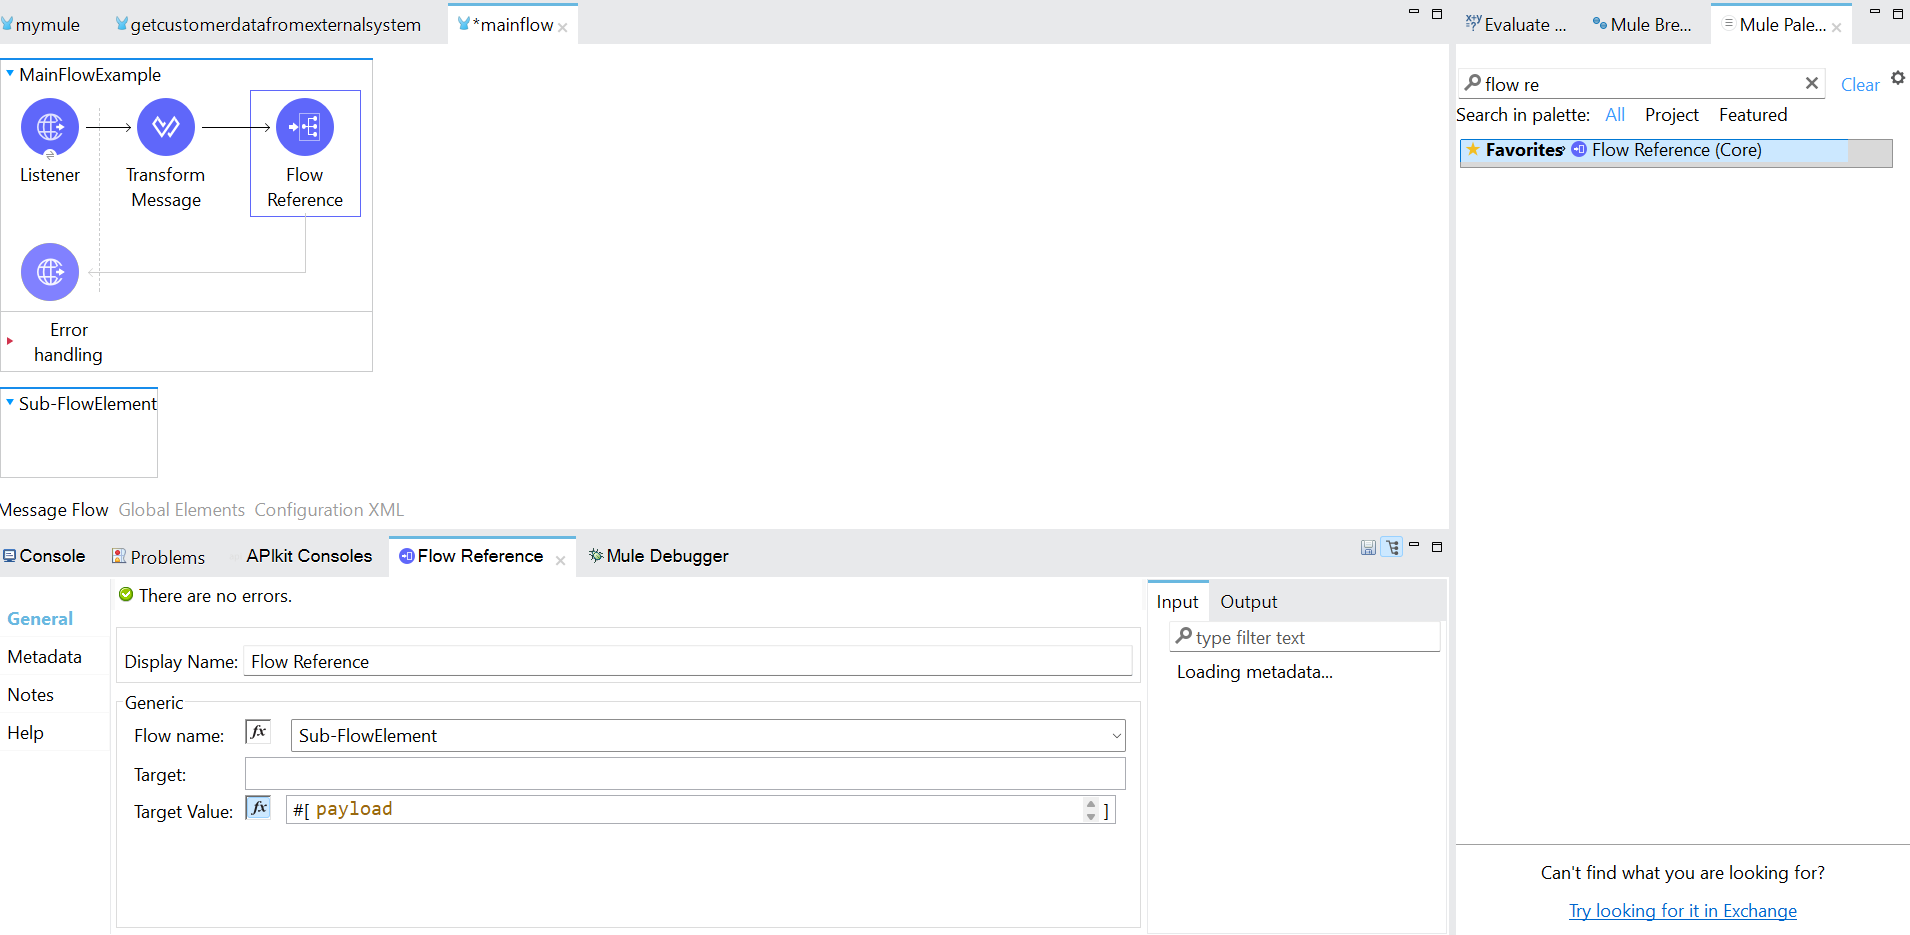
Step 5: Drag-and-drop the Flow Reference component, add the flow name, and configure the target value as shown in the image below.
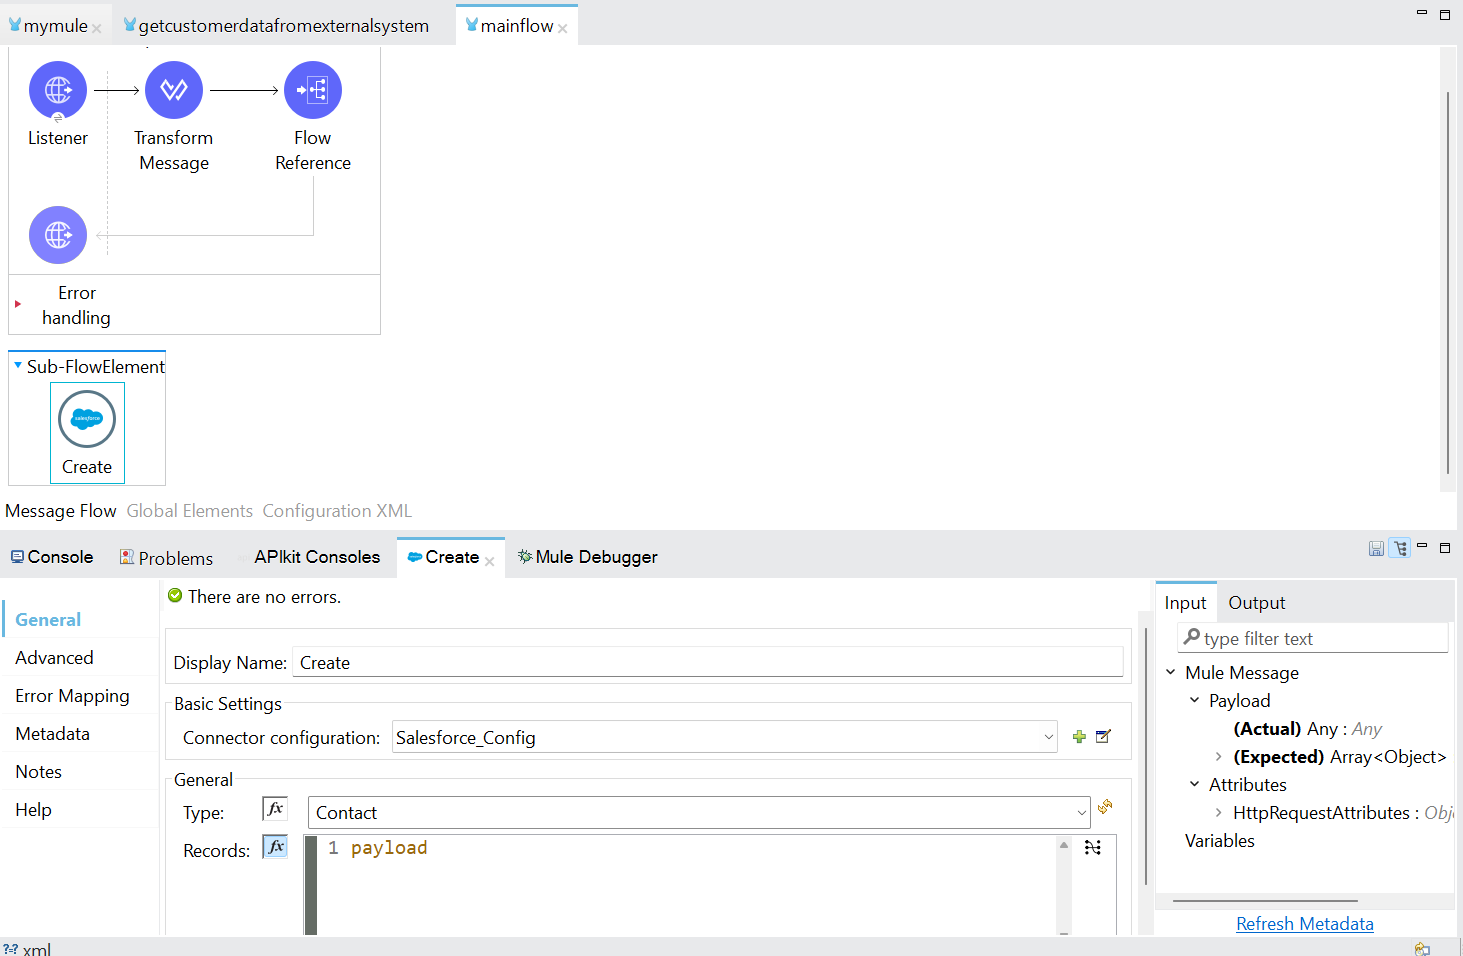
Step 6: Drag-and-drop the Salesforce Create element into the Sub-flow and configure the Object Type and record details as shown in the image below.
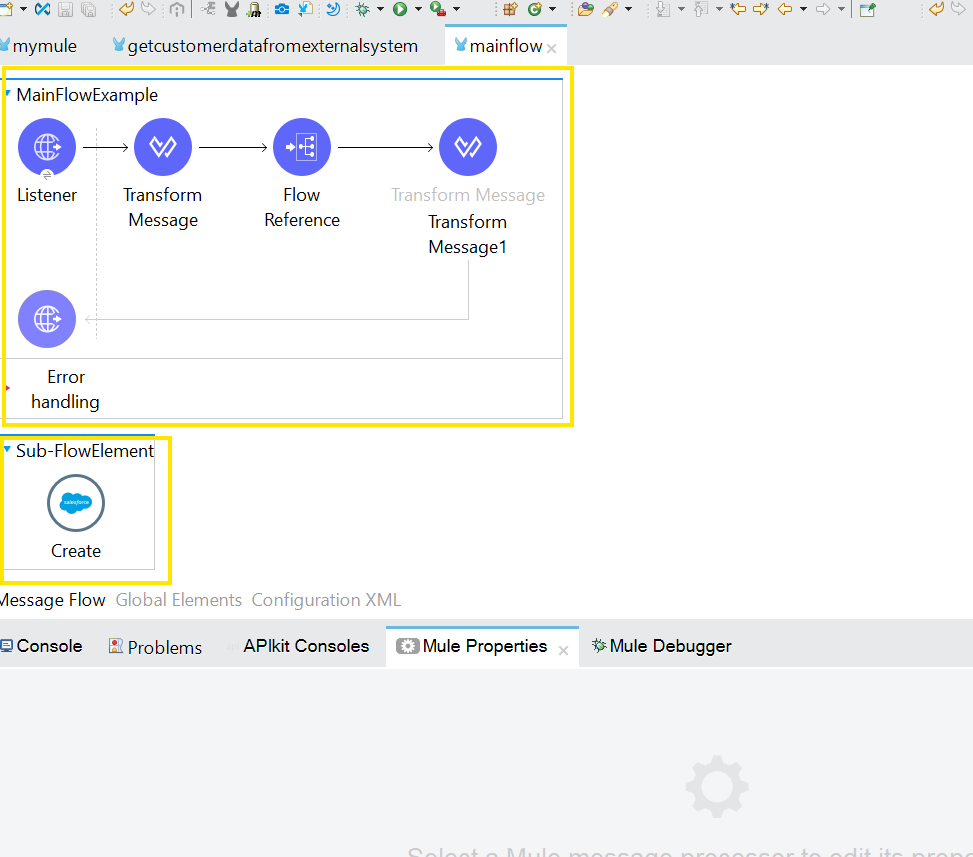
Step 7: Add the Transform Message component to transform the request payload and return the response in JSON format.
Step 8 :Finally, connect all the required elements properly on the canvas to complete the Mule flow. (To test the flow process, follow the testing steps mentioned above.)
Private Flow
Private flows are mainly used to separate common logic. When two or more flows have the same business logic but are triggered from different endpoints, you can move the shared logic into a Private Flow. Then, both flows can call the Private Flow using a Flow Reference, which improves reusability and reduces code duplication.
Private Flow Structure:
Private flow doesn't have the Source they flow only using the data processing and error handling part
Process: The Process section contains the core business logic where Mule transforms data, validates inputs, calls APIs, interacts with databases and routes messages as required.
Error handling: A Private Flow can include its own error-handling logic to catch and manage errors. After handling the error or processing the data, control returns to the calling flow.
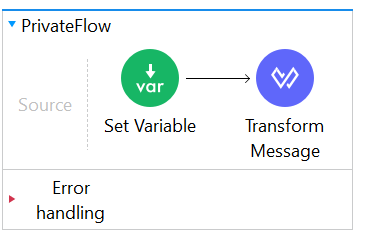
Business Scenario: Check Existing Contact Before Create Using Private Flow
Step 1: Create a new Mule project and drag-and-drop the Flow element onto the canvas.
Step 2: Add an HTTP Listener component to receive incoming API requests.
Step 3: Configure the HTTP Listener host, port, and path details.
Step 4: Add the Set Variable component and provide the variable name and value as shown in the image below.
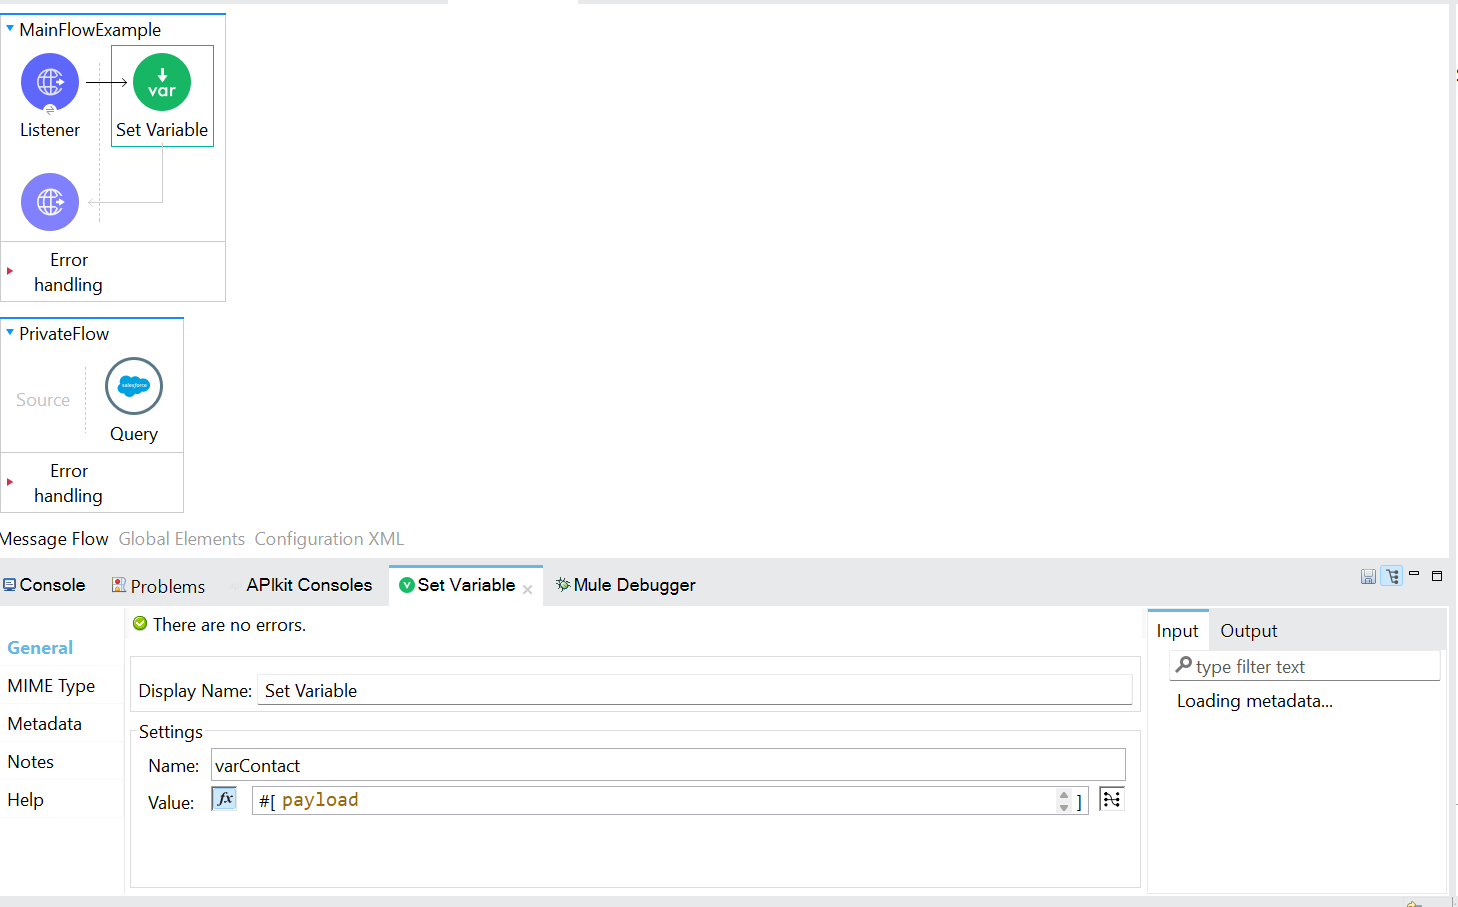
Step 5: Add the Flow element to the canvas without configuring a Source component, and provide a name for the flow.
Step 6: Add the Query element to the Private Flow and configure the query details.
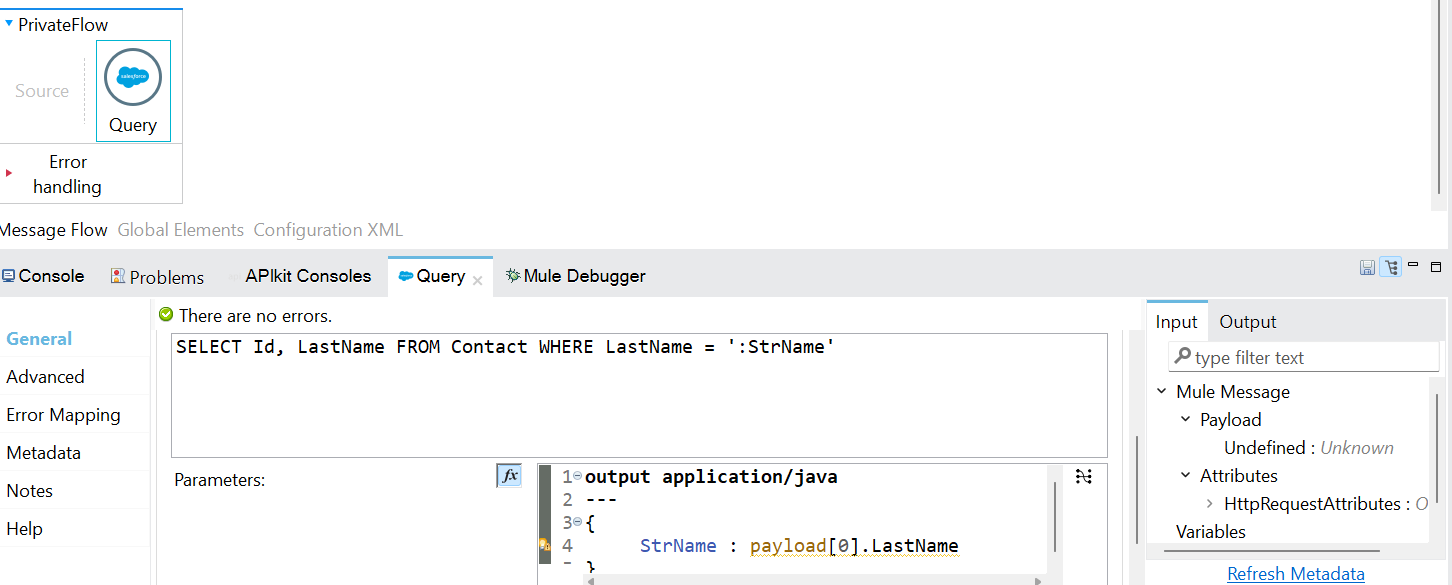
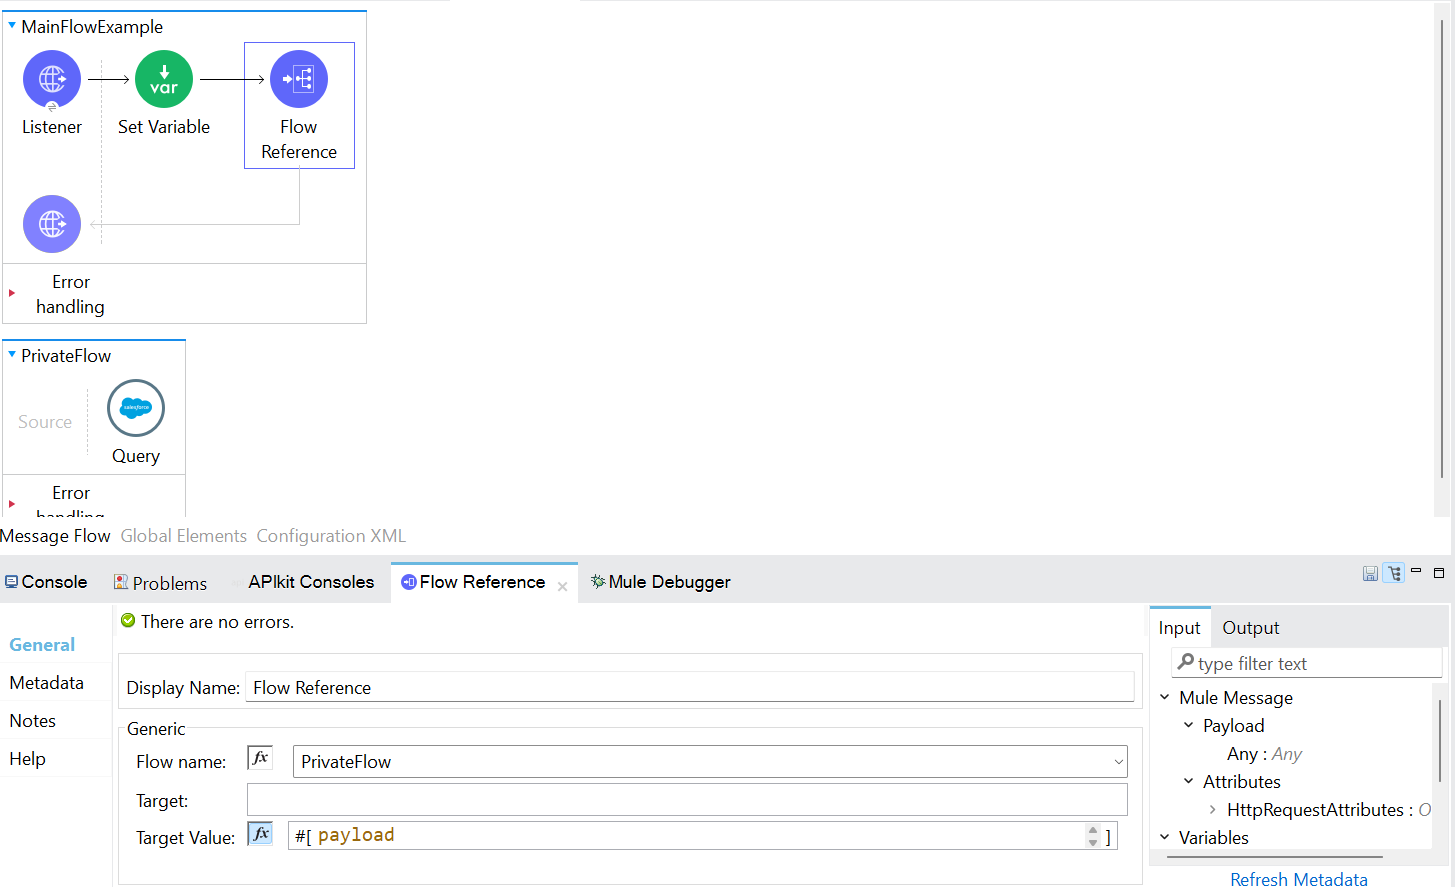
Step 7: Drag-and-drop the Flow Reference component, add the flow name, and configure the target value as shown in the image below.
Step 8: Add the Choice element and configure the condition inside the When section as shown in the image below.
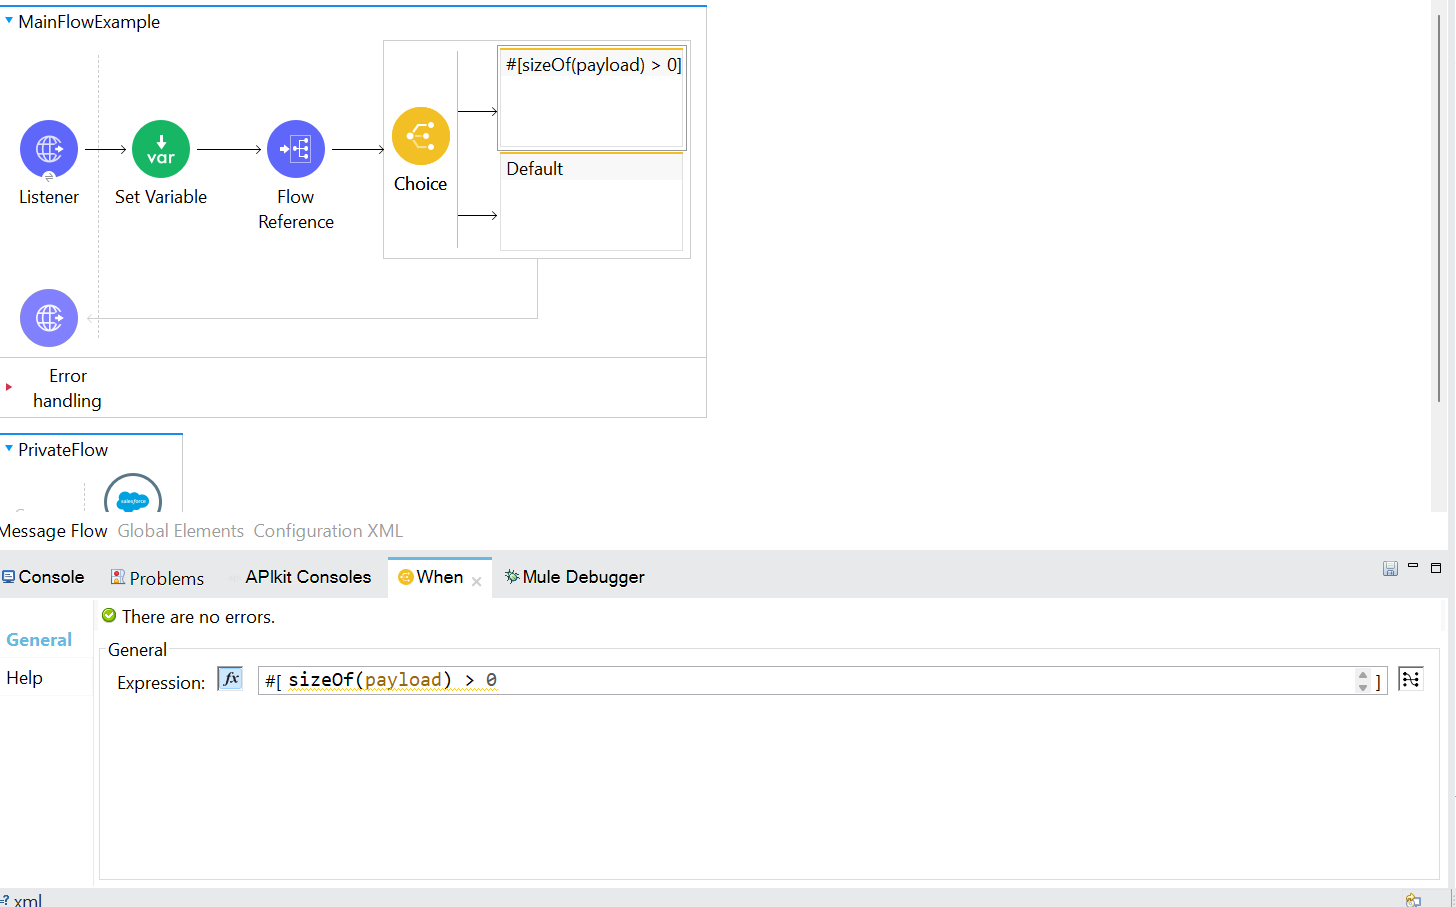
Step 9: Add the Transform Message component inside the When section and provide the error message.
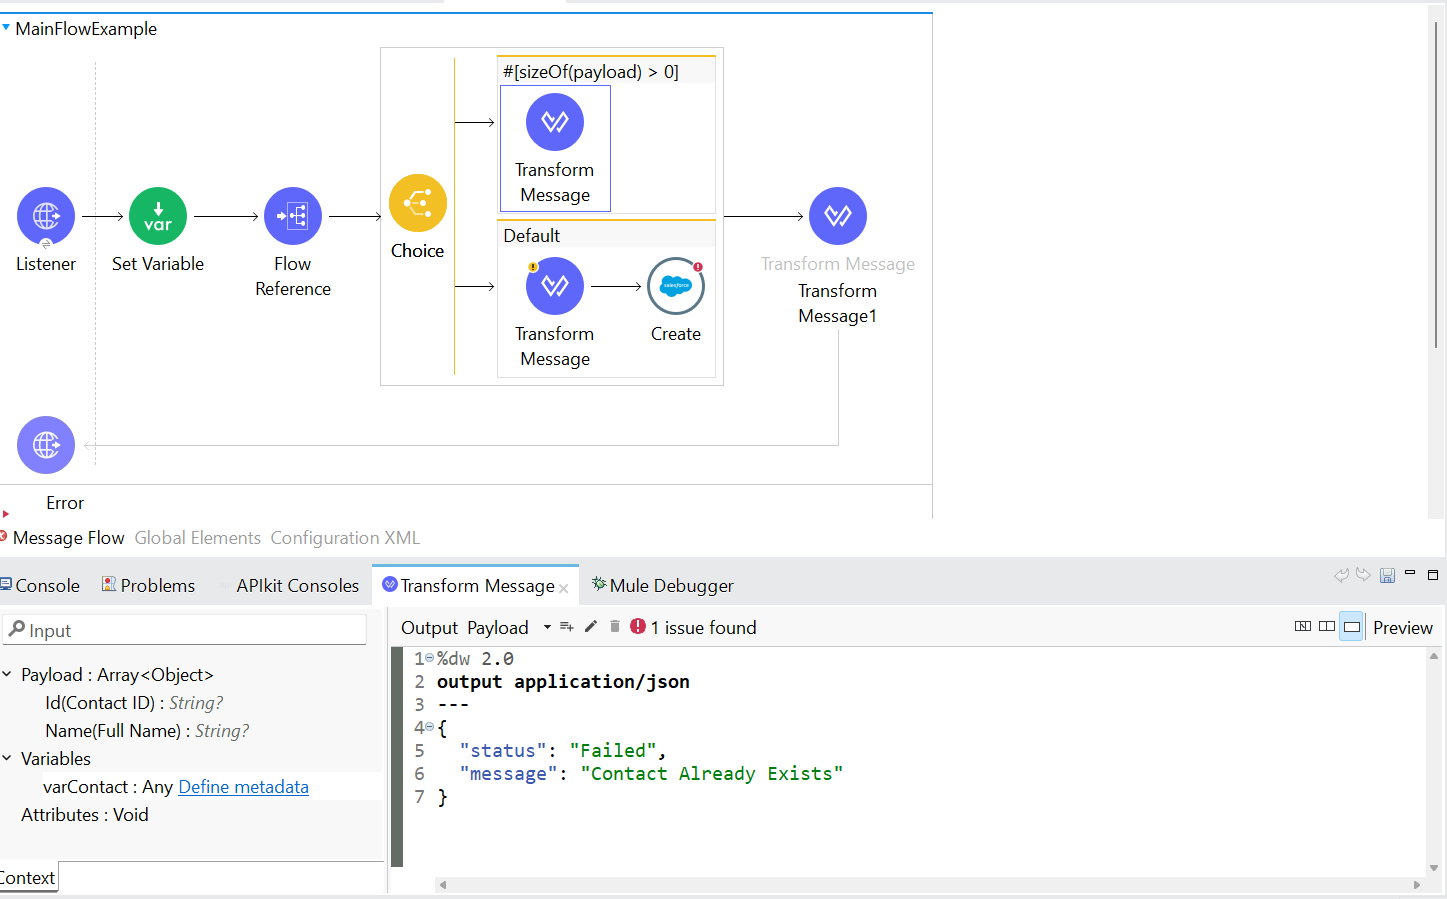
Step 10: Add another Transform Message component inside the Default section and configure the required transformation.
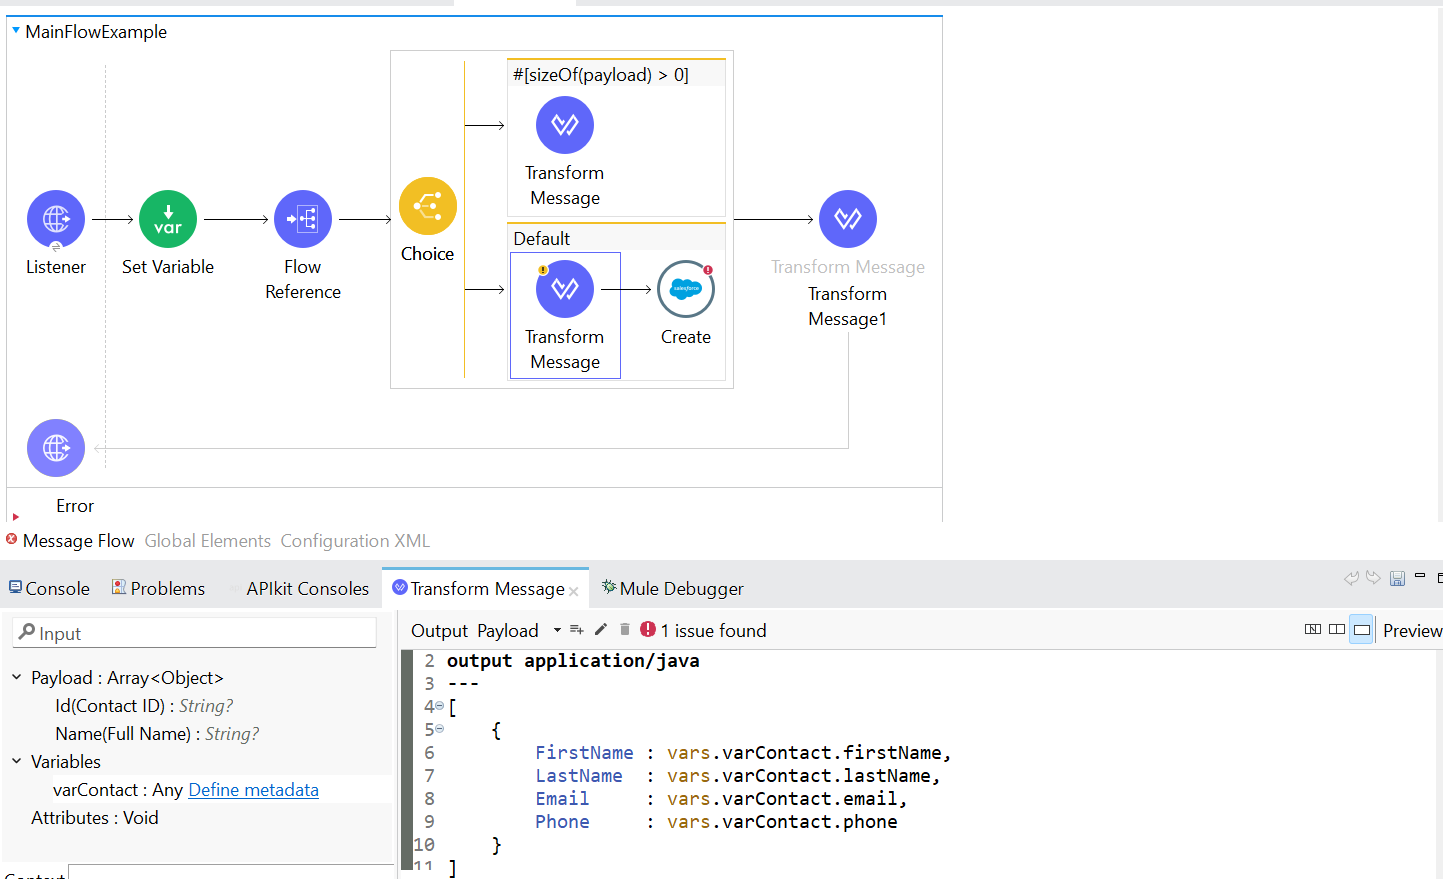
Step 11: Add the Create element and configure the payload values.
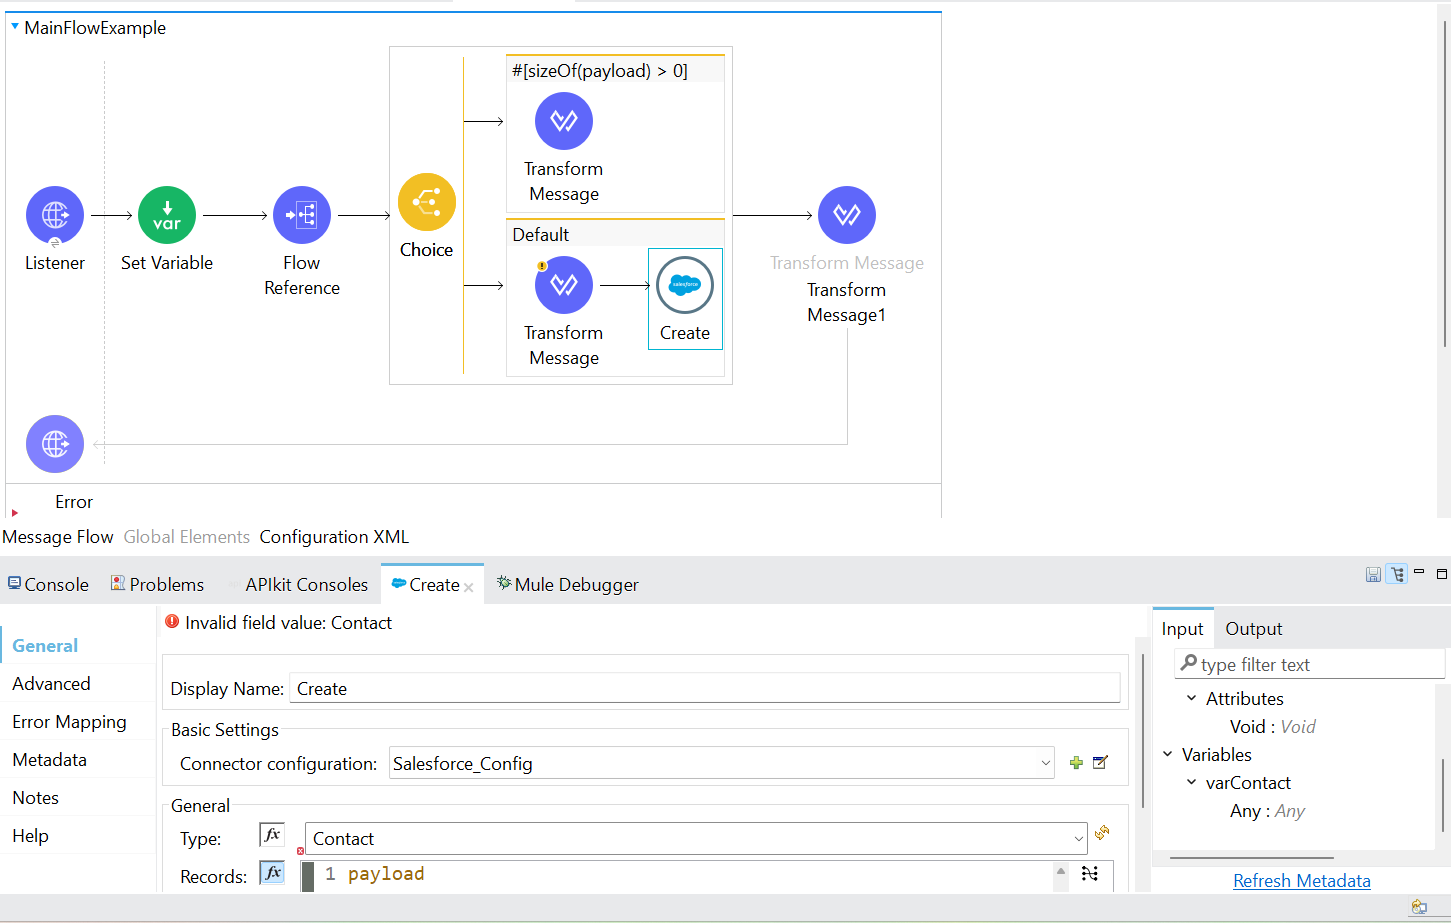
Step 12: Finally, connect all the required elements properly on the canvas to complete the Mule flow. (To test the flow process, follow the testing steps mentioned above.)
Conclusion
I hope this blog helped you understand Flows, Sub-Flows, and Private Flows in Anypoint Studio and how they are used in MuleSoft applications. We also explored the Mule 4 message structure, flow architecture, and practical examples for creating and testing APIs using Postman. In the next blog, we will continue learning more advanced MuleSoft concepts and real-time integration scenarios. Stay tuned!
