

Step‑by‑Step Guide to Creating Products in Revenue Cloud
Discover how to build a customizable Bundle Product using Salesforce Revenue Cloud for a seamless buying experience.
By Kishore Selvakumar
Salesforce Developer
Step-by-Step Guide to Creating Products in Revenue Cloud
Introduction
Building the perfect tech setup for college students isn’t just about picking the right devices—it’s about creating a seamless experience that combines performance, flexibility, and affordability. At Laptop World Pvt. Ltd, the world’s leading laptop retailer, we’re always innovating to make this possible.
This time, our Product Manager, Matt, is on a mission to design the ultimate College PC Bundle using Salesforce Revenue Cloud. Why Revenue Cloud? Because it empowers businesses to configure products, manage pricing, and deliver personalized bundles with ease.
In this blog, you’ll join Matt as he takes on the challenge of creating a fully customizable College PC Bundle—complete with a monitor, keyboard, mouse, and a powerful PC. We’ll walk you through every step, from setting up the bundle to adding attributes that make it truly configurable for students.
Ready to see how it’s done? Let’s dive in!
Creating the Perfect College PC Bundle with Revenue Cloud
At Laptop World Pvt. Ltd, the world’s largest laptop-selling company, innovation never stops. From laptops and PCs to accessories that power productivity, we’re committed to delivering the best tech experiences to our customers.
Meet Matt, a passionate Product Manager at Laptop World. His mission? To design and manage products that not only meet customer needs but also drive growth through Revenue Cloud.
This time, Matt has an exciting challenge: building a brand-new College PC Bundle.
What’s Inside the College PC Bundle?
- Monitor – crisp visuals for study and entertainment
- Keyboard – smooth typing for assignments and projects
- Mouse – effortless navigation and control
- PC – the powerhouse to run it all
Together, these essentials form the ultimate setup for students stepping into their academic journey.
Why Revenue Cloud?
With Revenue Cloud, Matt can seamlessly:
- Configure and launch new bundle products
- Ensure accurate pricing and packaging
- Deliver a smooth buying experience for customers
And the best part? You get to join Matt on this journey as we walk through the process of creating this bundle step by step.
Step 1:- Create the Bundle Product
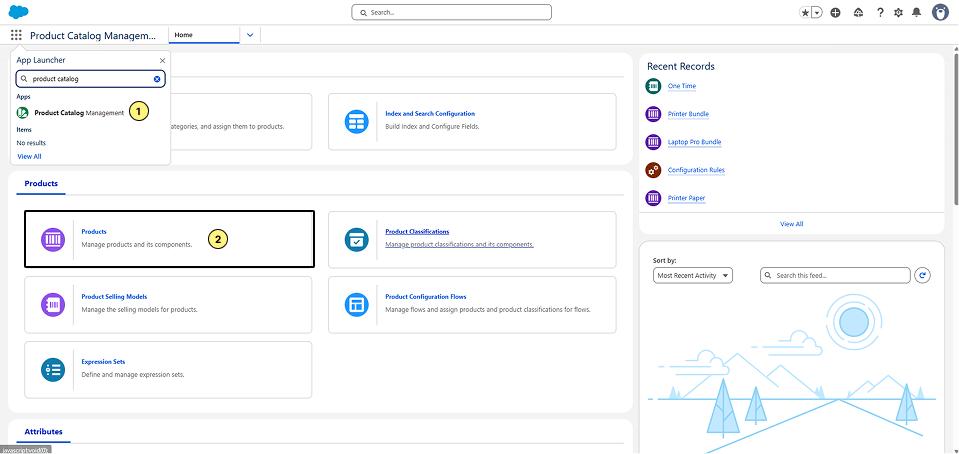
- Search for Product Catalog Management on the App Launcher.
On the Product Catalog Management, select the Home Page, and click on the Products tile.
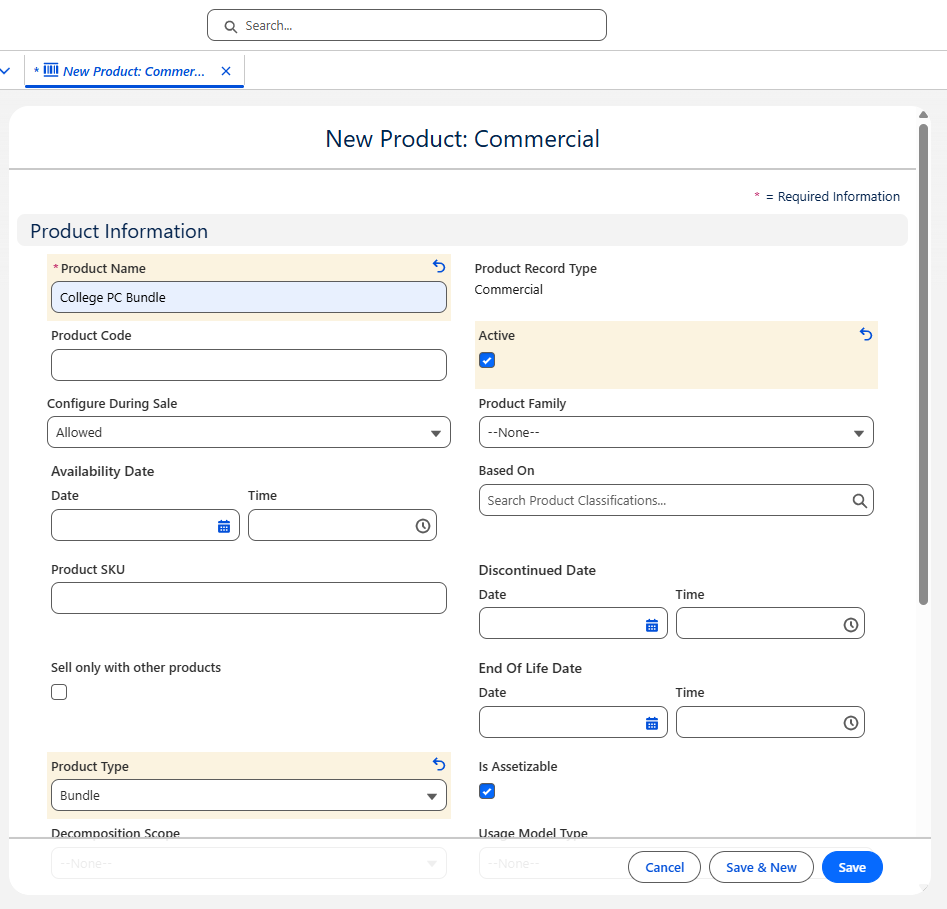
- On the Product object tab, click the New button to create the bundle product.
- Enter:-
Product Name:- College PC Bundle
Product Type:- Bundle
Active:- True - Click on Save.
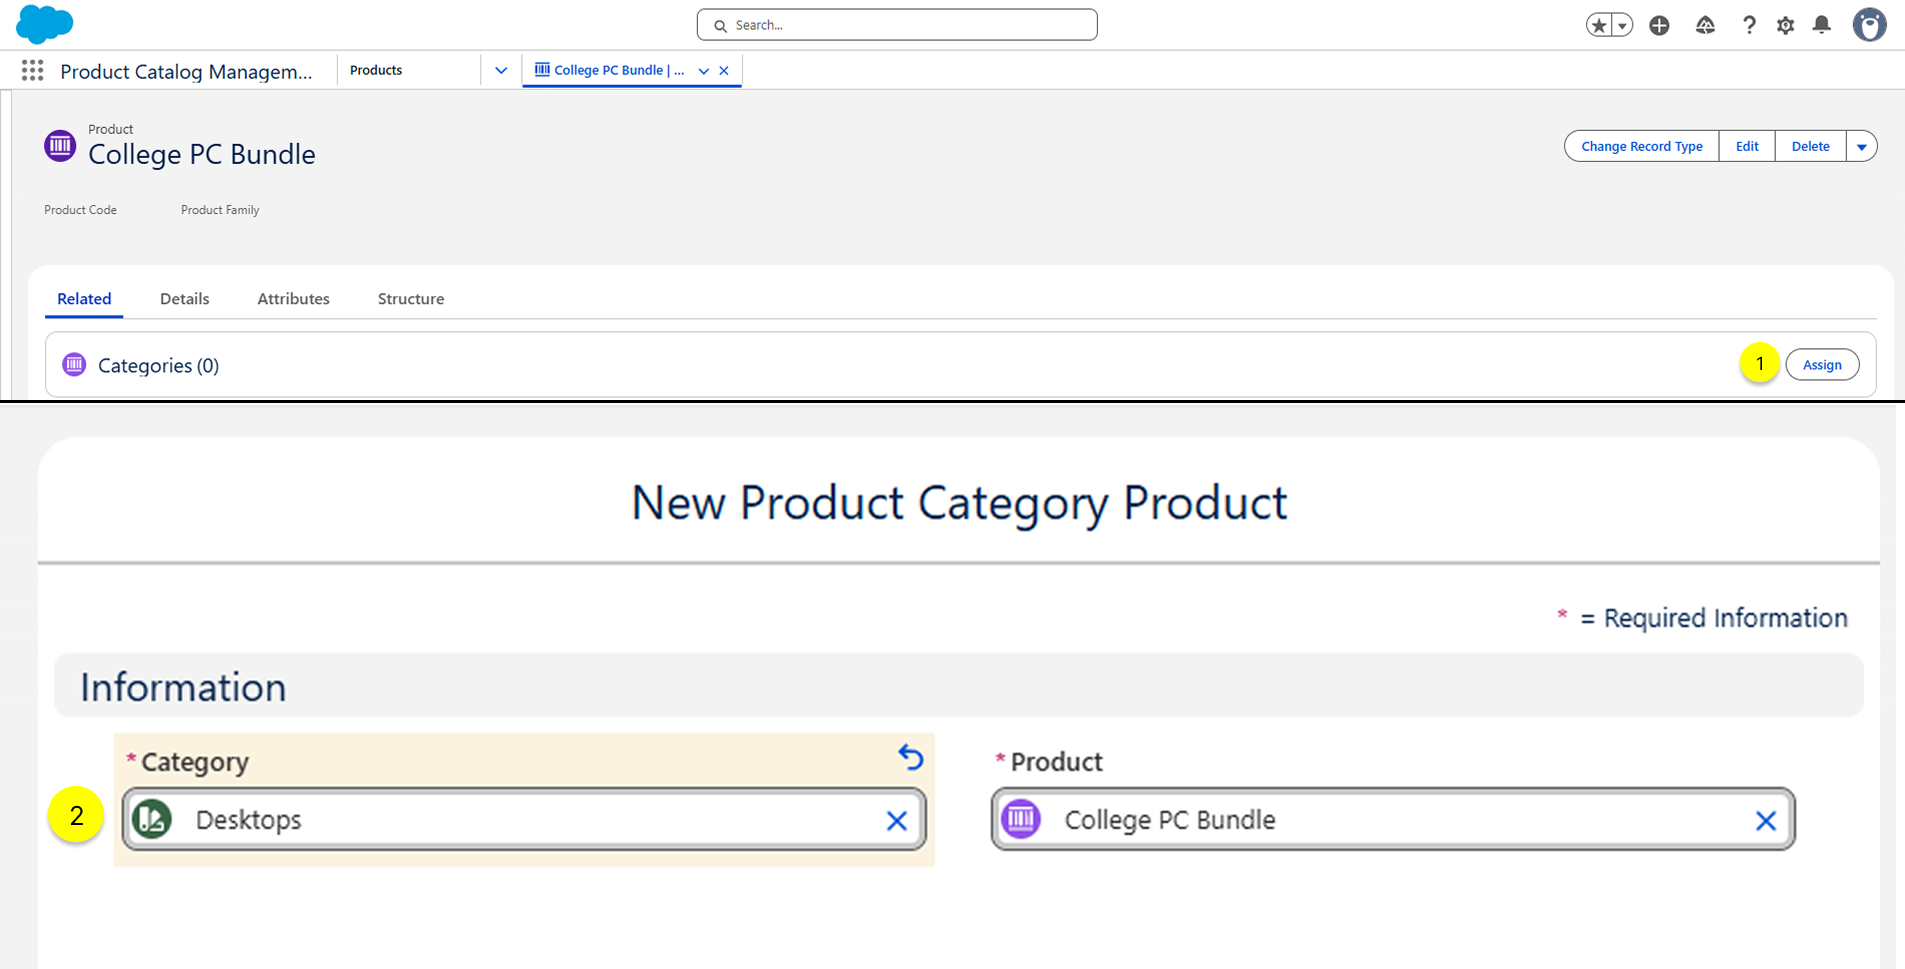
- Assign the Product to the Desktop Product Category
- On the Related tab, click the Assign button on the Categories related list.
- On the next Screen, select the Category as Desktops and click on Save.
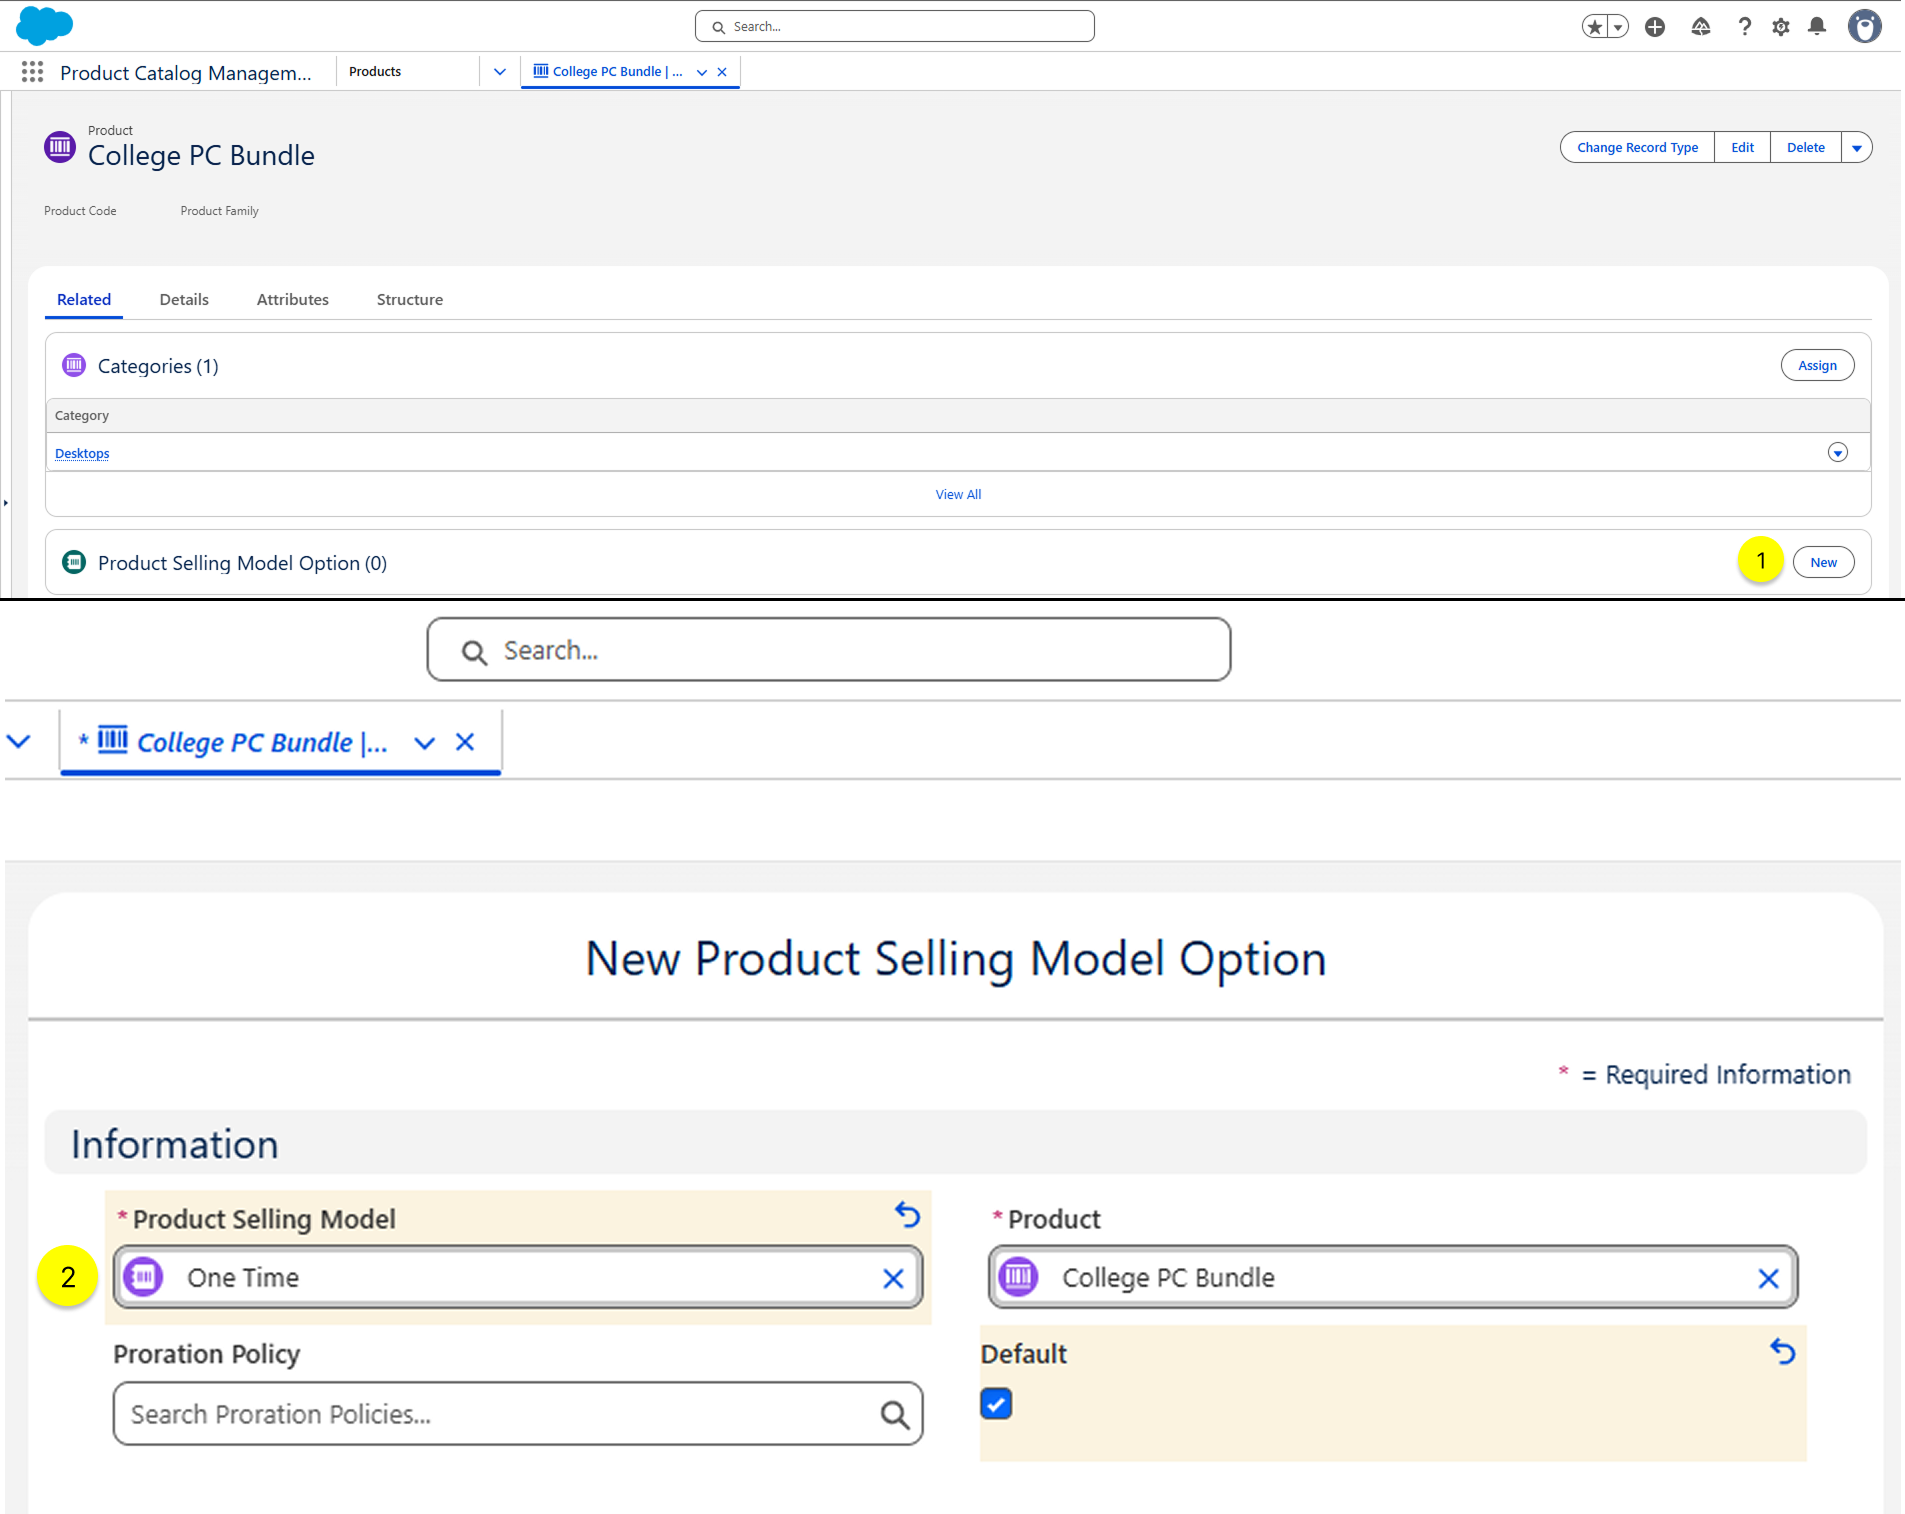
- Assign Product Selling Model Option
- On the Related tab, click the New button on the Product Selling Model Option related list.
On the next Screen, select the Product Selling Model as One Time and click Save.
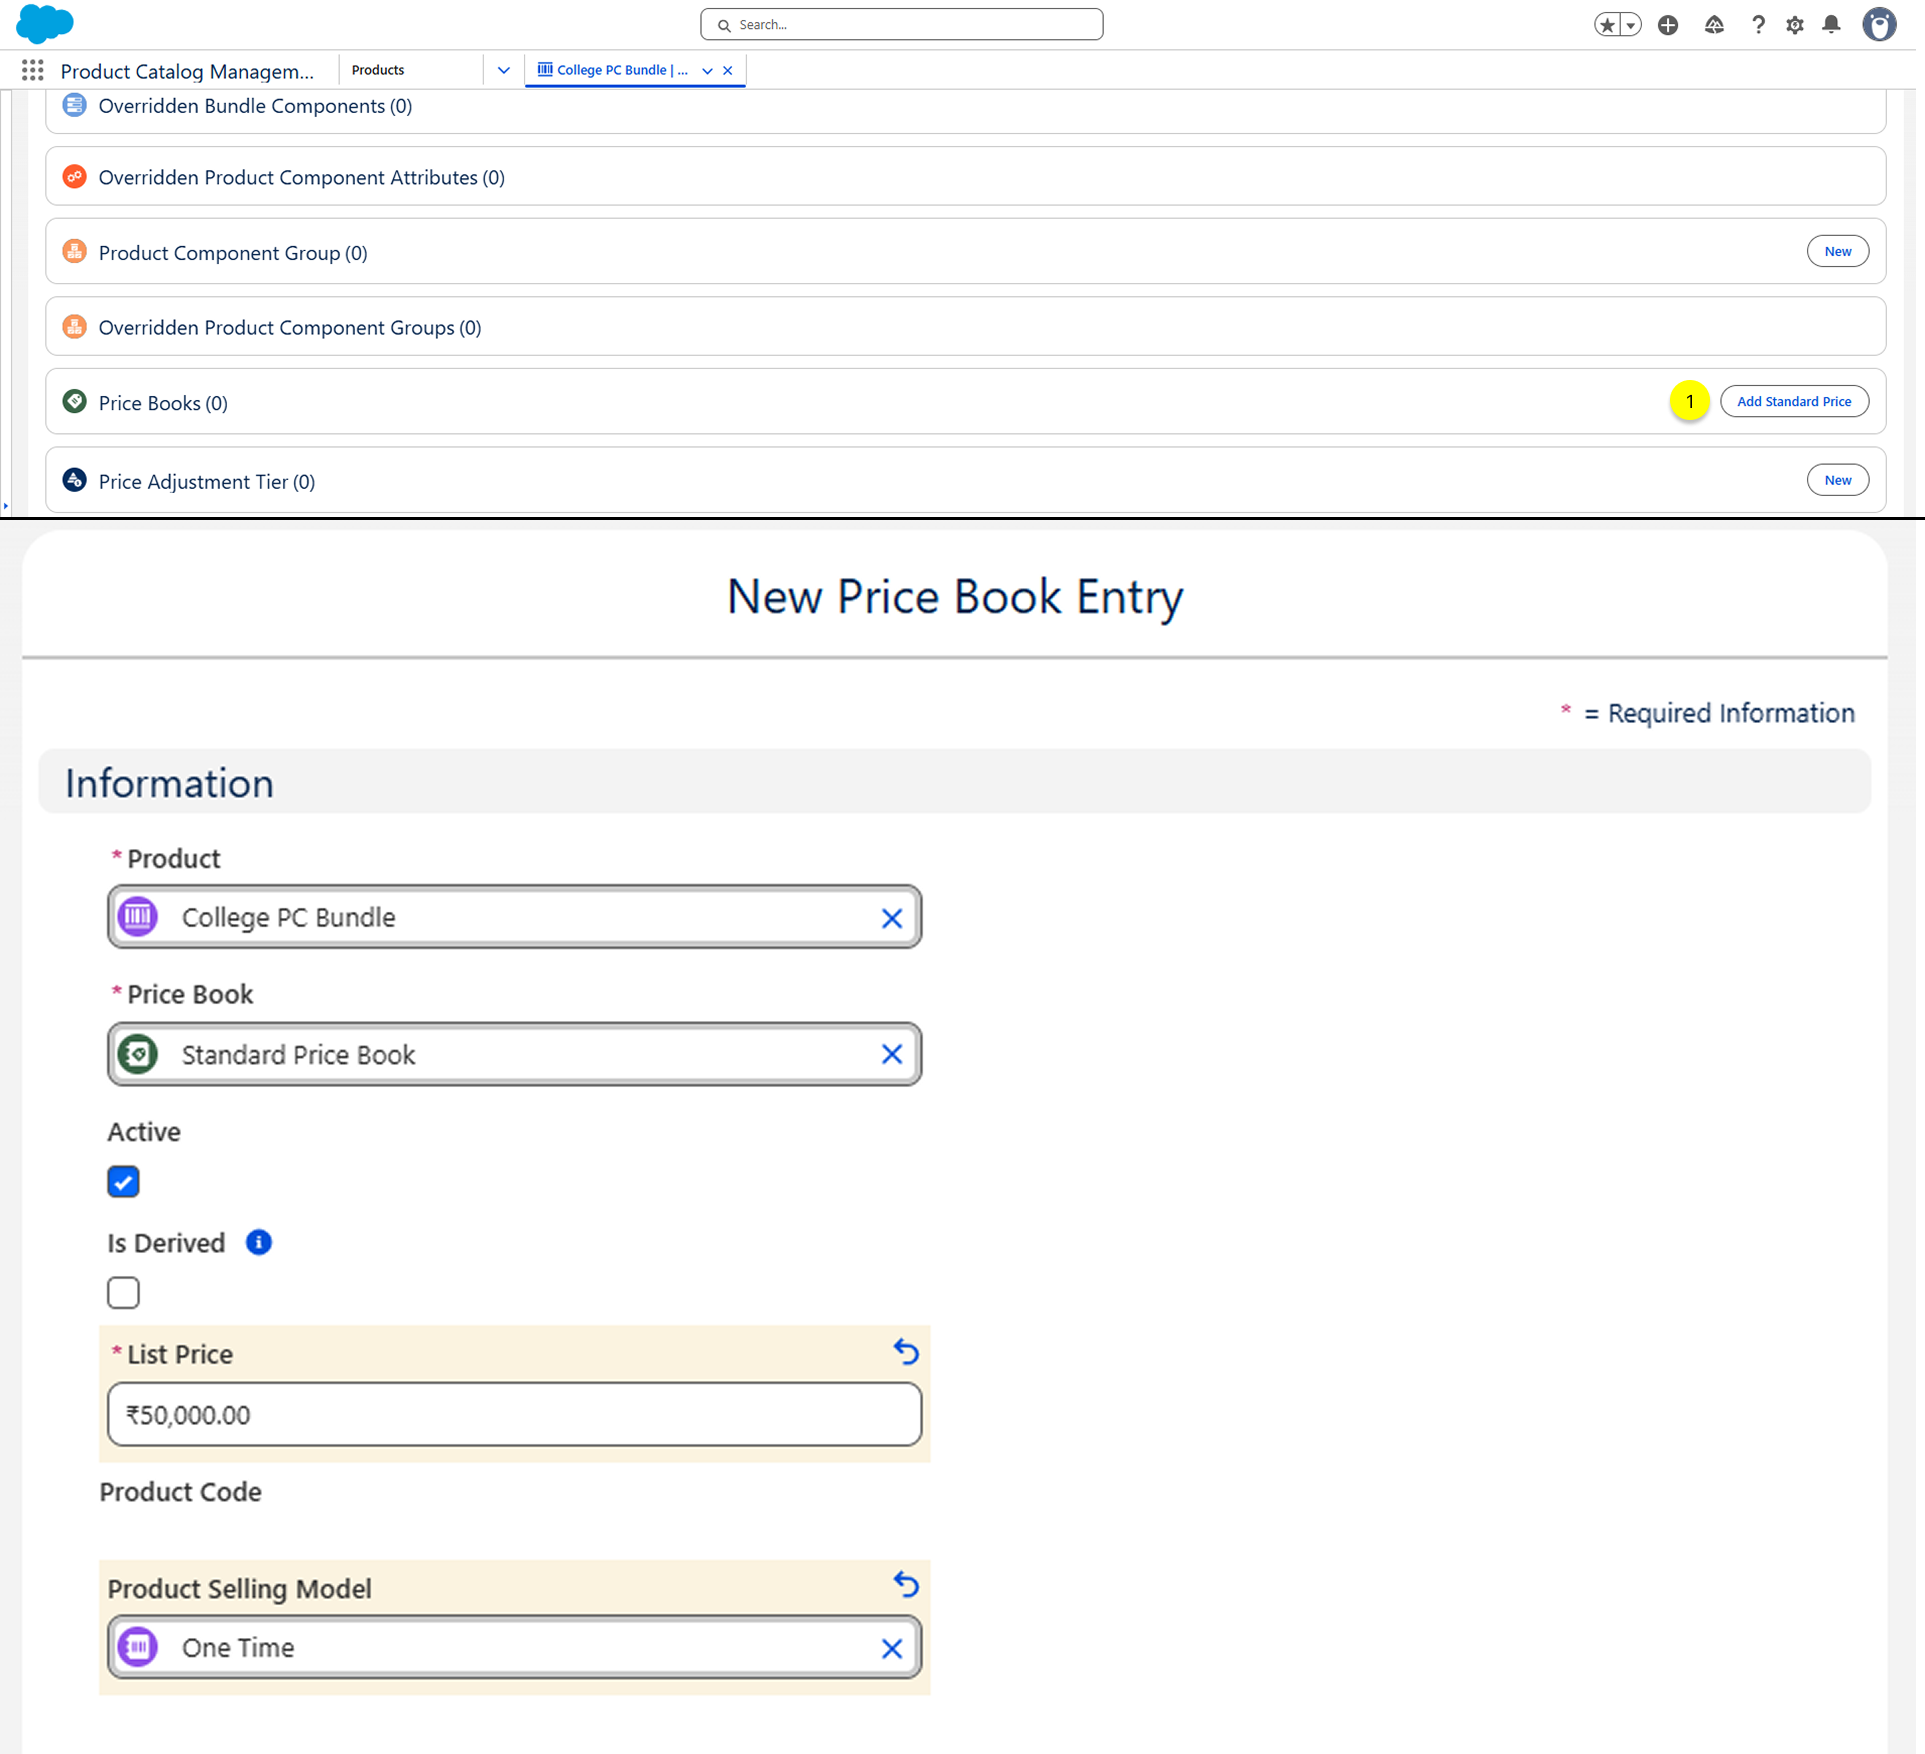
- Assign Price Book
- On the Related tab, click the Add Standard Price button on the Price Books related list.
- On the next screen, enter the Price and Product Selling Model. Click on Save.
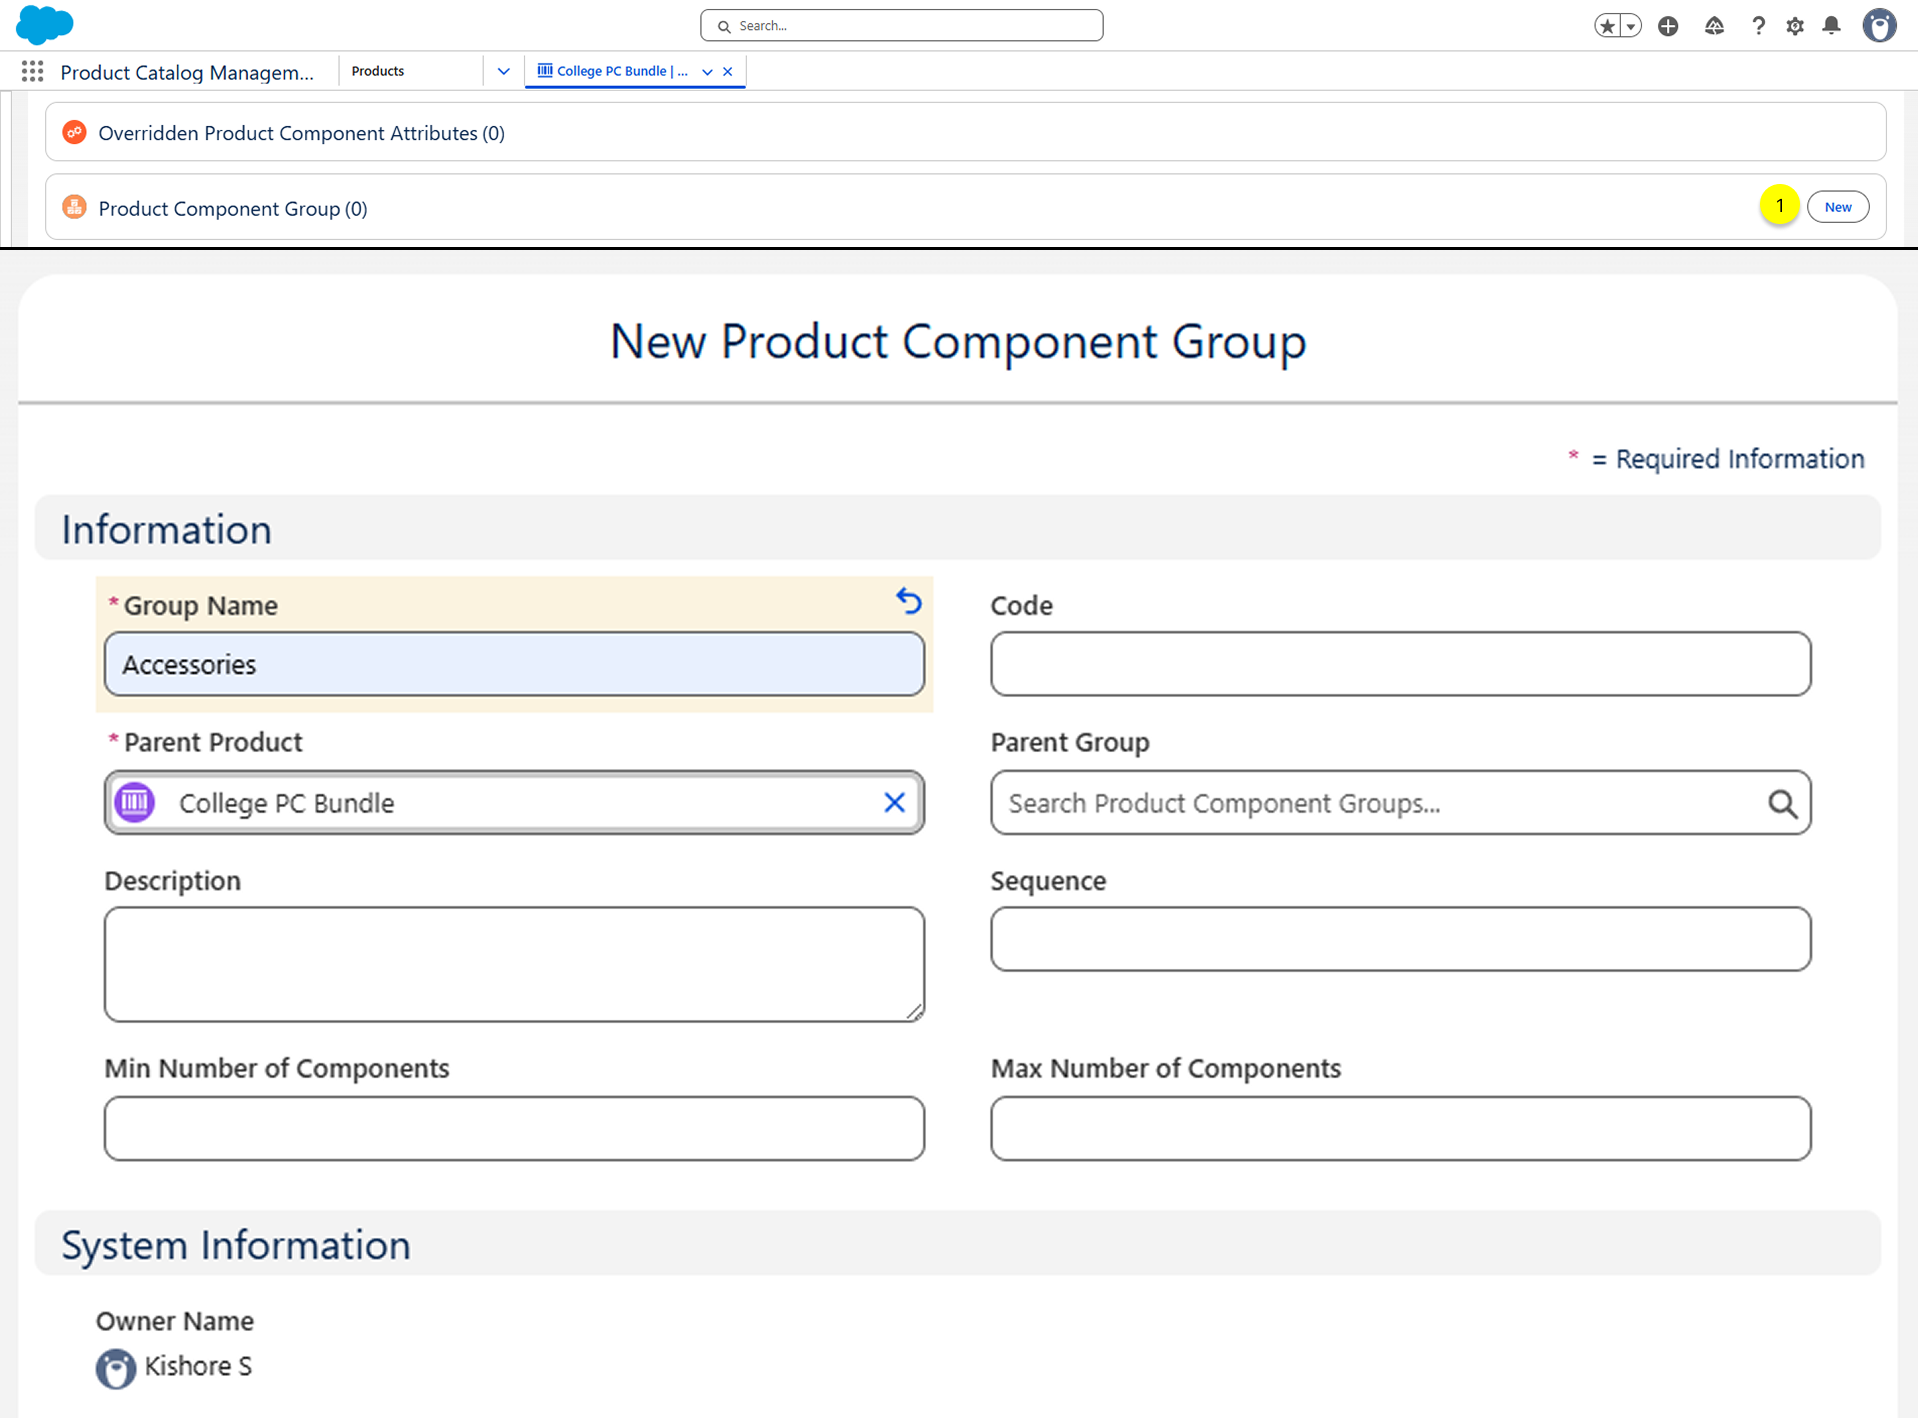
Step 2:- Create a Product Component Group
- On the College PC Bundle Product related tab, click New on the Product Component Group related list.
- On the next screen, enter the Group Name and click on Save.
Step 3:- Add Components to the Bundle Product
- On the College PC Bundle Product related tab, click Add on the Child Components related list.
- On the next screen, search for all the components, such as Monitor, Keyboard, Mouse, and PC, and click on Next.

- On the next screen, select the Group as Accessories to display all components under a single group, and then click Save.
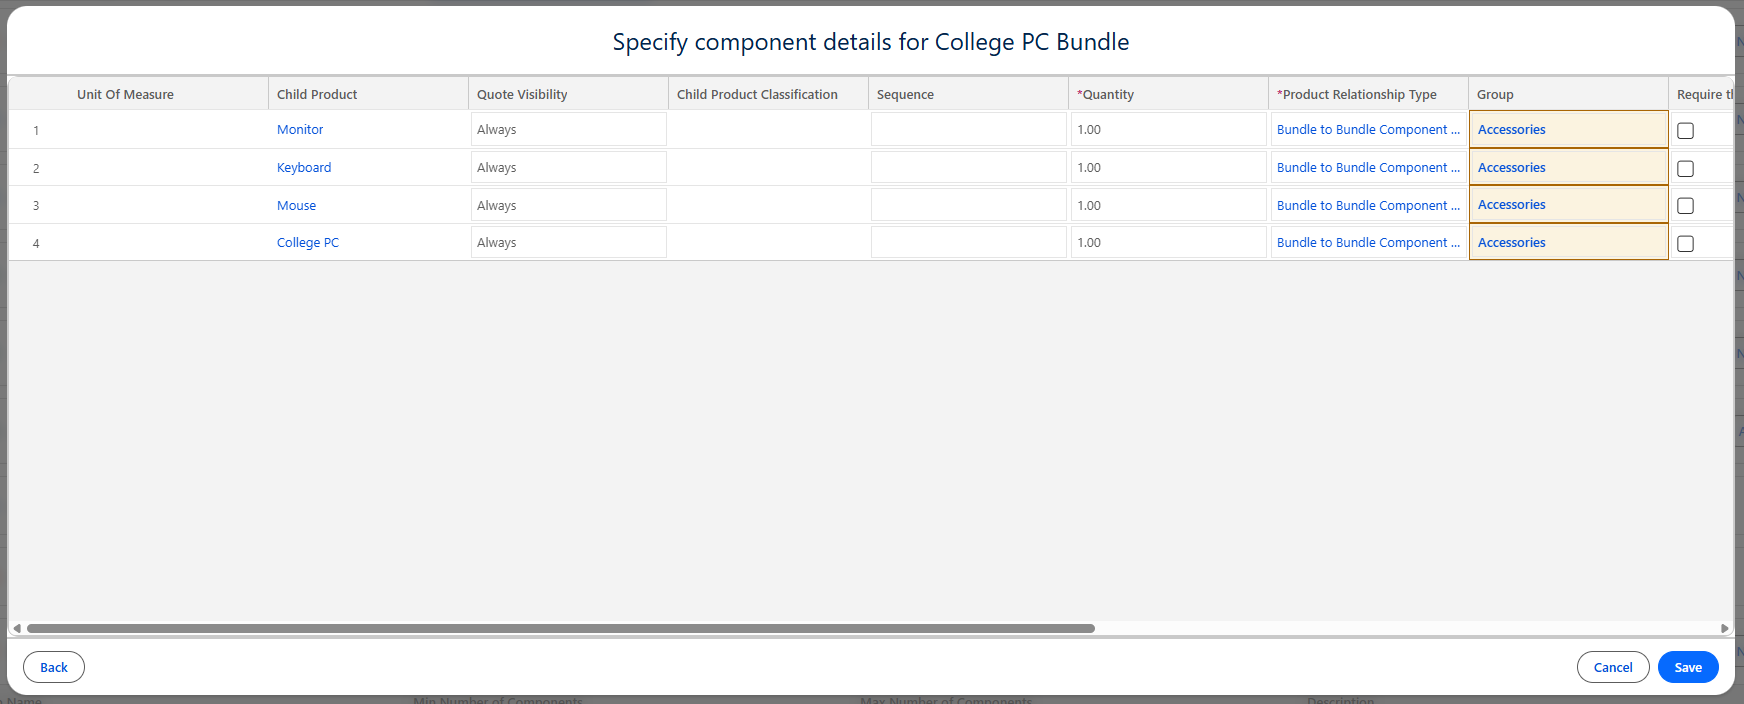
(Note:- if any of the accessory products are not available, follow the next step to create a new product)
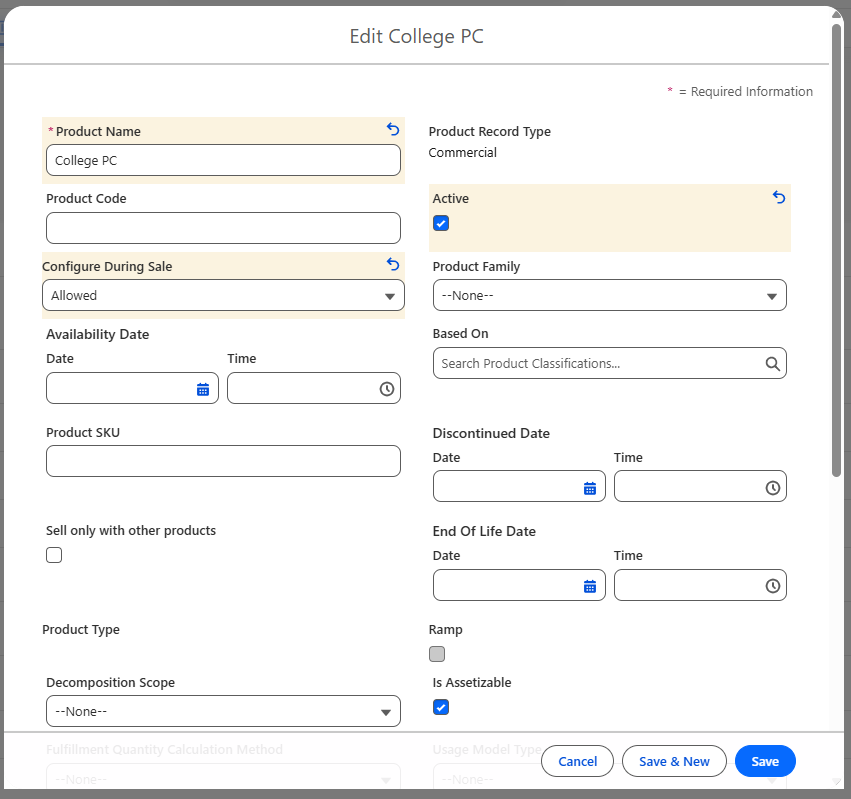
Step 4:- Create a New Simple Product
- On the Product Catalog Management, select the Home Page, and click on the Products tile.
- On the Product list view page, click on the New button.
- Select the Commercial Product and click on Next.
- Enter the product Details
- Product Name:- College PC
- Active:- True
- Configuration During Sales:- Allowed
- Click on Save.
- Assign the Categories, Product Selling Model, and Pricebook to be the same as the College PC Bundle Product.
Great job! Our Product Manager, Matt, would now like to review all the child products included in the bundle. To do this, navigate to the College PC Bundle Product and open the Structure tab.
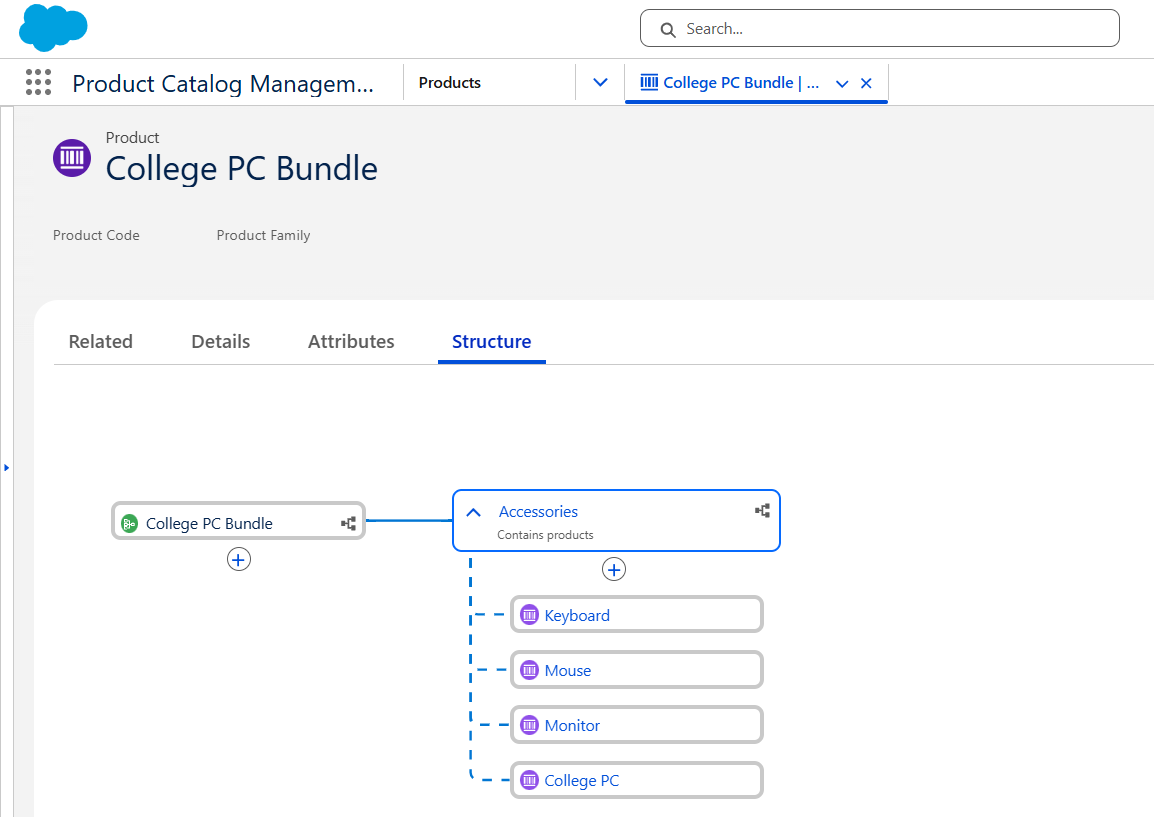
To make the College PC bundle more customizable, let's add some Product Attributes and organize them into Attribute Categories.
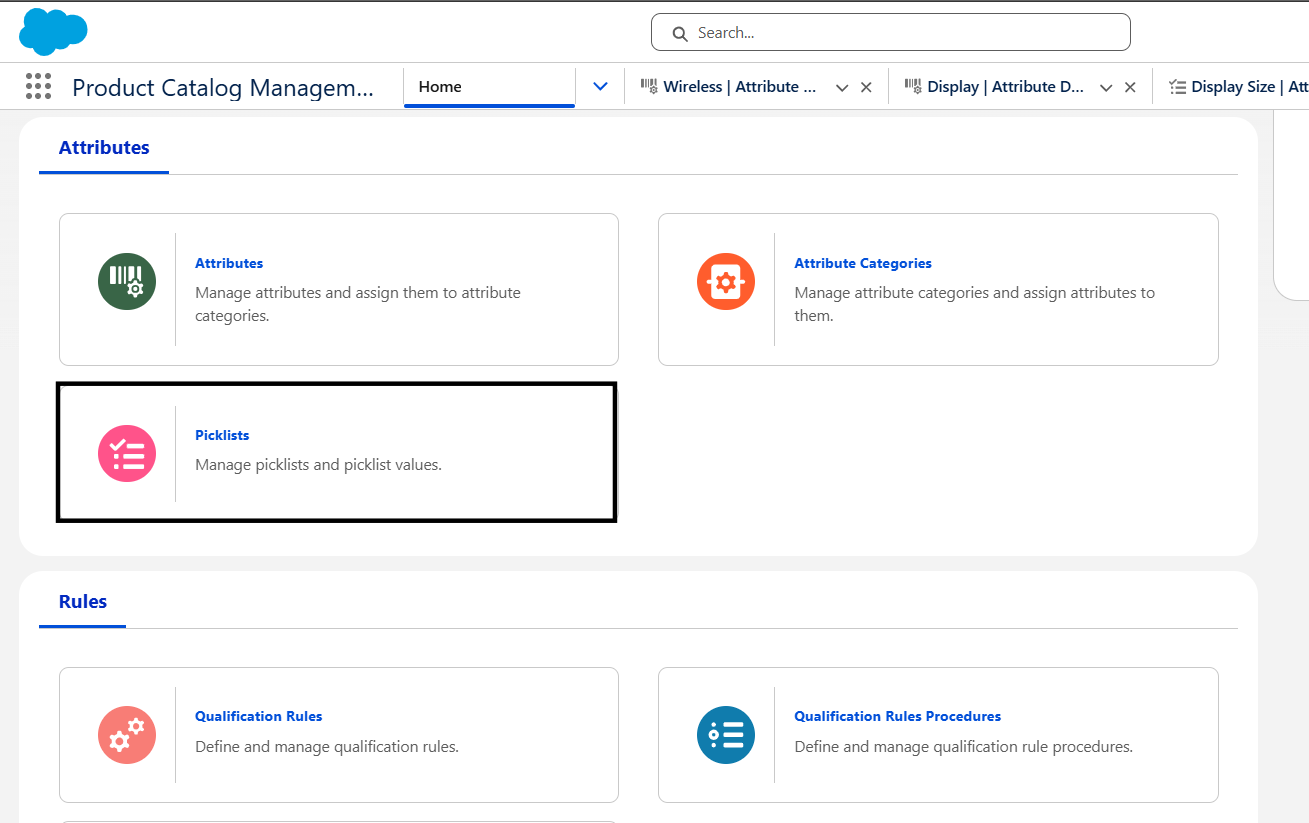
Step 5:- Create a Product Attributes for College PC
- On the Product Catalog Management, select the Home Page, and click on the Picklists tile.
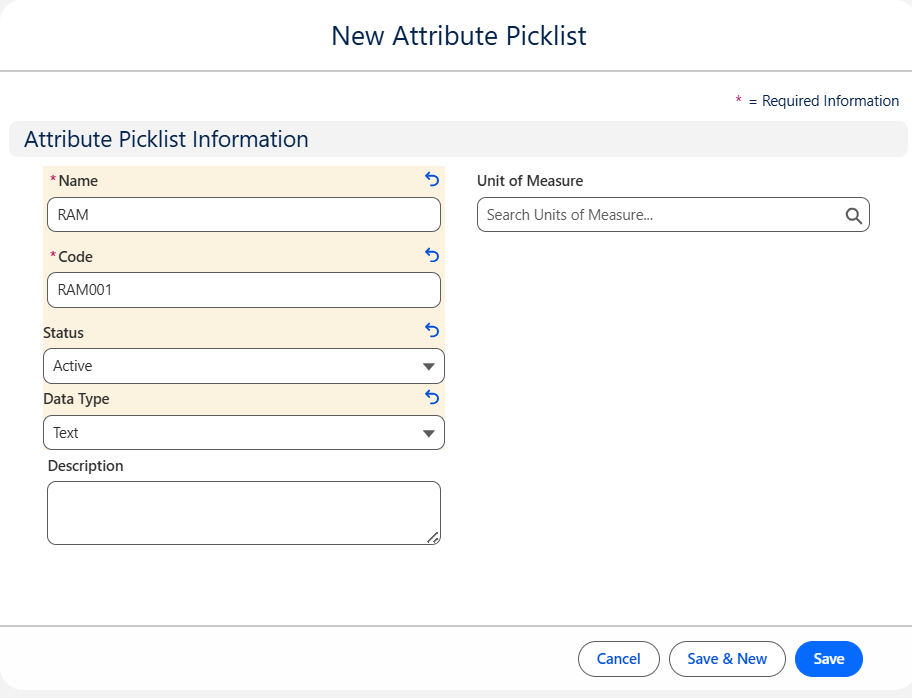
- On the Attribute Picklist list view page, click on New.
- Enter the value
- Name:- RAM
- Code:- RAM001
- Status:- Active
- Data Type:- Text
- Click on Save.
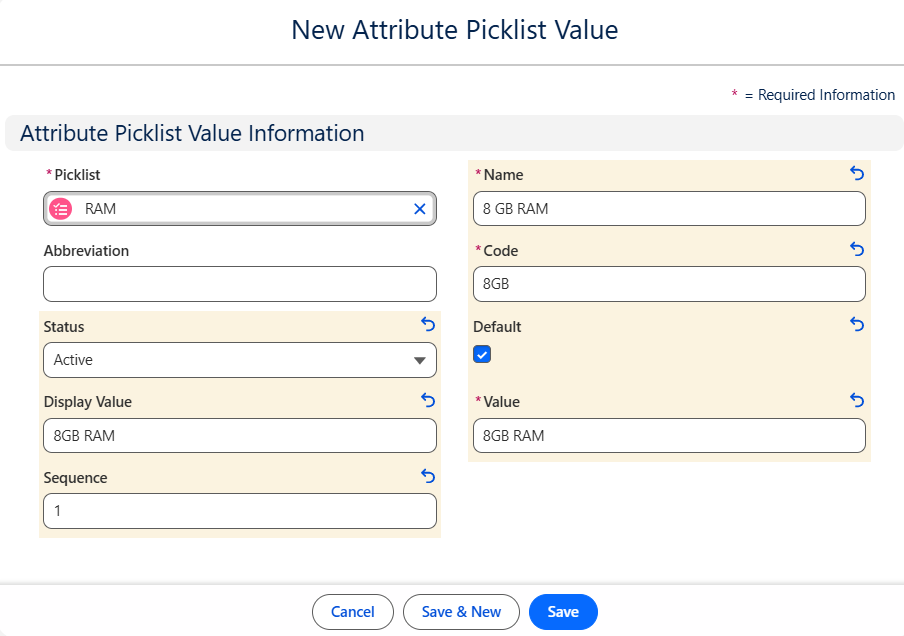
- On the Attribute Picklist related tab, click New on the Attribute Picklist Values related list.
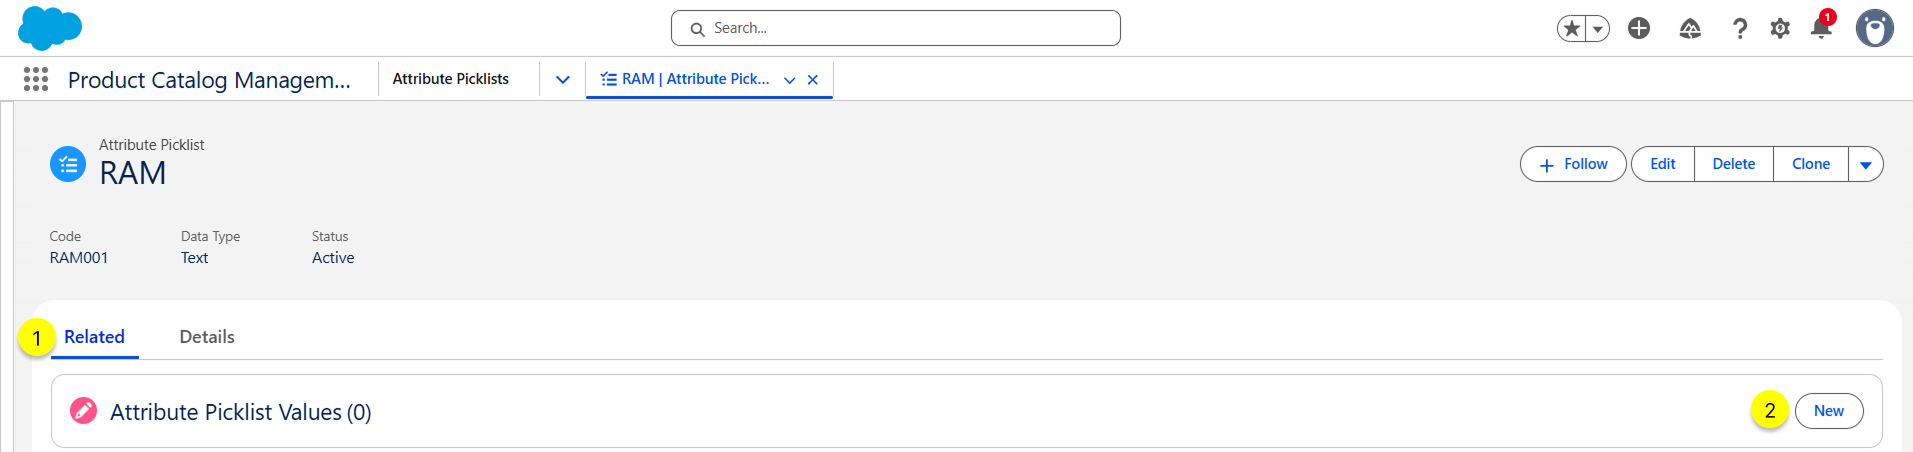
- Enter the Value
- Name:- 8GB RAM
- Code:- 8GB
- Default:- true
- Status:- Active
- Display Value:- 8GB RAM
- Value:- 8GB RAM
- Sequence:- 1
- Click on Save.
- Repeat steps 6 and 7 to create the attribute picklist value for 16GB RAM and 32 GB RAM.
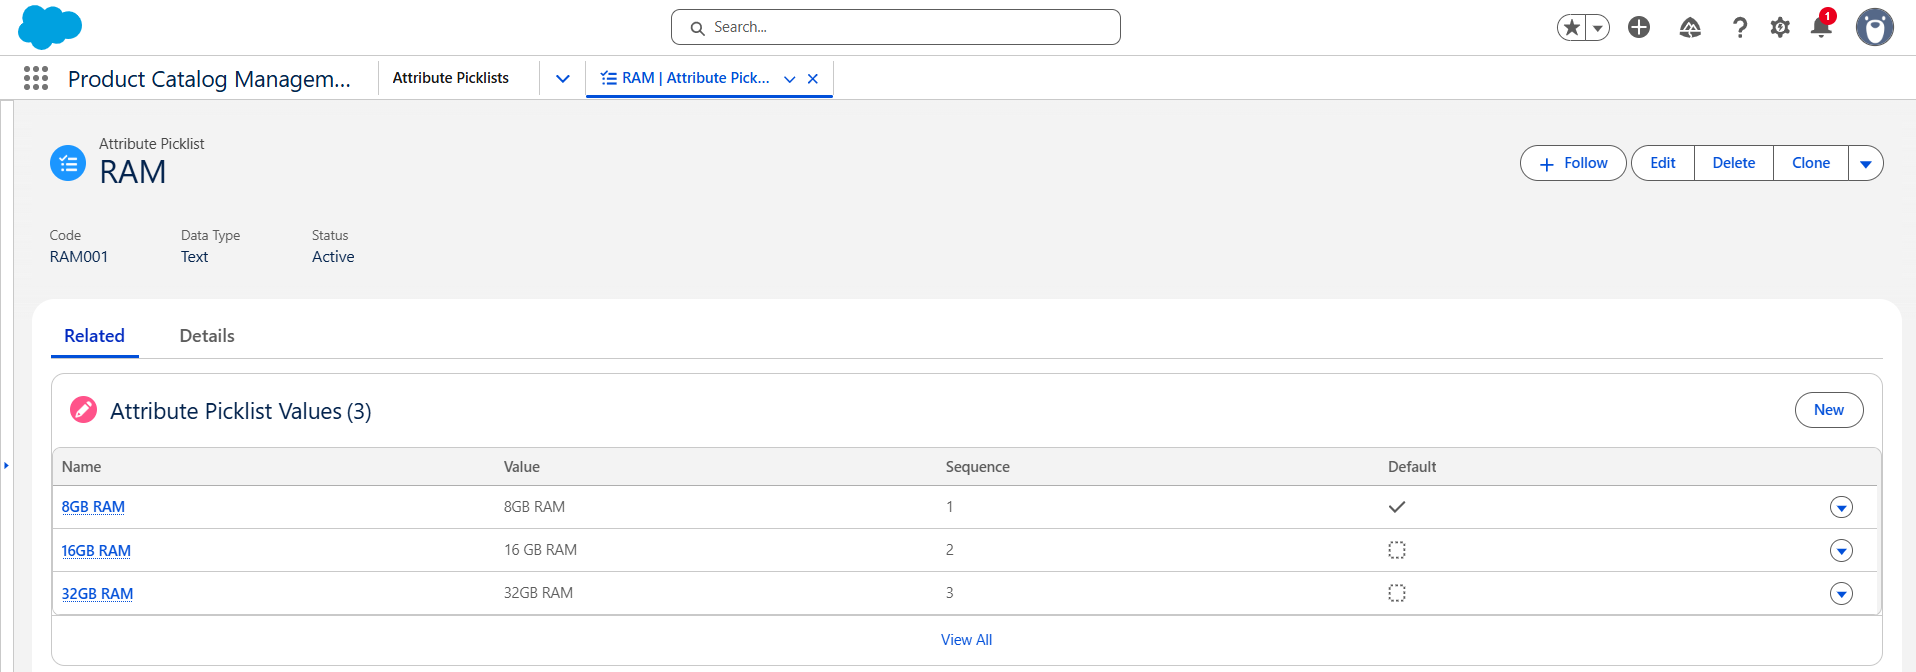
- Likewise, create a few more Attribute Picklists for the College PC product, such as Storage, Processor, and Graphics Card.
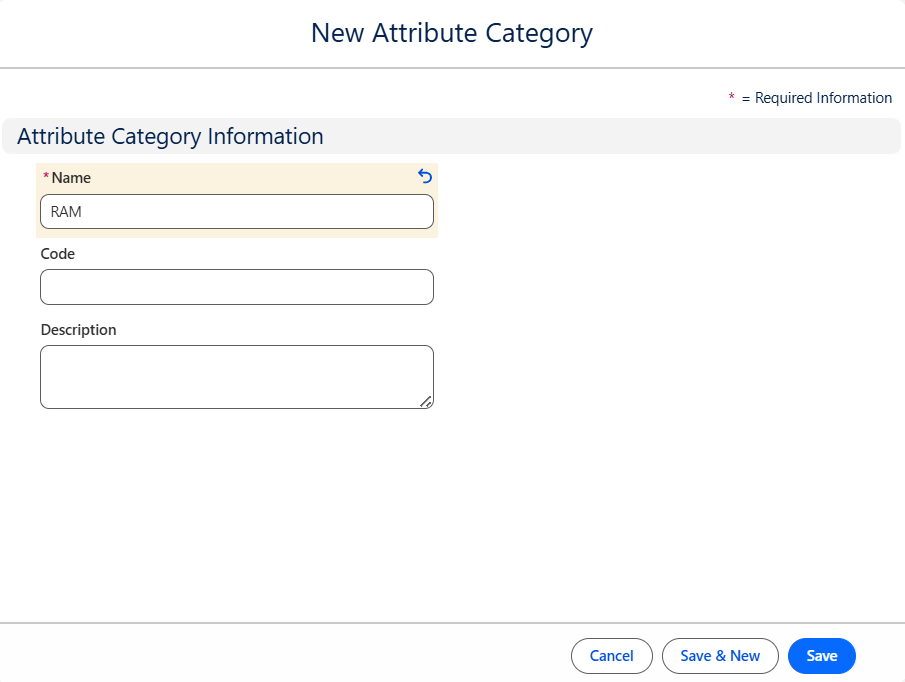
- Then, Create an Attribute Category for the Attribute Picklist.
- On the Attribute Categories list view, click on the New button.
- Enter the value
- Name:- RAM
- Click on Save.
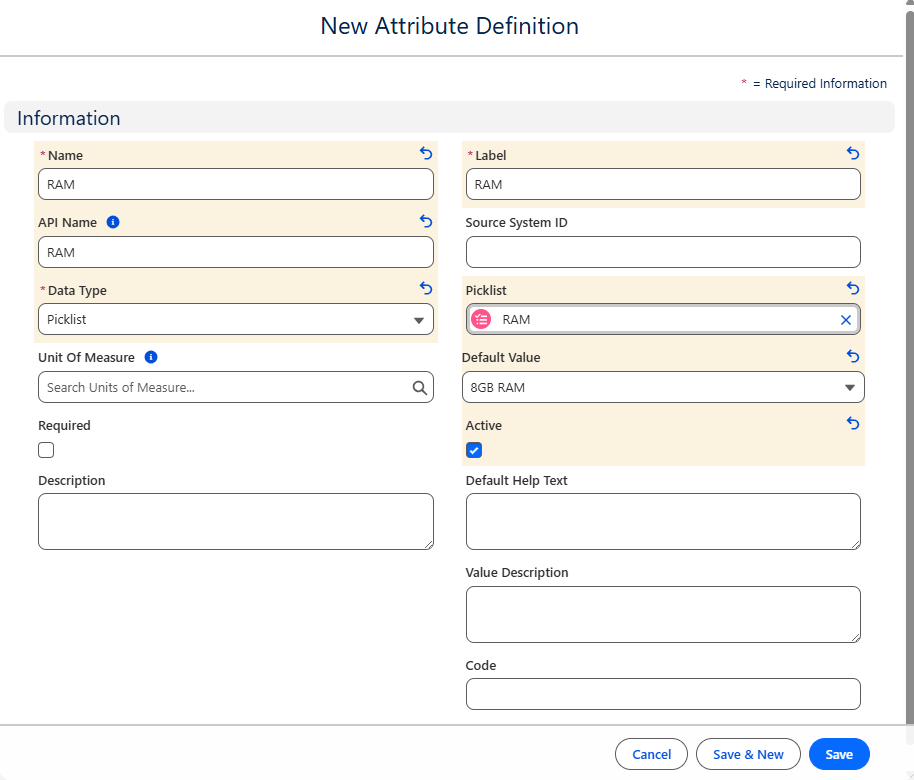
- On the Attribute Definition list view, click on the New button.
- Enter the Value
- Name:- RAM
- Label:- RAM
- API Name:- RAM
- Data Type:- Picklist
- Picklist:- RAM
- Active:- true
- Click on Save.
- Then, assign the Attribute Category to the Attribute Definition.
- On the Attribute Definition related tab, click on Assign on the Attribute Categories related list to assign an Attribute Category to the Attribute Definition.
Step 6:- Create Product Classification for the College PC Product
A product classification serves as a predefined template that simplifies the process of defining and creating products. It contains a set of dynamic attributes that can be consistently applied across multiple products. By leveraging these classifications, organizations can efficiently create similar products with variations, ensuring standardization and reducing repetitive configuration efforts.
Follow the steps to create a product classification with the necessary attributes for the College PC Product.
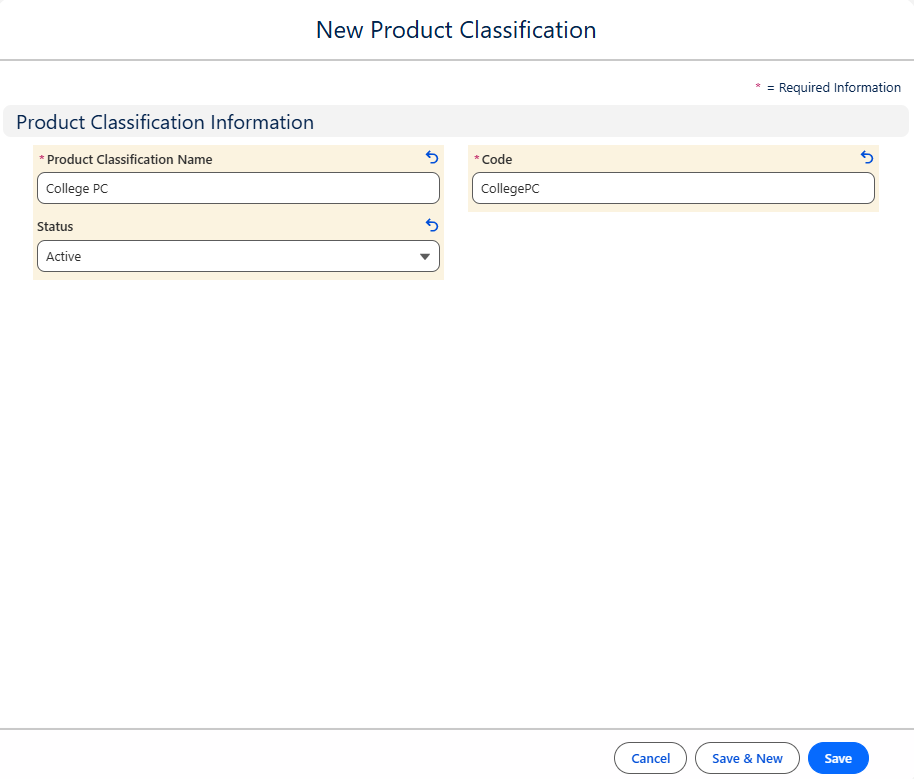
- On the Product Classification list view, click the New button.
- Enter the Value:-
- Name:- College PC
- Code:- CollegePC
- Status:- Active
- Click on Save.
Step 7:- Assign Attribute Picklist to the Product Classification
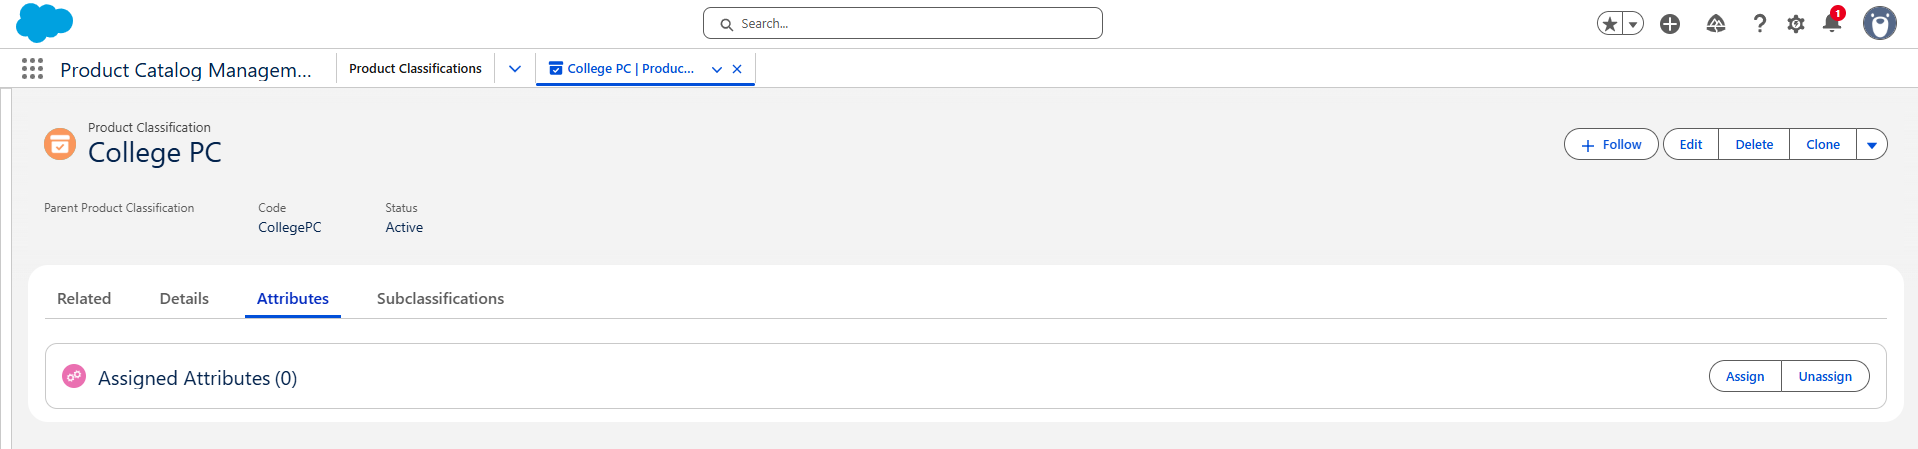
- Navigate to the College PC Product Classification and open the Attributes tab.
- Click on the Assign button on the Attributes tab.
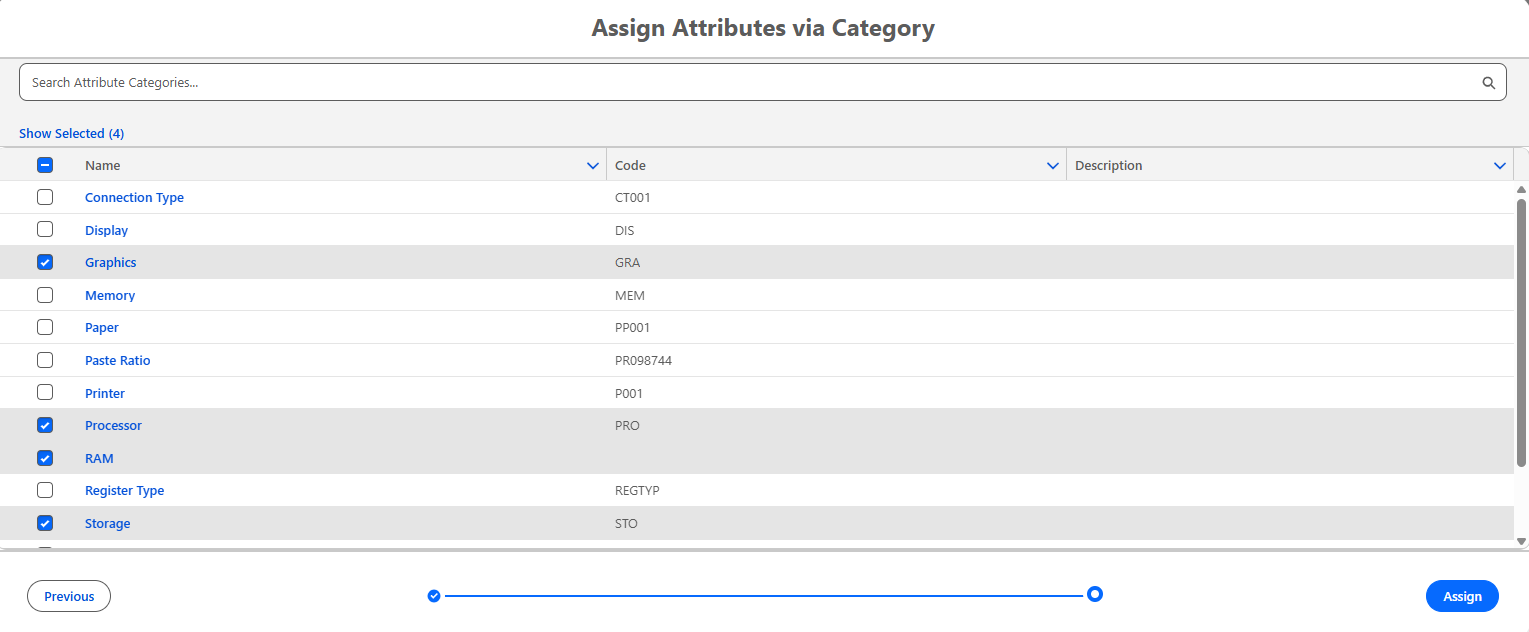
- We have created the Attribute Category for the RAM attribute, so select Assign Attributes by Category and click Next.
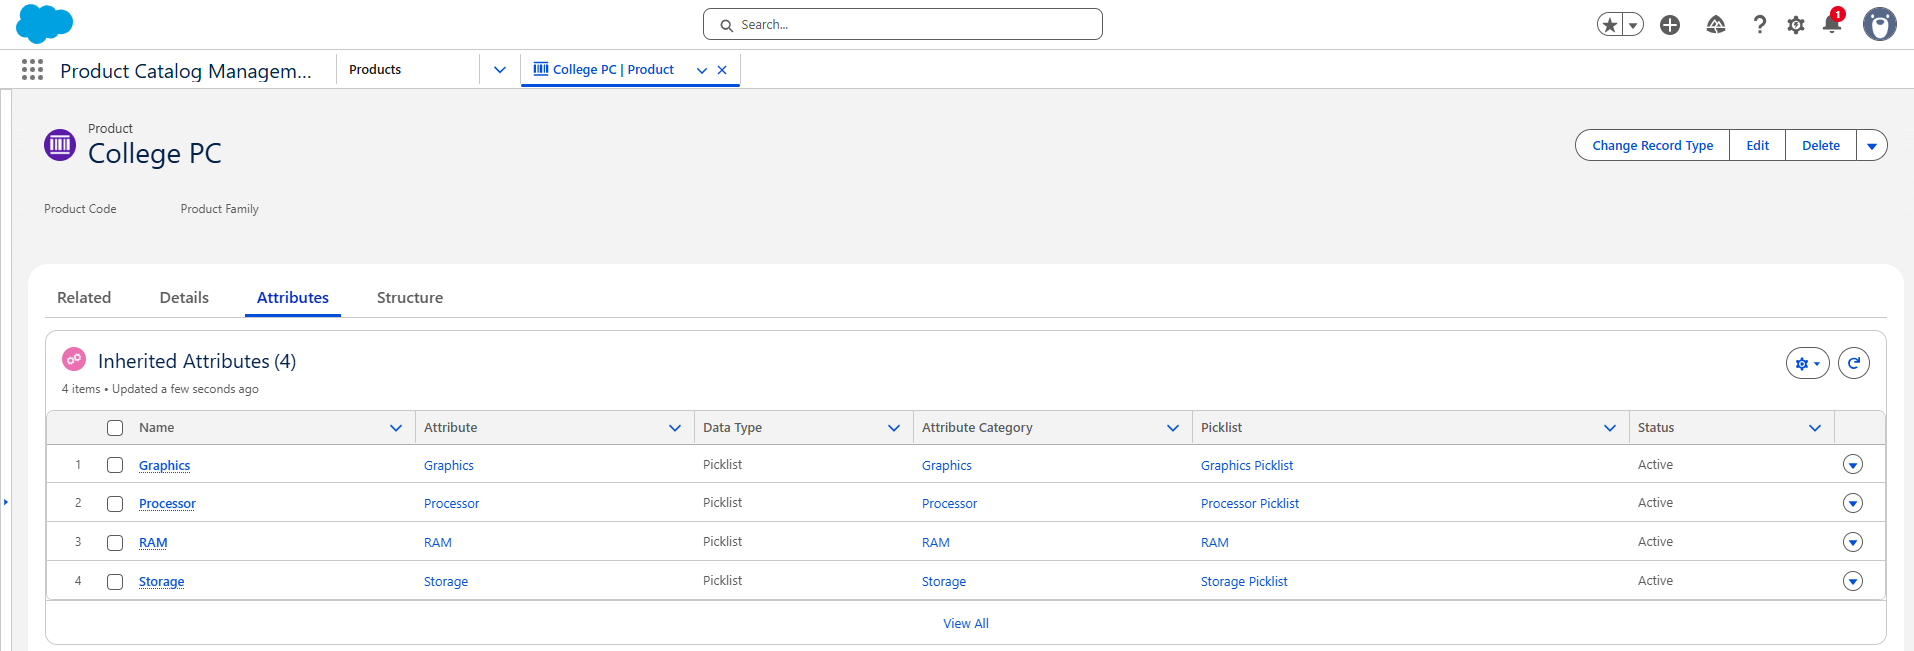
On the next Screen, select the Attributes RAM, Storage, Graphics, and Processor. Then click Assign.
We are almost done, as the final step is to assign the College PC Product Classification to the College PC Product to assign all the attributes listed under the College PC Product Classification
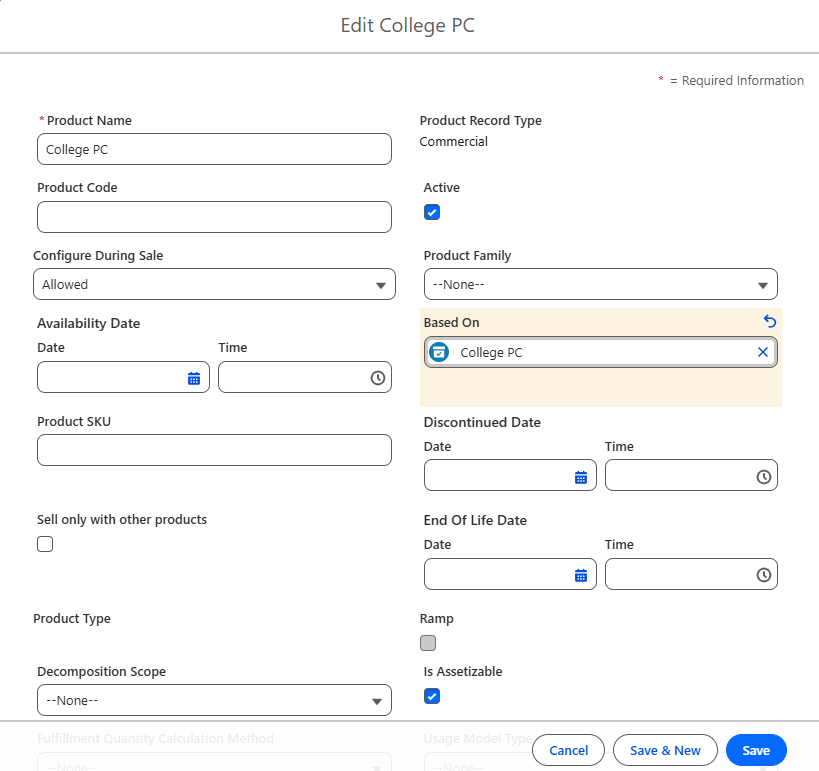
- Navigate to the College PC Product and click on Edit.
- In the Based On field, select College PC and click on Save.
To see all the attributes for the College PC product, open the Attributes tab.
Step 8:- Add the Product College PC Bundle to the Quote
- Create a new Test account or select any existing account.
- On the Account record related tab, click New Quote on the Quotes related list.
- Enter the Quote name and click on Save.
- Open the Quote record.
- On the Quote record, click on the Browse Catalogs quick action and select the Standard Price Book as the price book of the quote.
- On the Catalogs screen, select the Hardware Catalog and click on Next.
- On the Next screen, select the Configuration icon near the College PC Bundle Product.
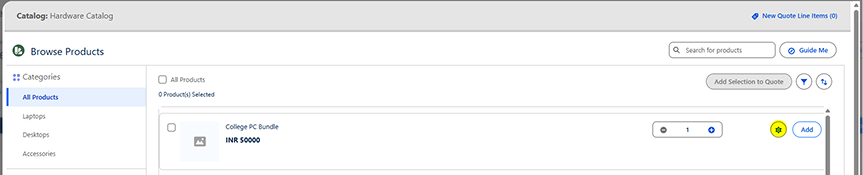
- On the Configuration screen, we can see all the accessories, such as the Monitor, Mouse, Keyboard, and PC, as child components.
- Click on the configuration icon on the College PC Component.
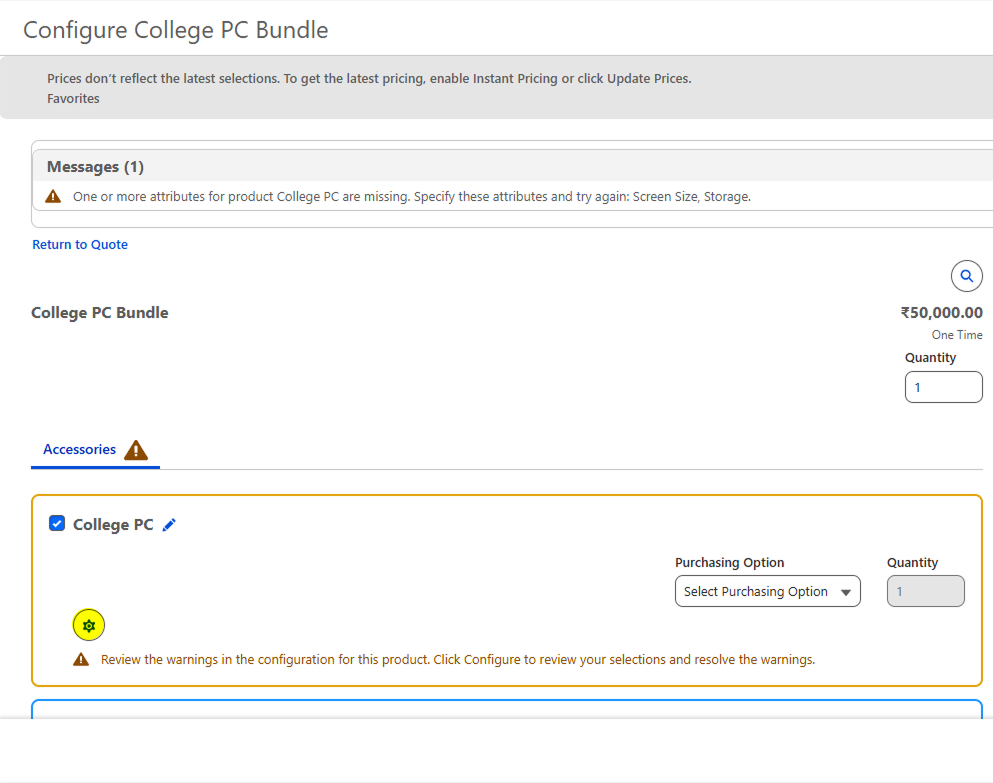
- On the College PC Configuration page, we can see all the attributes for the product to customize it based on the customer's needs.
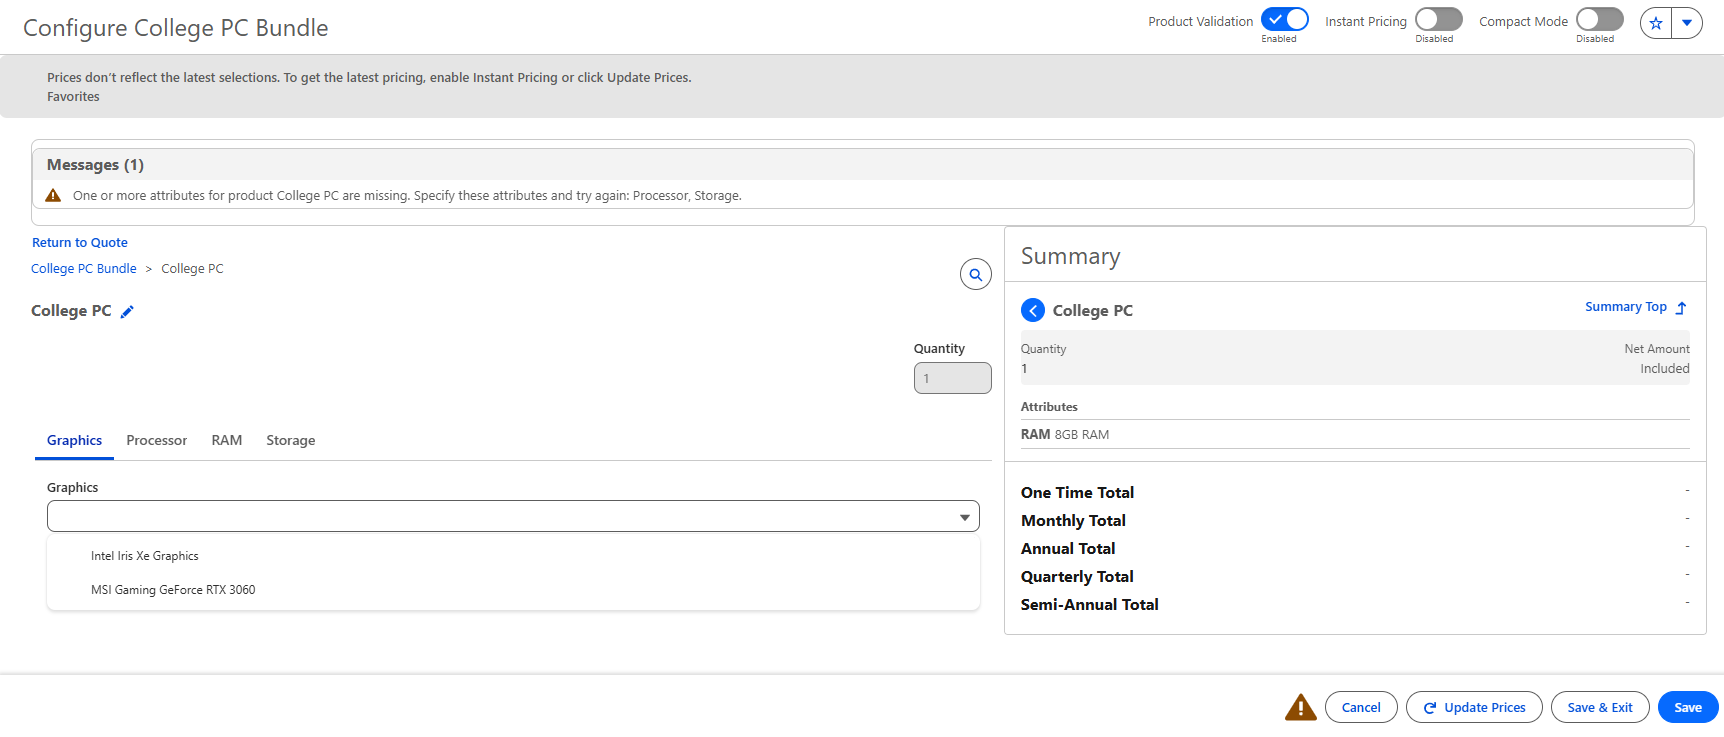
- Select all the required attributes and click on Save.
- On the College PC Bundle Product, select all the necessary accessories and click on Save & Exit.
- The College PC Bundle Product will be successfully saved to the Quote.
Conclusion
Building the College PC Bundle with Salesforce Revenue Cloud demonstrates how businesses can deliver flexibility, personalization, and a seamless buying experience. From creating bundle products and adding dynamic attributes to streamlining pricing and quoting, Revenue Cloud simplifies complex configurations while ensuring accuracy and speed. This approach not only enhances customer satisfaction but also drives growth through innovative product strategies. Ready to transform your product offerings? Start leveraging Revenue Cloud today!