

Field Service Lightning Optimization
Explains how field service operations can work smarter with Salesforce & how optimize its processes, leading to major improvements in efficiency & cost savings
By Surya Vijayakumar
Salesforce Developer
Field Service Optimization
Optimization is the process of finding the best service schedule/window for your customers and your business. It will refine and improve your automated tasks. We can configure the optimization rules to run automatically on the specified time as per our needs. Also, we can run this optimization from the dispatcher console. That will assign the field service resource to the service appointment based on the highest grade. Let's see how it works.
Let's go with an example. Imagine a company that sends out technicians to repair home appliances. There are 4 technicians (mobile workers), and 5 homes (appointments) scheduled for repairs. Each technician can go to any home, but the company wants to minimize travel time and ensure each repair is completed within a given time window. That can be done by considering the several factors like below,
- Technical Availability: Availability of the service resource/technician (e.g., Technician A is available from 9 AM to 5 PM).
- Travel Time: Travel time between the house and each technician’s starting location.
- Service Duration: How long each repair will take (e.g., fixing a washing machine may take 2 hours).
- Constraints: Ensure each home is serviced within its required time window (e.g., between 10 AM and 2 PM).
This scenario involves finding the best combination of which technician goes to which house and at what time. In this case, there are 4 technicians, and 5 appointments means, there are 4^5 = 1024 possible combinations for assignments. Crazy to handle it manually, right?
How does it work?
- The system considers all data sent for optimization, known as the data domain. This includes relevant service appointments (based on the optimization horizon and time constraints), service territories, and mobile workers.
- It orders appointments based on priority.
- Priority is defined using the work order priority, work order line-item priority, and Service Appointment Priority Fields in the Field service settings.
- It views the selected appointment details such as territory, required skills, and due date.
- A scheduling policy's work rules filter out candidates who are unqualified or unavailable for an appointment
- It retrieves available time slots between the service appointment's earliest allowed start and due date within the given time horizon
- It adds those weights together with the priority of the service appointment's work order or work order line item to create a score.
Note: The default priority range is a 1–10 scale, where 1 is the highest priority and 10 is the lowest priority. You can also choose to use a scale of 1–100. Here's how an appointment is prioritized using the 1–10 scale in orgs created after summer 2020.
Priority | Value of Priority |
1 | 25500 |
2 | 20500 |
3 | 15500 |
4 | 5500 |
5 | 4250 |
6 | 3000 |
7 | 2500 |
8 | 2000 |
9 | 1500 |
10 or null | 1000 |
Imagine you’re running a company that sends technicians to fix solar panels. You receive a service request from a customer, and you want to schedule the appointment efficiently. The company uses three main objectives:
- ASAP: Fix the issue as soon as possible, which weighs 4 points
- Preferred Resource: Send the technician whom the customer prefers, which weighs 4 points
- Minimize Travel: Reduce the technician’s travel time, which weighs 2 points
- Priority: Every appointment also has a priority value based on urgency in this case, it’s 3 (This number is multiplied by 15500 based on the above table).
Let’s assume the system gives these grades for the appointment:
- ASAP: 80 (out of 100)
- Preferred Resource: 90 (out of 100)
- Minimize Travel: 70 (out of 100)
Now, we calculate the score using the formula you provided.
(ASAP grade x ASAP weight) + (Preferred Resource grade x Preferred Resource weight) + (Minimize Travel grade x Minimize Travel weight) + (15500 x Priority) = Final Score
The final score for this appointment is 47,320.
The optimizer compares the scores of various available appointments and selects the one with the highest score to schedule.
Setup Optimization
- Create Optimization Profile: App Launcher > Field Service Admin > Field Service Settings > Optimization > Activation. Click Create Optimization Profile and OK.
- Activate the Optimization User: Setup > Users > Find Field Service Optimization User. Activate that user.
- Activate Optimization: App Launcher > Field Service Admin > Field Service Settings > Optimization > Activate optimization. On the next screen, click Allow to allow the optimizer the access that it needs.

Run Optimization
Below are the different options that are used to run the Field Service Optimization.
- From Dispatcher Console
- Schedule Optimization
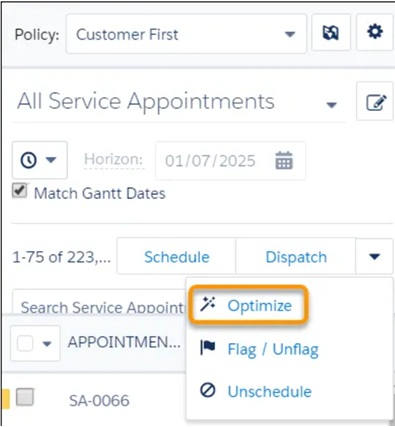
From Dispatcher Console
In the dispatcher console, we can see the action button named Optimization. By clicking this, we can filter out the appointments that need to be optimized and proceed with optimization.
Schedule Optimization
There is an option to schedule an Optimization job to run this based on a specific interval, like daily night, 2 times per day, etc., To schedule the optimization, go to App Launcher > Field Service Admin > Field Service Settings > Optimization > Scheduled Jobs. In the Optimization pane, click New Job and enter the name of the scheduled job, and save. To set up a new job that needs to be run at 1 AM,
- Open a new optimization job. They click Next to Nightly Schedule Optimization.
- Define the job’s scope.
- Effective Territories: San Francisco and Los Angeles
- Optimize in Stages: They toggle to optimize the first set of territories and then the next.
- Territories per stage: 1
- Time horizon in days: 2
- Filter by criteria: None
- Scheduling policy: Customer First
- Email recipient: packindustry@gmail.com
- Frequency: Recurring
- Select each month and day of the week
- Hour: 1 AM
- Click Save.
- Click Run Now.
Before Optimization vs After Optimization:
comparison below will clearly showcase the advantages of the Optimization process by comparing it with before and after using this.
Manual Assignment | Optimization Process |
Technician A (in City A) is assigned 12 appointments based on their skills. However, no consideration is given to their travel time, location of appointments, or specific skill requirements for each job. | Technician A (in City A) now has 8 appointments for internet installations. Their route is optimized so that all appointments are clustered in the same area, minimizing travel time between jobs. |
Technician B (in City B) is assigned 8 appointments. These are spread across the entire city without optimizing the order in which jobs are done or minimizing travel time. | Technician B (in City B) is assigned 10 repair jobs that fit their skillset. Their day is scheduled efficiently, with jobs assigned based on proximity and required skills. |
Technician C (in City C) has been randomly assigned 15 jobs, but they are required to handle both repairs and installations, even though they are more skilled in repairs. | Technician C (in City C) is assigned 7 jobs with a mix of repairs and installations. The system ensures they don’t have to cross the city for each appointment, with travel time between jobs reduced by 50%. |
Conclusion
Great! We have covered one of the gem topics in Field Service Lightning. Keep in touch, we will dive into FSL Mobile on our next blog.