

Installation of Commerce Cloud
Learn the benefits of Salesforce Commerce Cloud and follow the step-by-step guide to easily install and configure the B2B Commerce Cloud in Salesforce.
By Arunkumaran Vivekanandan
Salesforce Developer
Installation of Commerce Cloud
What is Commerce Cloud?
In today's era, online business and buying products online are not an option; they’re a necessity. Online retail has become a pivotal aspect of modern business, with billions of digital buyers worldwide. Salesforce provides a cloud-based E-Commerce platform to enhance the shopping experience and drive sales. Commerce Cloud offers distinct commerce solutions for B2B Commerce, B2C Commerce, and D2C Commerce.
Commerce Cloud provides a more personalized and seamless shopping experience. In the commerce cloud, we can create an online store and allocate some digital space to that store. This store will operate similarly to an offline store. This store works on a centralized platform to manage the operations of catalogs, product information, pricing configuration, customer information, inventory management, order management and more.
Step 1: Enabling Digital Experiences
These steps enable external users (like customers or partners) to register themselves and access your digital storefront.
- Navigate to Setup > Enter Digital Experiences in the Quick Find box.
Open the Settings > Enable the Digital Experience checkbox and Save it.
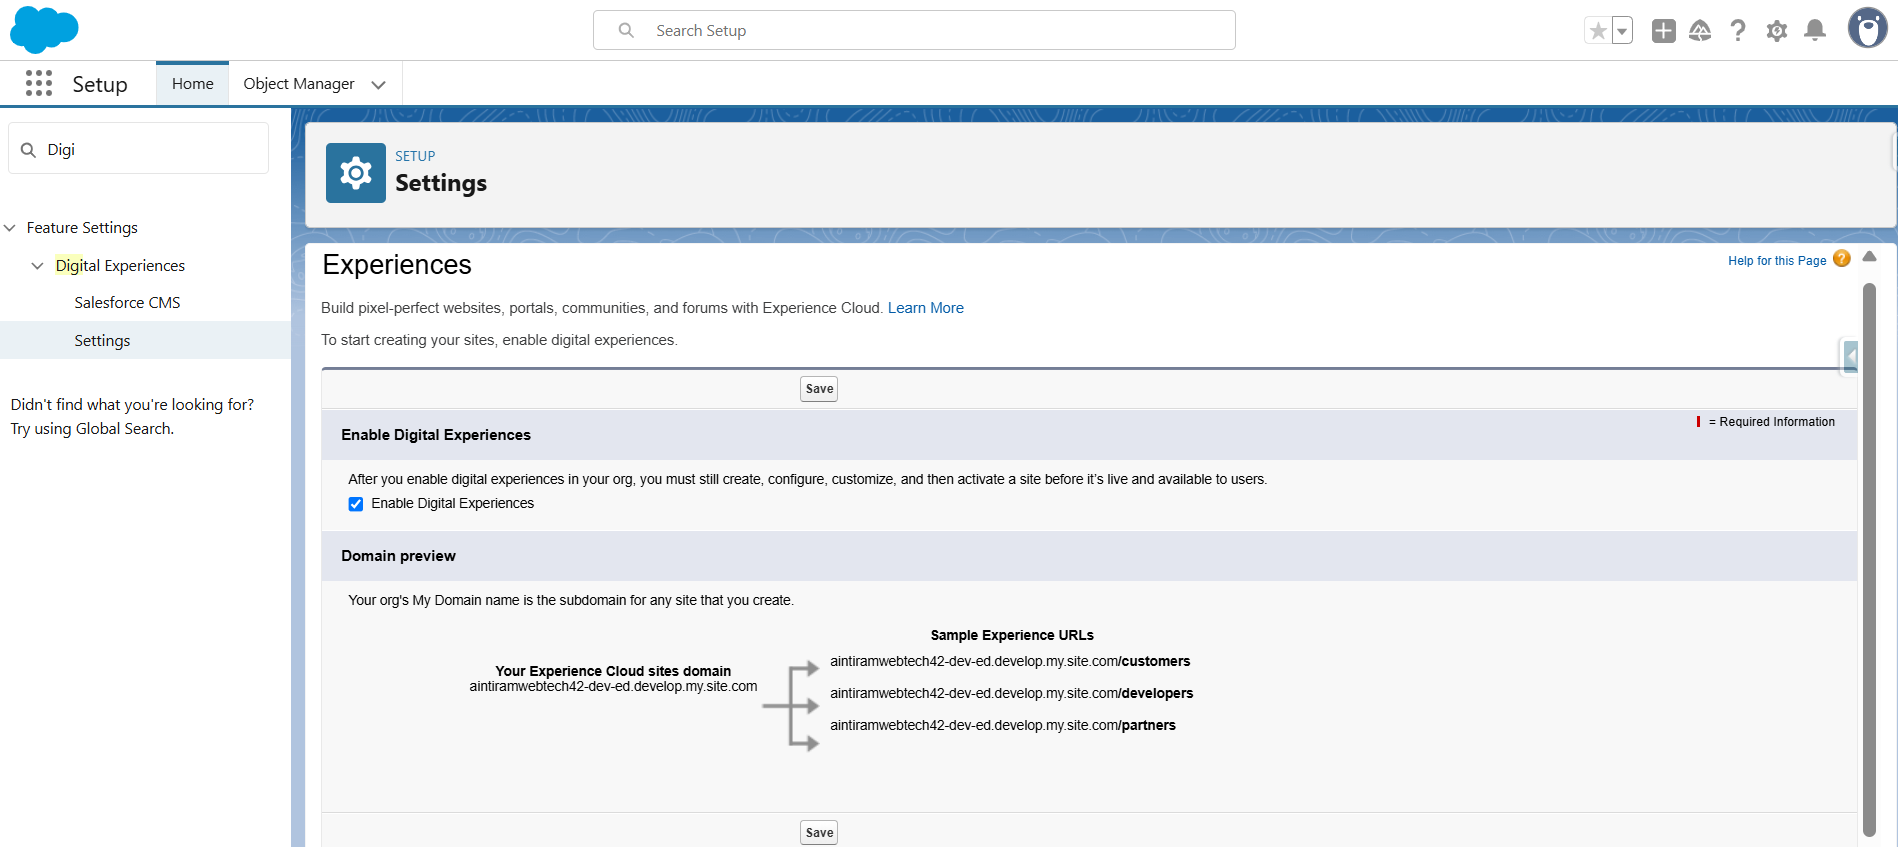
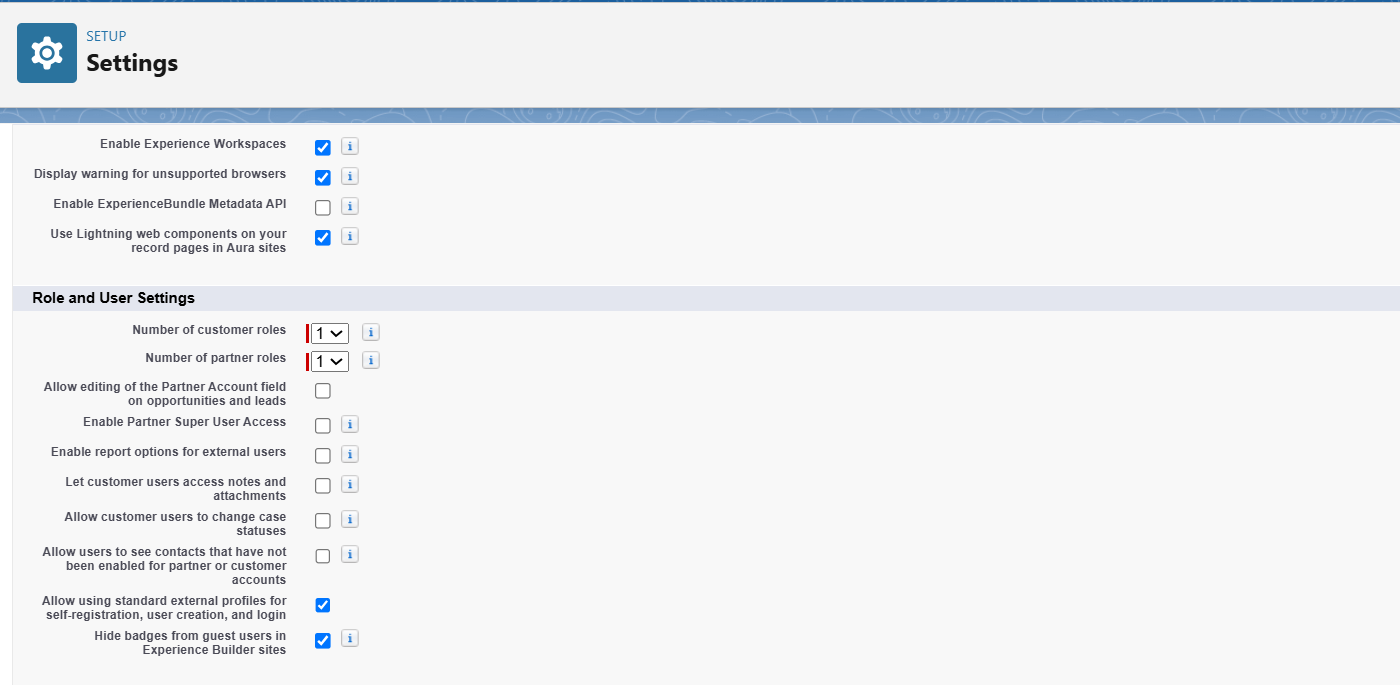
Under the Digital Experiences, access the Role and User Settings section > Check the option of Allow using standard external profiles for self-registration and user creation in the digital experience.
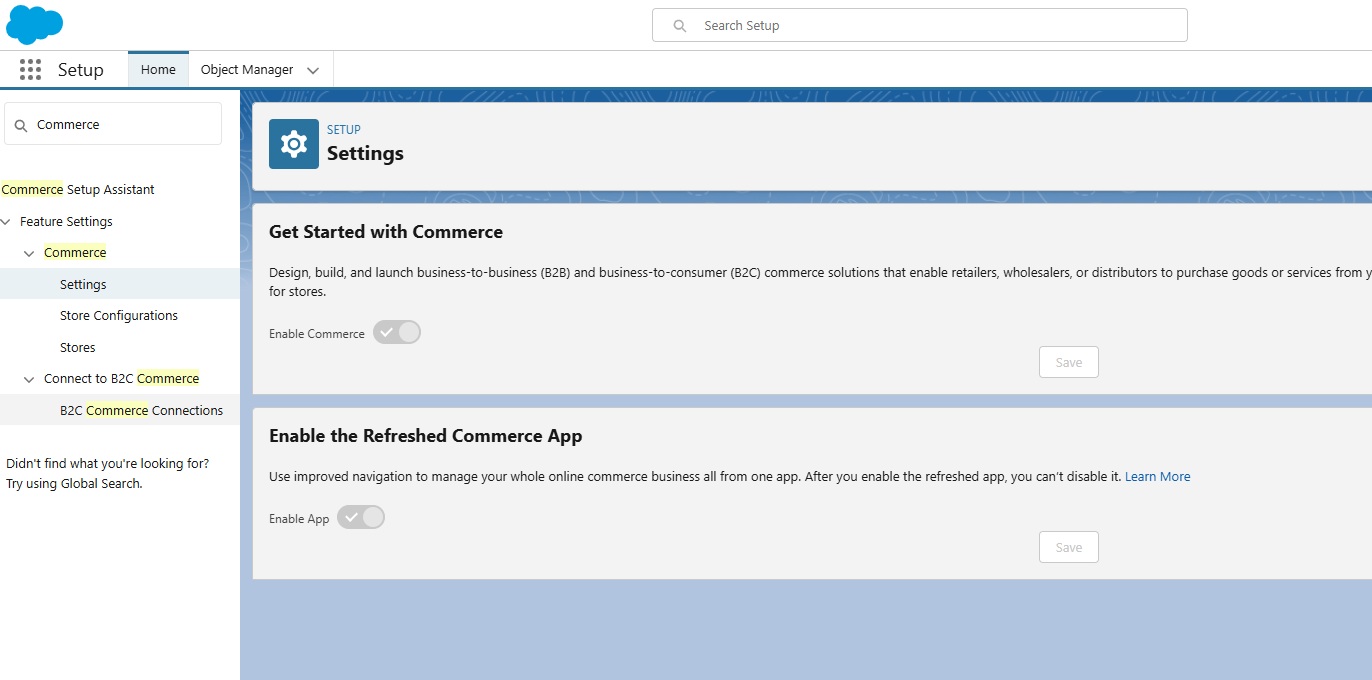
Step 2: Enabling Commerce App
Enabling these features gives you access to the latest UI and performance improvements in the Commerce App, helping to streamline your E-Commerce operations and enhance the overall user experience.
- Navigate to Setup > Search the Commerce > Select the Settings.
- Locate and enable the Toggle for Commerce.
- Also, be sure to enable the Refreshed Commerce App.
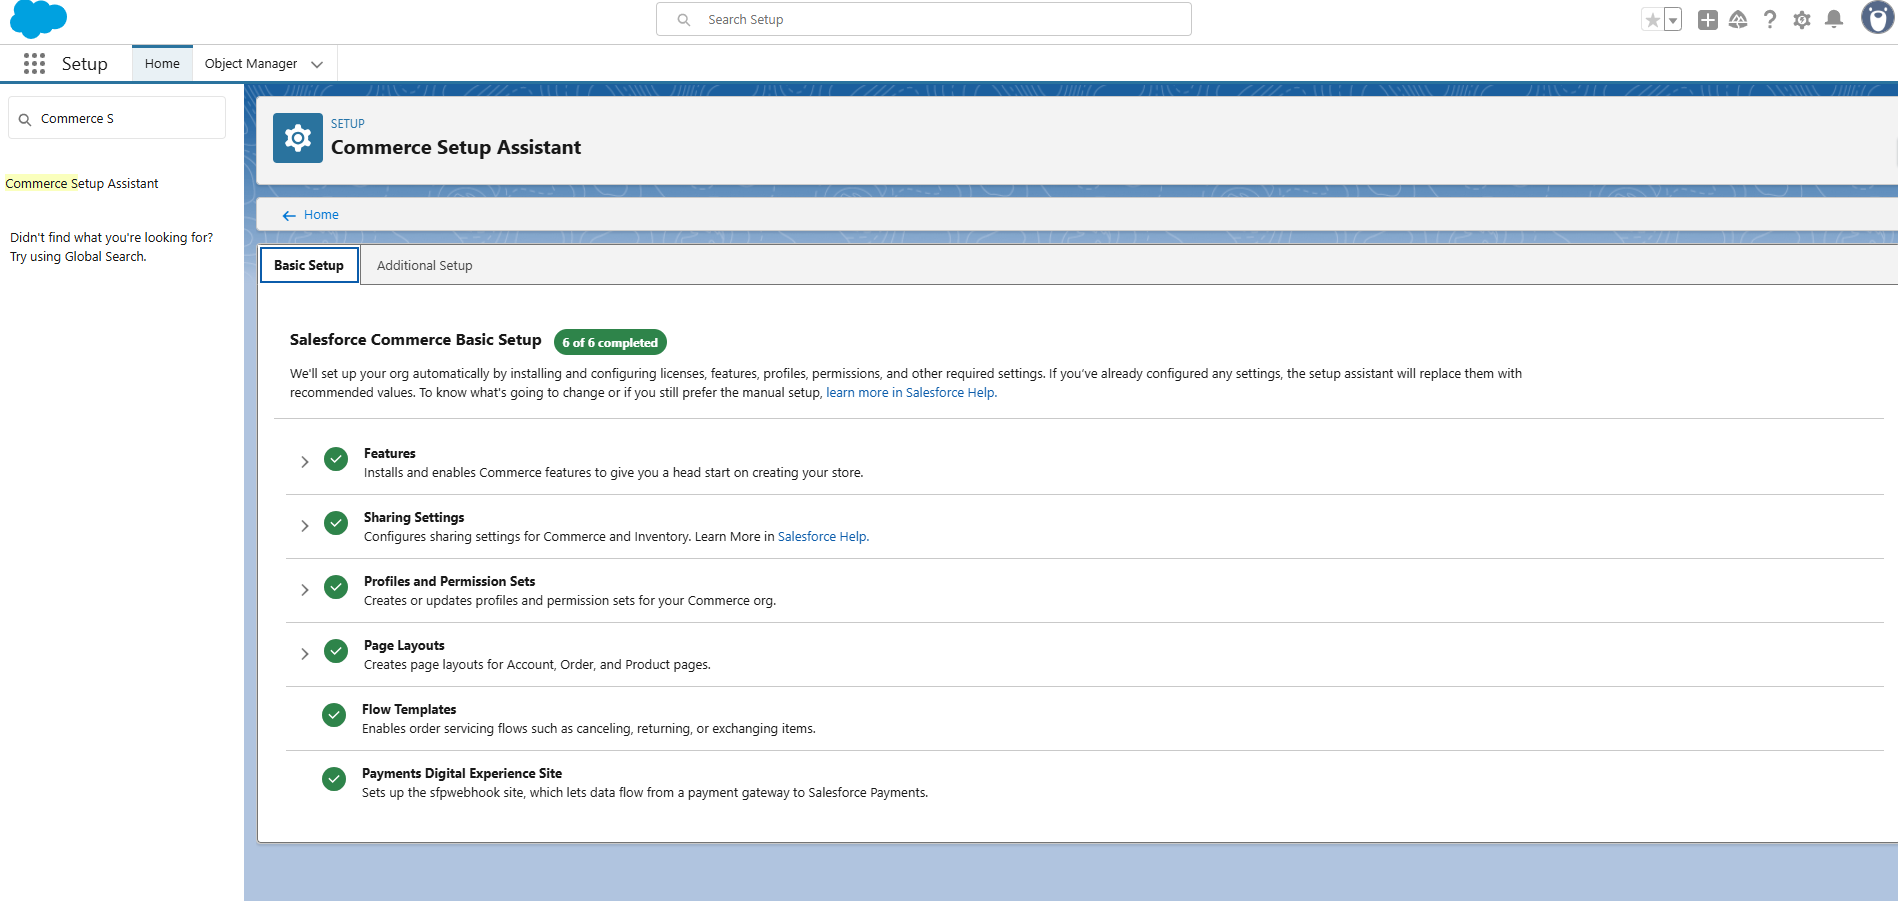
Step 3: Commerce Setup Assistant
Setting up Salesforce Commerce Cloud can be a complex process, but Salesforce provides a helpful tool to make it easier - the Commerce Setup Assistant. The Commerce Setup Assistant is your go-to tool for streamlining the initial configuration of your Commerce Cloud environment.
Here’s a quick guide to enable the Commerce Setup Assistant.
- Navigate to Setup > Commerce Setup Assistant in your Salesforce org.
- Select Salesforce Commerce Setup from the options available and click Get Started.
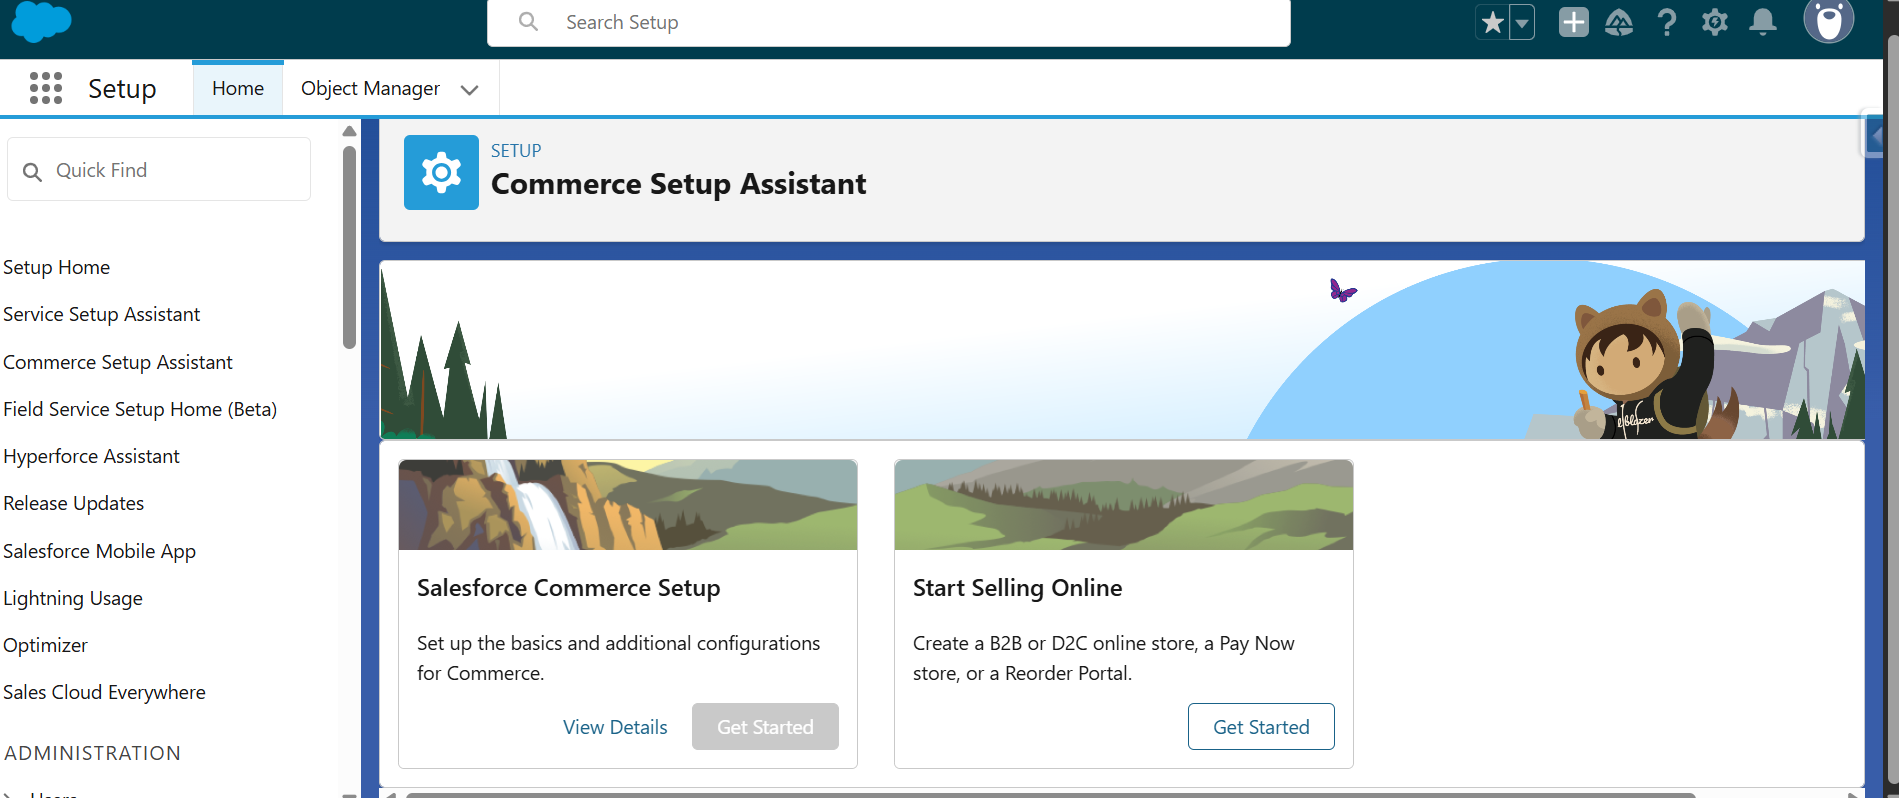
The Commerce Setup Assistant automates many steps needed to prepare your system for a full commerce implementation.
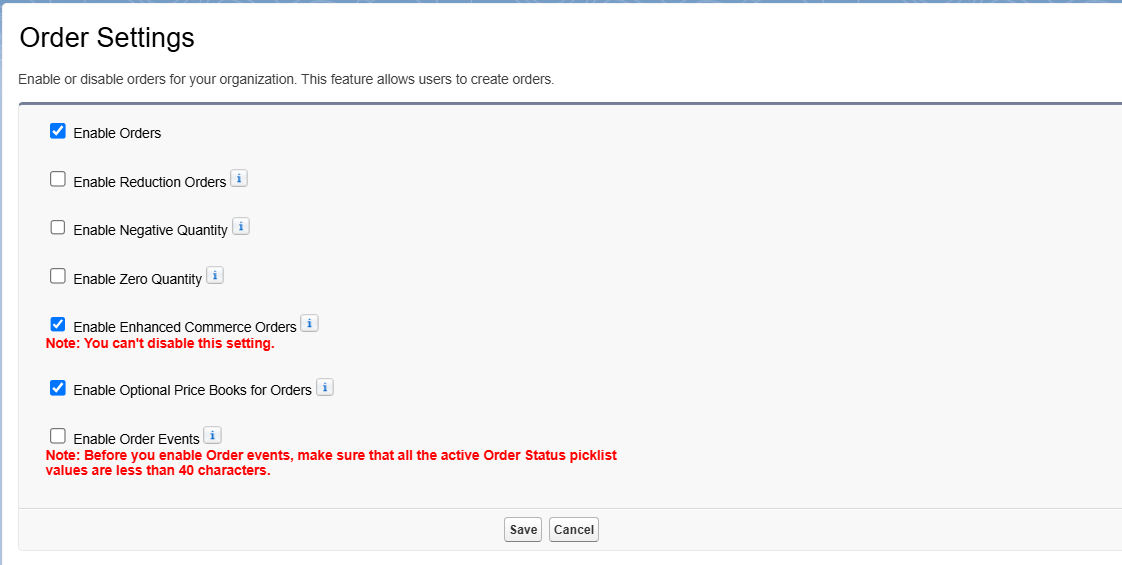
Step 4: Configuring Order Preferences
These options allow you to use enhanced ordering features and flexible pricing strategies.
- Navigate to Setup > Feature Settings > Sales > Order Settings
- Enable the following checkboxes
- Enhanced Commerce Orders
Optional Price Book for Orders
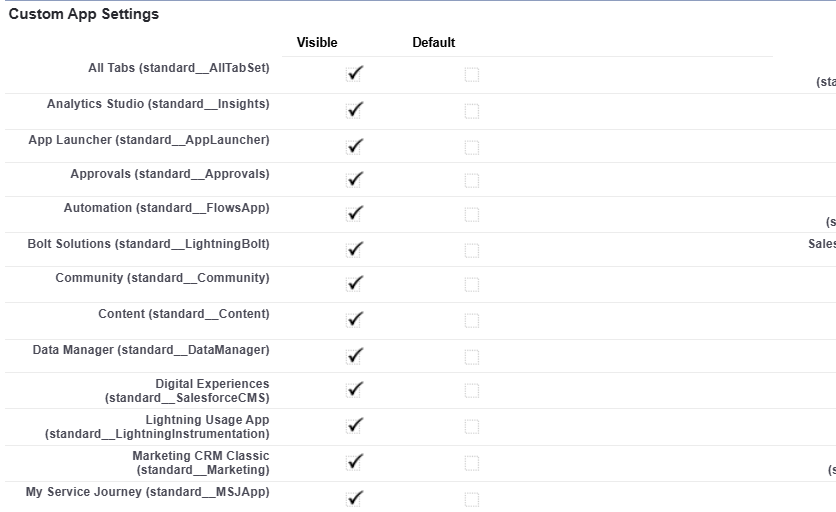
Step 5: Activating Salesforce CMS
This enables access to Salesforce CMS tools for content and media management.
- Navigate to Setup > Users > Profiles > System Administrator profile
Under Custom App Settings, make sure Digital Experiences (Standard__SalesforceCMS) is set to Visible.
- Under Tab Settings, change the following tabs from “Tab Hidden” to “Default On”
- CMS Channels
- CMS Workspaces
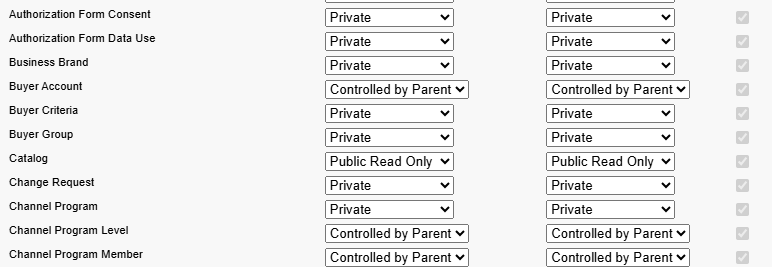
Set Up Org-Wide Defaults & Object Access
Setting up Org-Wide Defaults
To ensure proper visibility and access for key Commerce Cloud records, you must configure object-level sharing settings in Salesforce. Here’s how to do it.
- Navigate to Setup > Sharing Settings
- Set the following Commerce Cloud objects to Public Read Only.
- Catalog
- Electronic Media Group
- Order Delivery Method
This ensures that these objects are visible to the necessary user profiles and external users.
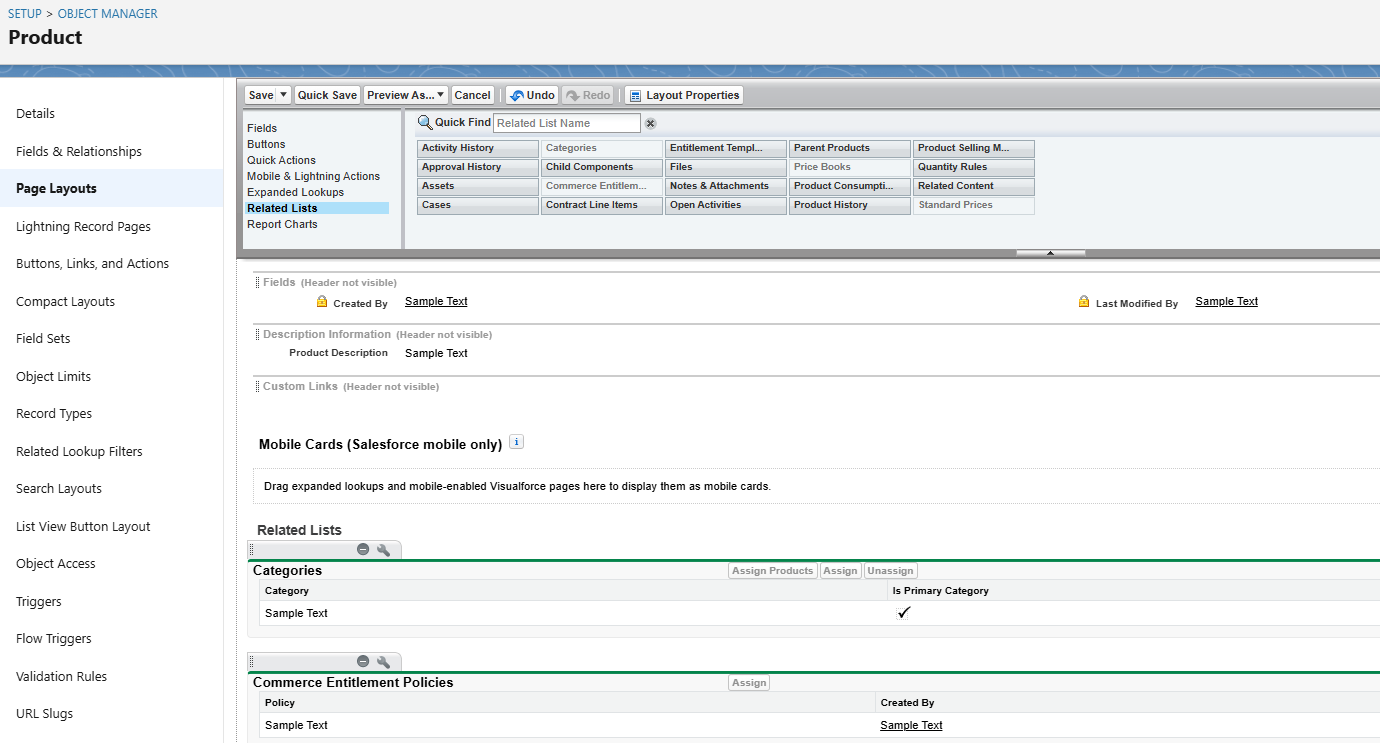
Updating the Product Page Layout
This help users to access essential product details and related configurations in one view.
- Navigate to Setup > Object Manager > Product > Page Layouts.
- Drag the Product SKU field into the Product Detail section.
- Add the following related lists
- Categories
Commerce Entitlement Policies
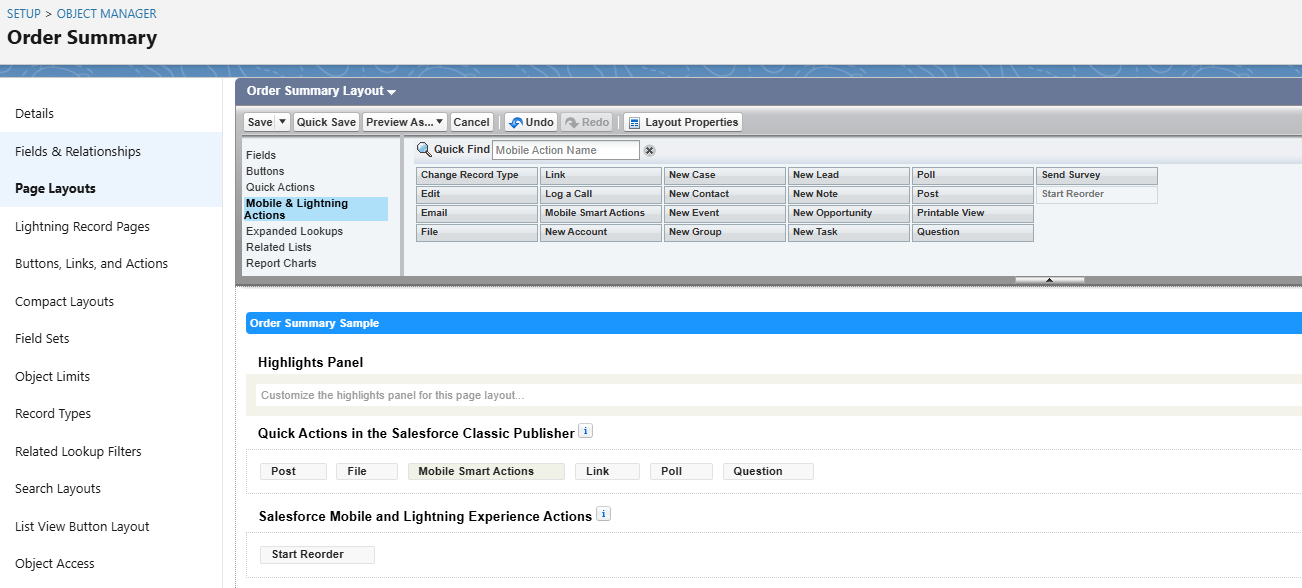
Updating the Order Summary Page Layout
- Navigate to Setup > Object Manager > Order Summary > Page Layouts
- Remove all mobile actions except
- Start Reorder
Updating the Order Delivery Group Summary Layout
This makes it easier to identify which products are included in each delivery group.
- Navigate to Setup > Object Manager > Order Delivery Group Summary > Page Layouts
- In the Order Product Summaries related list
- Click the wrench icon
- Click Customize Fields to Display
- Add the Product Name field to the list
Finalizing Commerce App Setup
Data Translation and Multi-Currency
To support multiple languages and currencies, do the following
- Navigate to Setup > Company Settings > Company Information.
- Enable the checkboxes
- Activate Data Translation
Activate Multiple Currencies

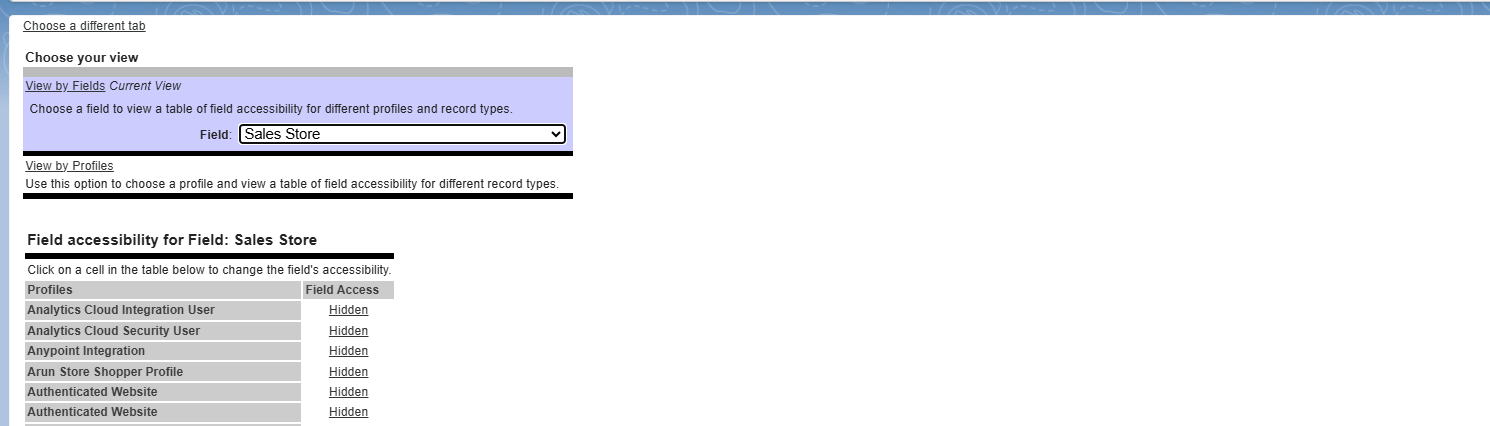
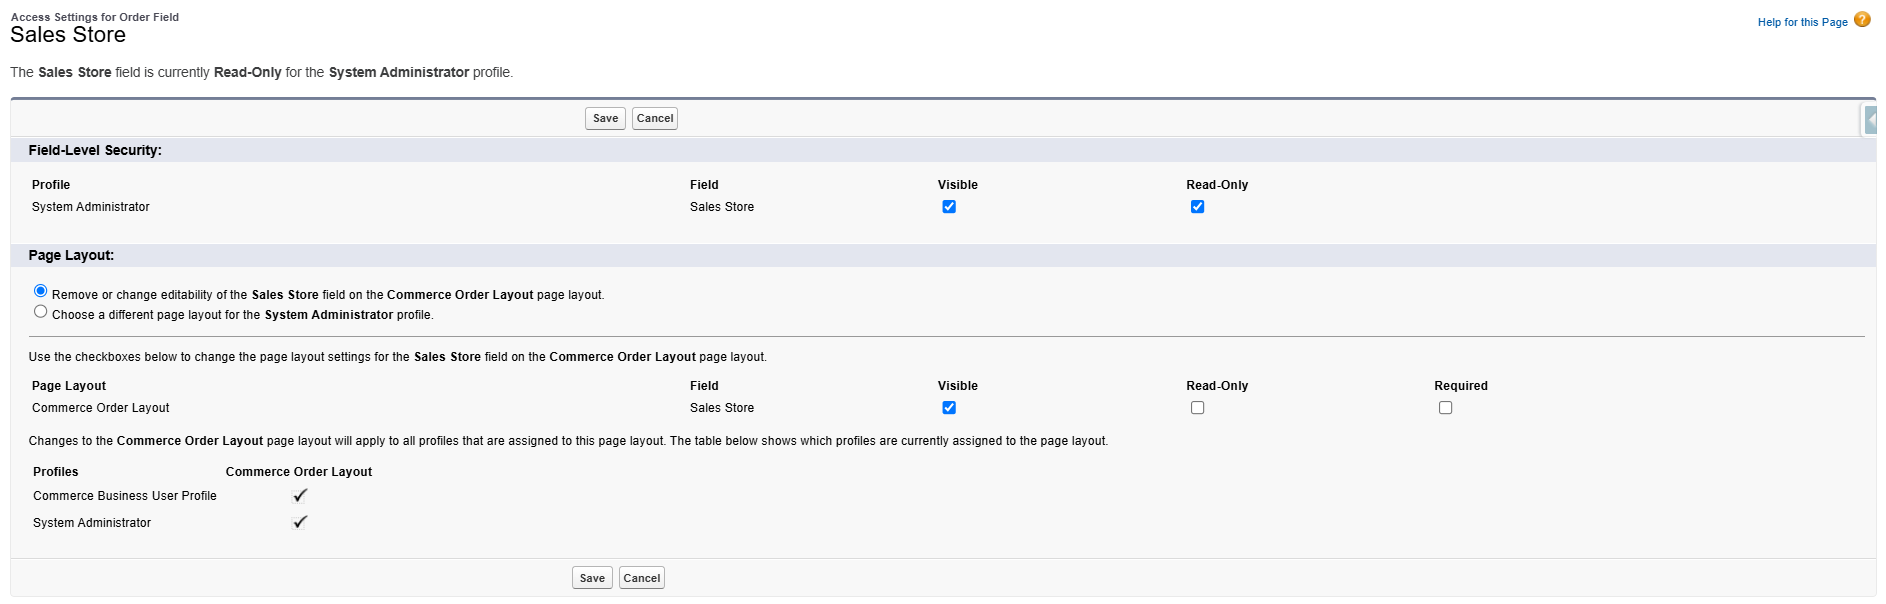
Field Accessibility and Commerce App Reports
To make sure you have visibility into key fields like “Sales Store” on the Order record
- Navigate to Security > Field Accessibility.
- Choose Order from the list of records > Click View by Fields.
Select the Sales Store field to adjust its visibility settings as needed.
- Navigate to System Administrator Profile > Change Default Access from “Hidden” to “Visible” and add Sales Store field to Order Layout > Save.
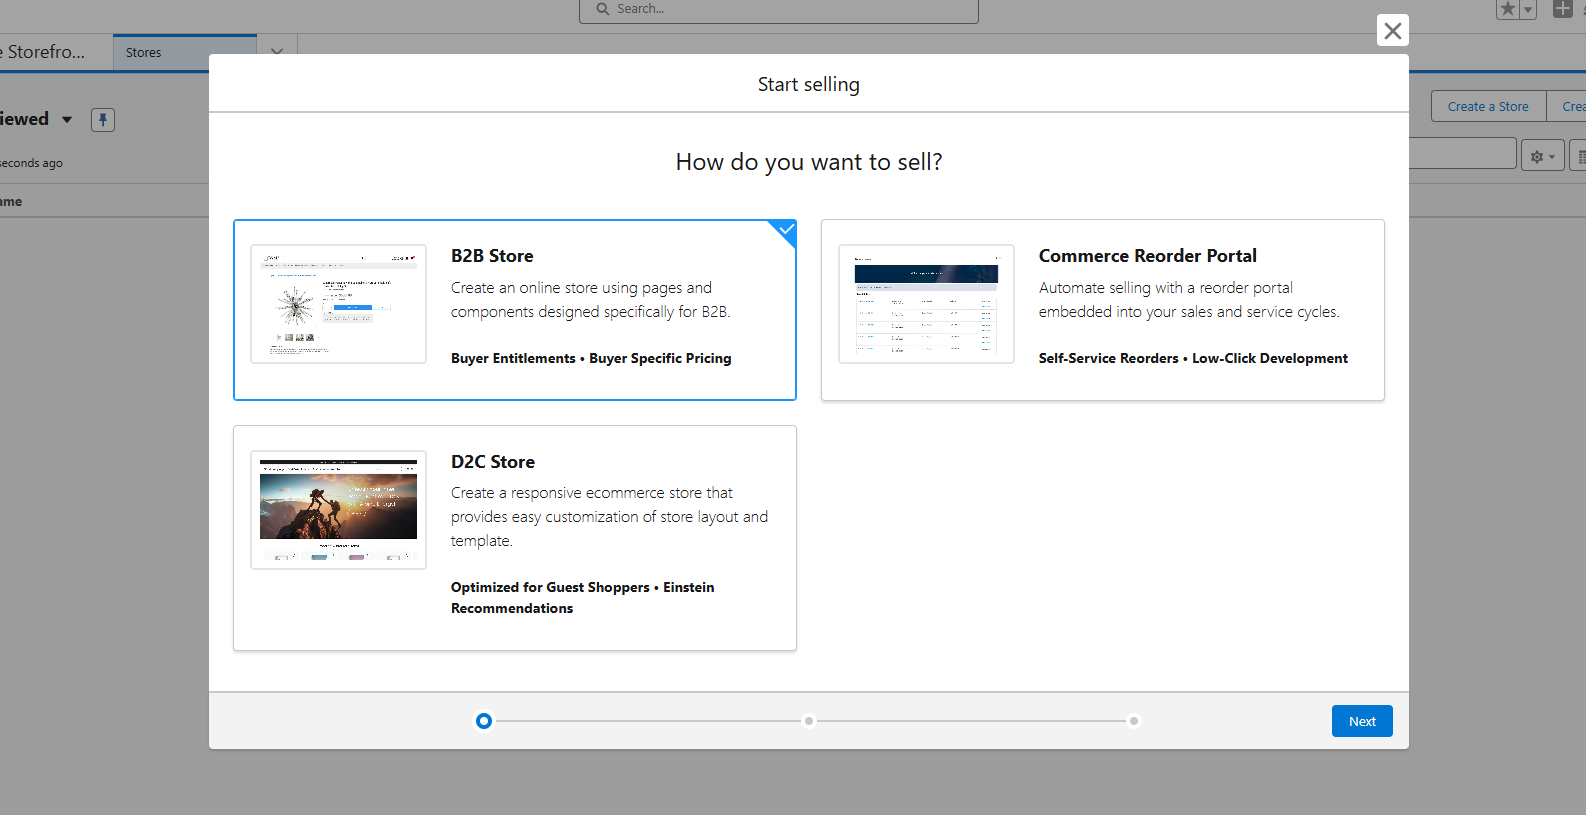
Creating a New Store After Installation
Now we are ready to create our first store by following the steps below.
- Go to App launcher > Select the Commerce app or Commerce Storefront Console to create a store.
- Choose Create and select any type - B2B Store, D2C Store, or other, and enter all required fields.
- Using Commerce Storefront Console, we can access the commerce cloud objects, setup store branding, add products, set up payments, and others.
Store Types
Commerce Cloud provides the option to create different types of stores. Each store integrates with product configurations, catalogs, pricebooks, and customer-specific details. All the configurations are handled in one place for buyers.
B2B Store
Designed for business-to-business transactions, this store type supports complex buying processes such as negotiated pricing, bulk ordering, and account-specific catalogs.
D2C Store (Direct-to-Consumer)
Perfect for selling directly to individual consumers. This option offers a streamlined, user-friendly shopping experience similar to traditional e-commerce stores.
Commerce Reorder Portal
This portal is a low-click development tool. It supports the services of self-service reorder, Sales and Service interactions with customers, and managing the order-related process on this portal.
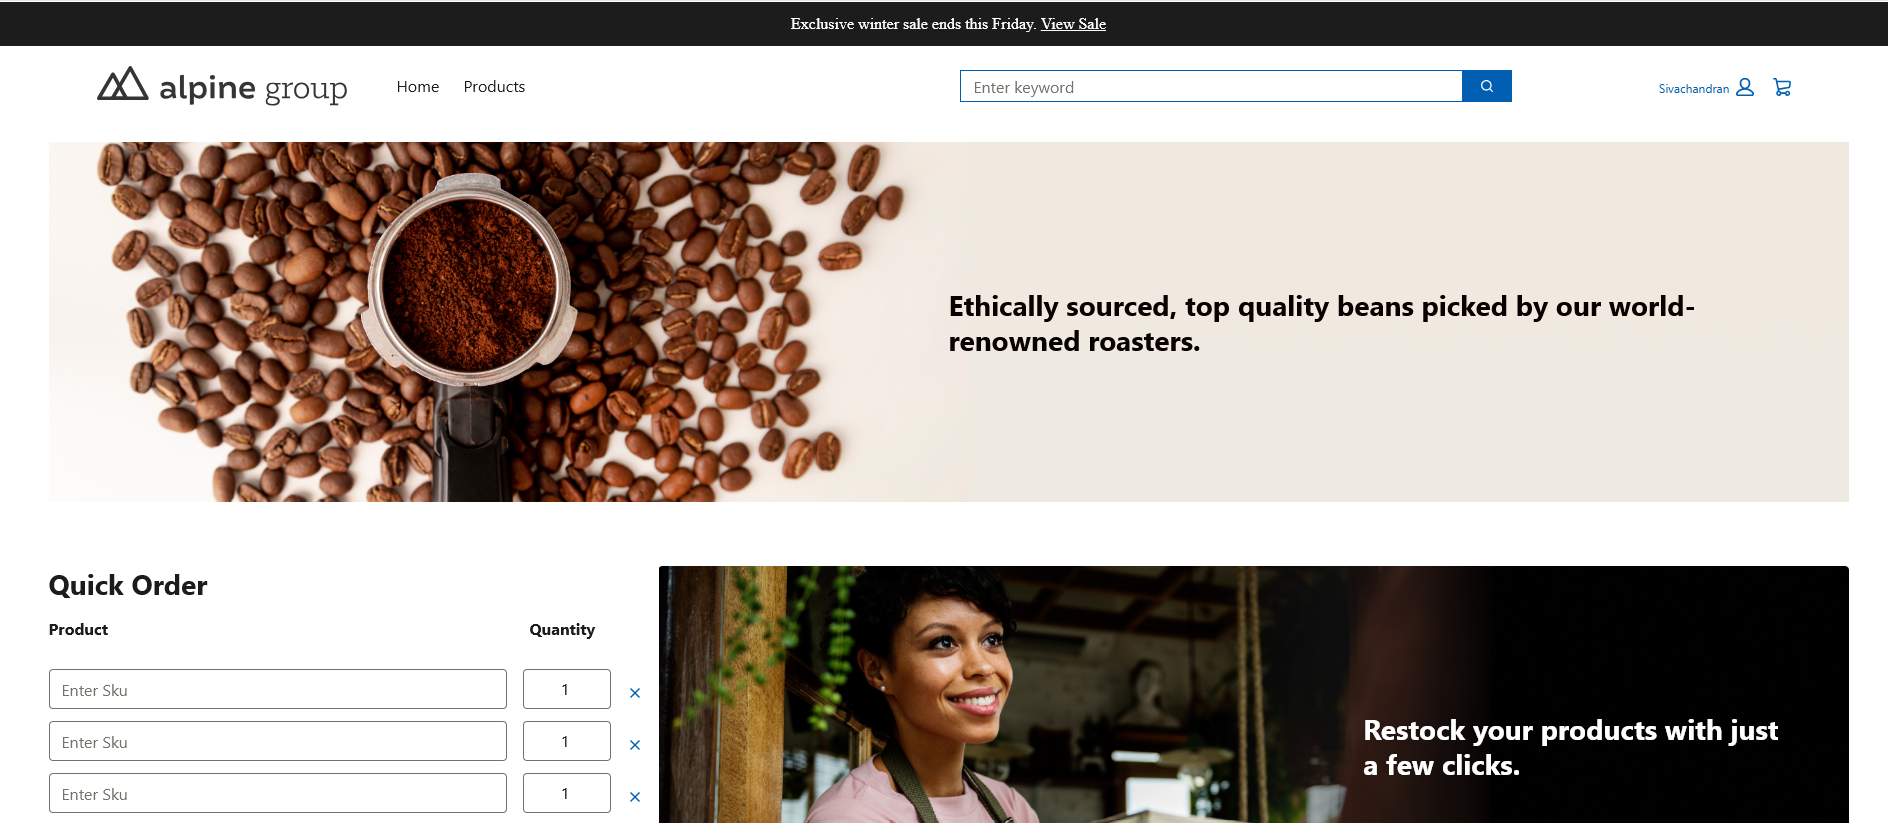
Storefront Preview
- In App Launcher, search the Commerce app, choose your store, and on the right-side corner, select the Preview option. This option helps to display our storefront changes.
Conclusion
Finally, we have created a fresh store using a commerce application with no products. Our next blog will describe the products, price book, and catalog configurations on the storefront.