

Create Dynamic Content Blocks In SFMC Using Basic AMPScript
This blog will helps you to understand the base of creating a content block dynamically in the salesforce Marketing Cloud Emails using simple AMPscript code.
By Sharan Kumar Mariappan
Assistant Software Developer
How To Create Dynamic Content Blocks In SFMC Using Basic AMPScript?
Our company Aintiram Web Tech, has it's own dedicated marketing department. Let's assume that is responsible for conducting Salesforce Marketing events and notifying their customers regarding events that will happen across different regions. They are focused on giving exceptional experiences to all the attendees through their content.
The marketing team is led by Mr. Aintiran and his team is diligently sending out personalized emails using Salesforce Marketing Cloud. But sending an email based on the region is tough task for them. But they never gave up. They tried to find a new path. Team recognizes that they need a more automated and efficient process that aligns with the dynamic nature of their events.
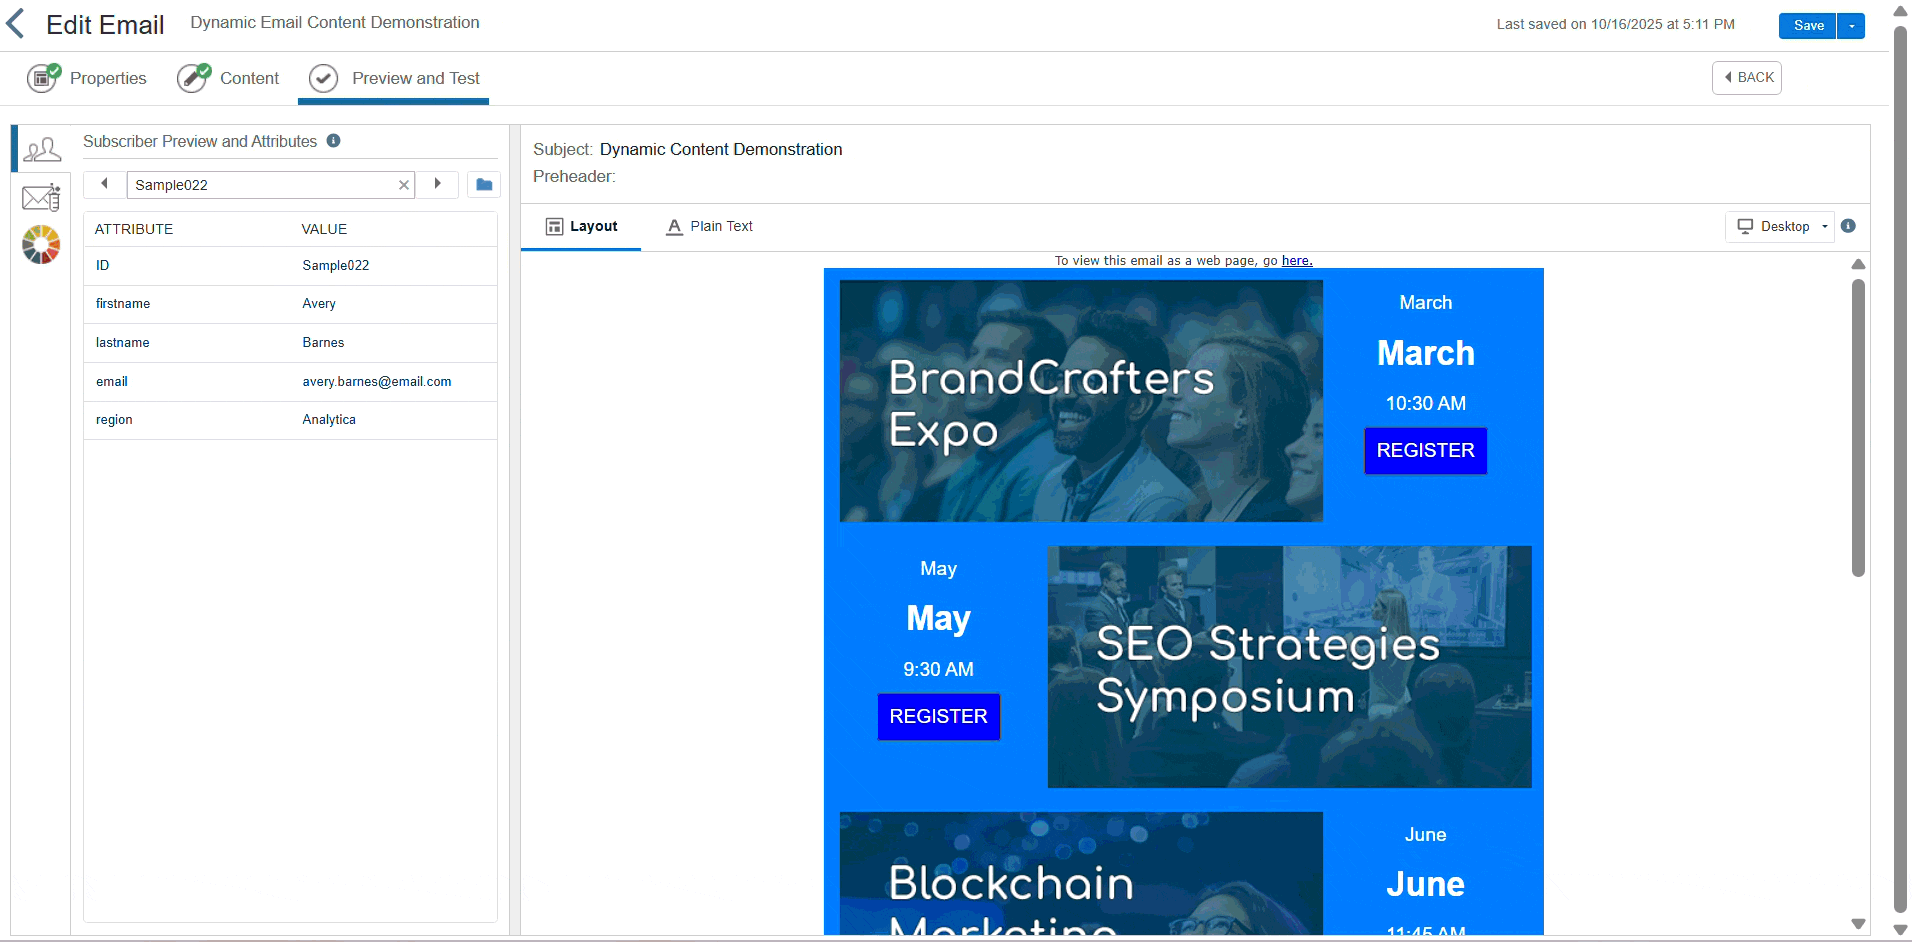
The client who rendered projects to Aintiran and team approached them, to send 0 to 4 event details per person through an email based on the region where they reside. If there are no events for that particular region. Just send an email with some notes. The client also insisted on sending the content blocks that must be mobile responsive.
The content blocks must accurately reflect the event data provided in the sample exports. Also, the earliest event should be displayed at the top (Based on the event dates). The content block must be able to be dropped into any existing Aintiram Marketing Emails.
Aintiran and the team have started a team hurdle meeting in ABC meeting software, to create a responsive design in the Salesforce Marketing Cloud. Now the team is ready to start designing. Let's travel with them and understand what actions they would use to achieve the dynamic content block
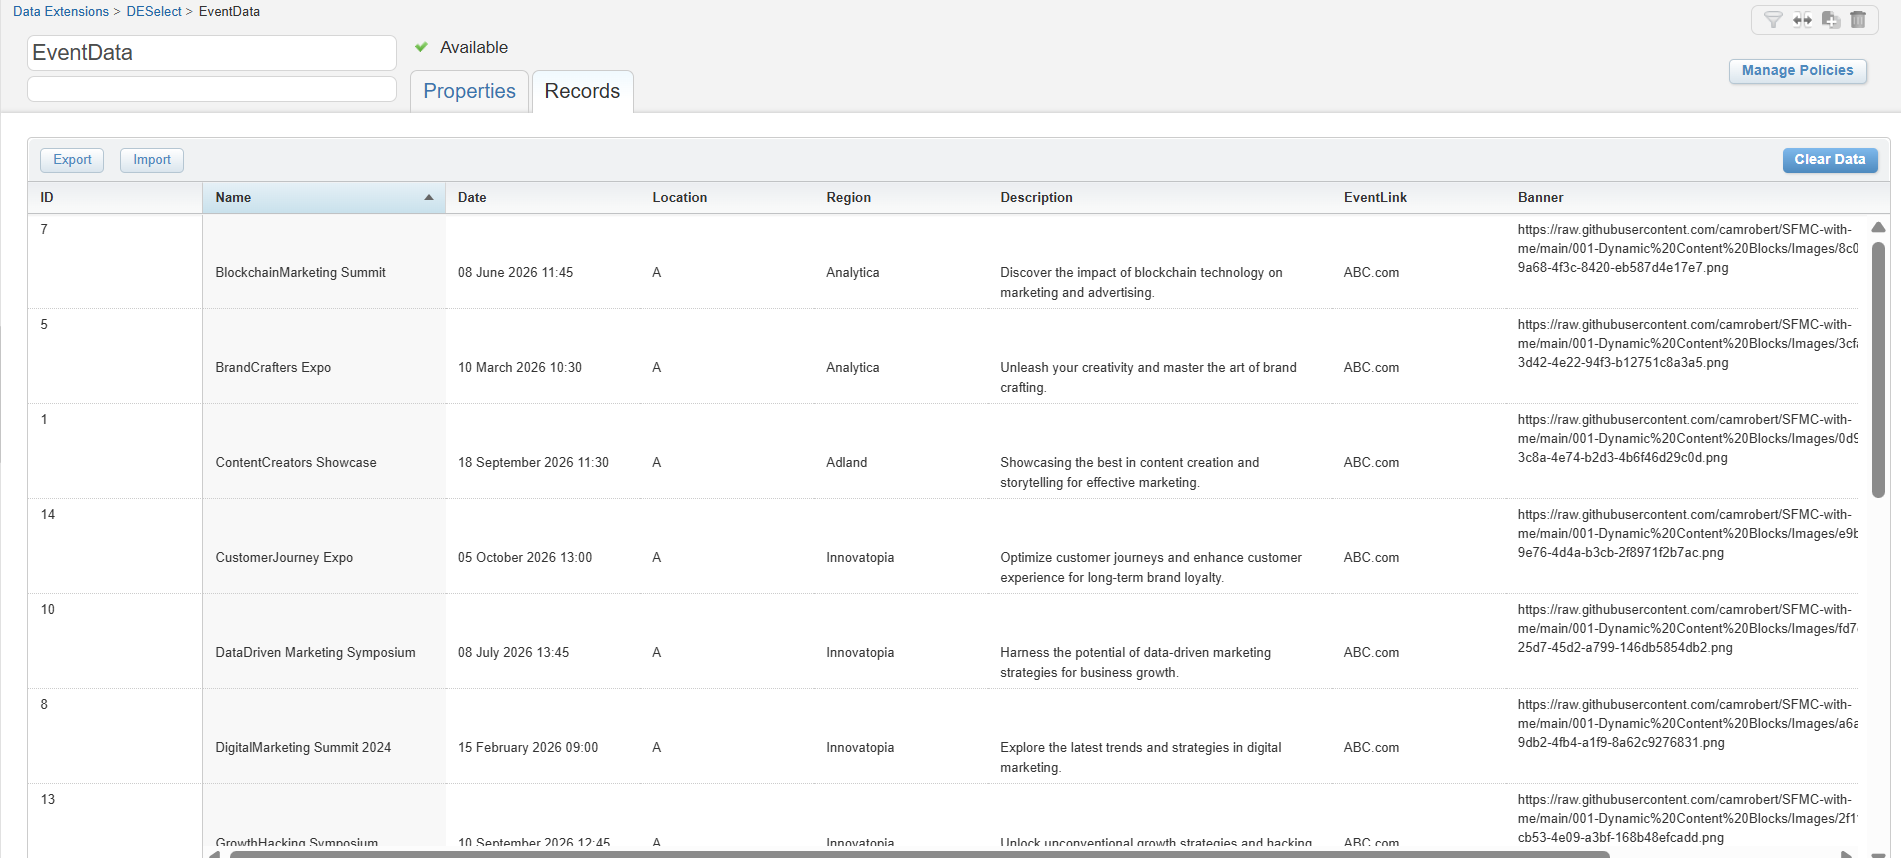
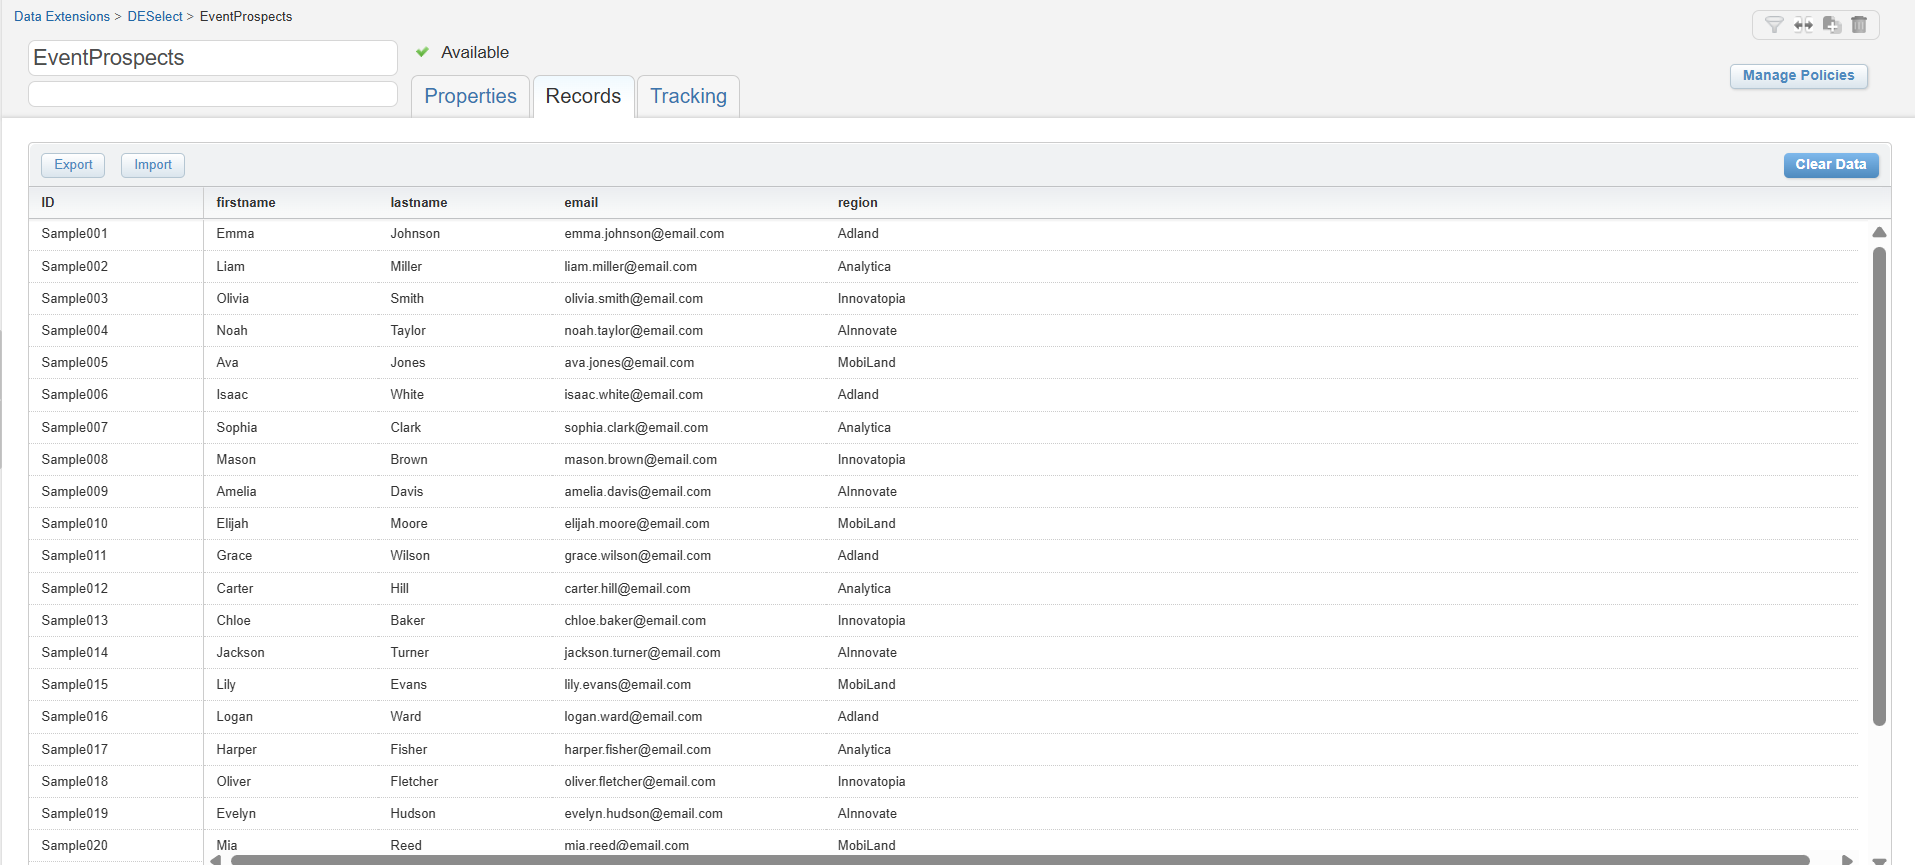
Note: For you to practice, we suggest you use this sample data or else you can create your own sample data based on the screenshoot of attached data extension screenshot. You can download the data from gitHub, link mentioned below: https://github.com/camrobert/SFMC-with-me/tree/main/001-Dynamic%20Content%20Blocks.
Let’s understand, what are all the steps Aintiran guided their team to build dynamic content.
Step 1: Create Data Extensions
Jump into the marketing cloud, navigate to data extension (If you want to know what data extension is read in our previous blog - Create a Data Extension in Marketing Cloud). Start creating two data extensions, one for customer data and another for event data. Upload the sample files from which you have downloaded from the gitHub. (1)

Step 2: Create an email in Content Builder
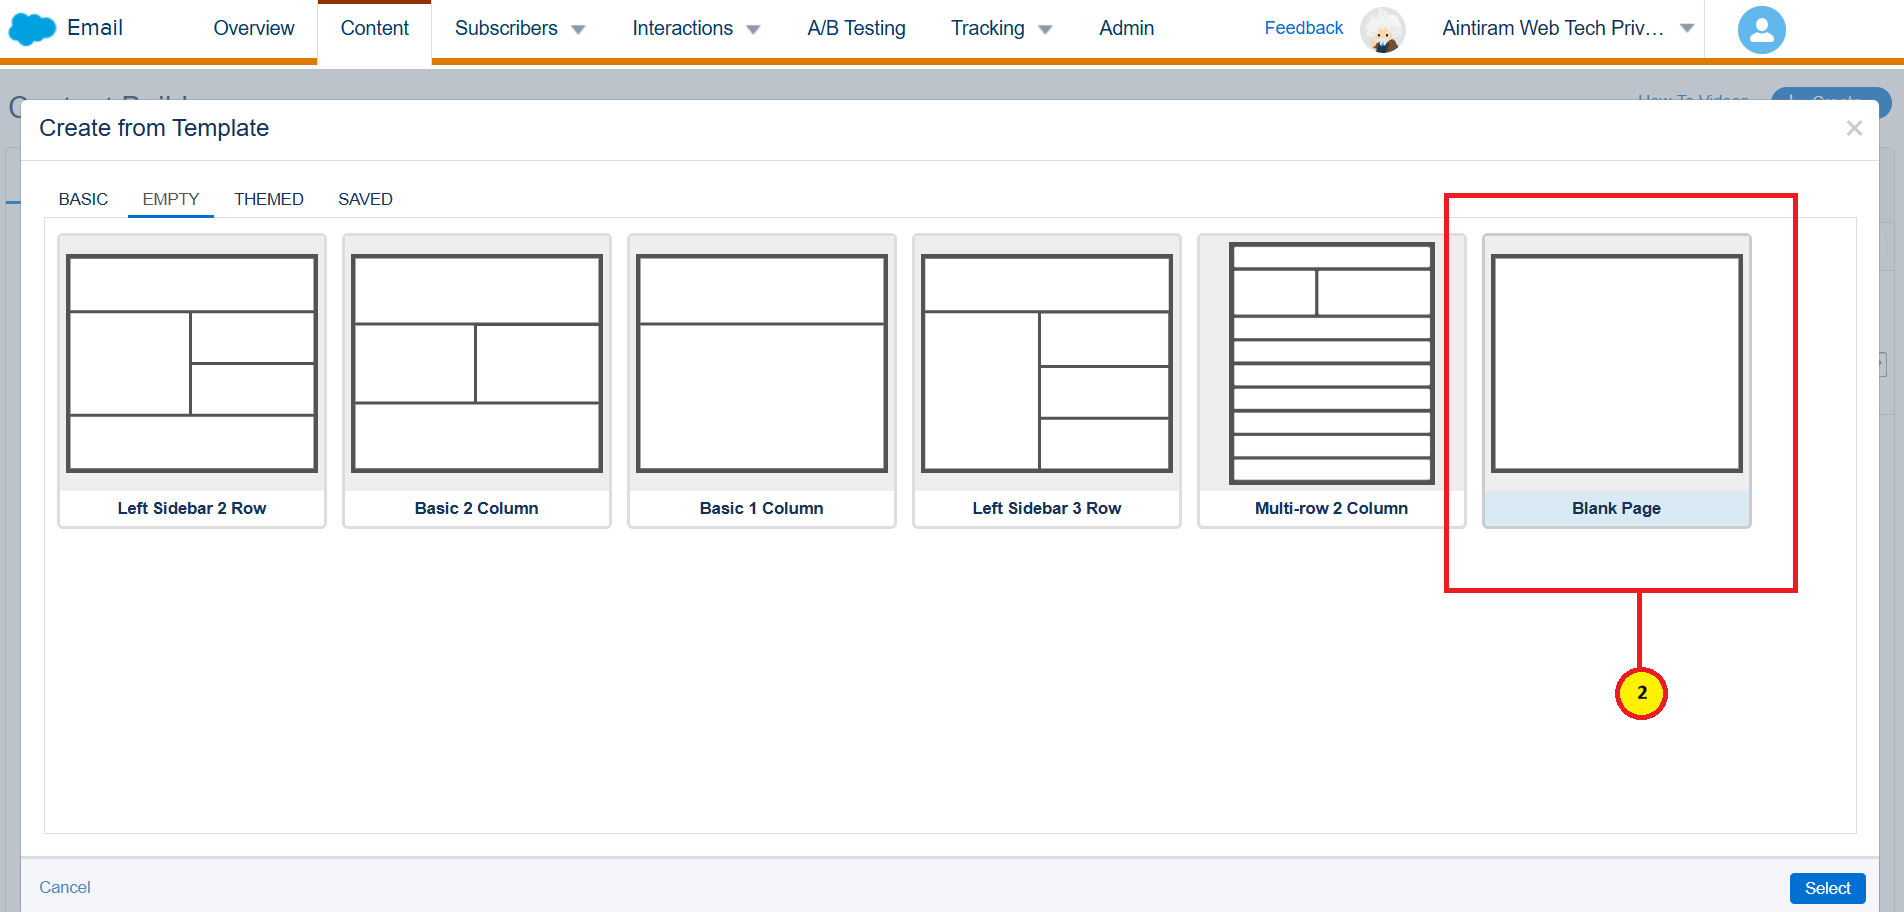
Navigate to content builder, start creating a template. Select blank page in empty template for now (2).
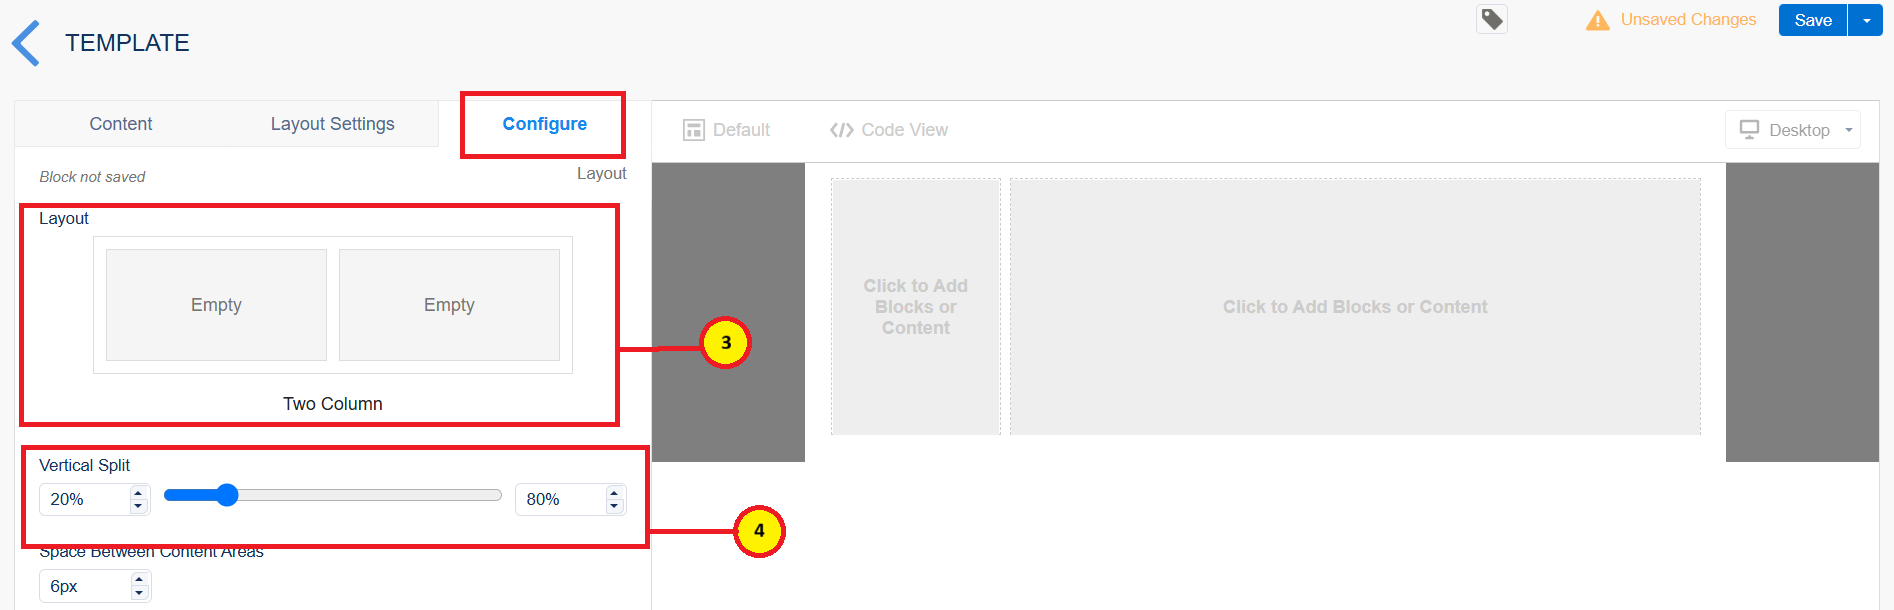
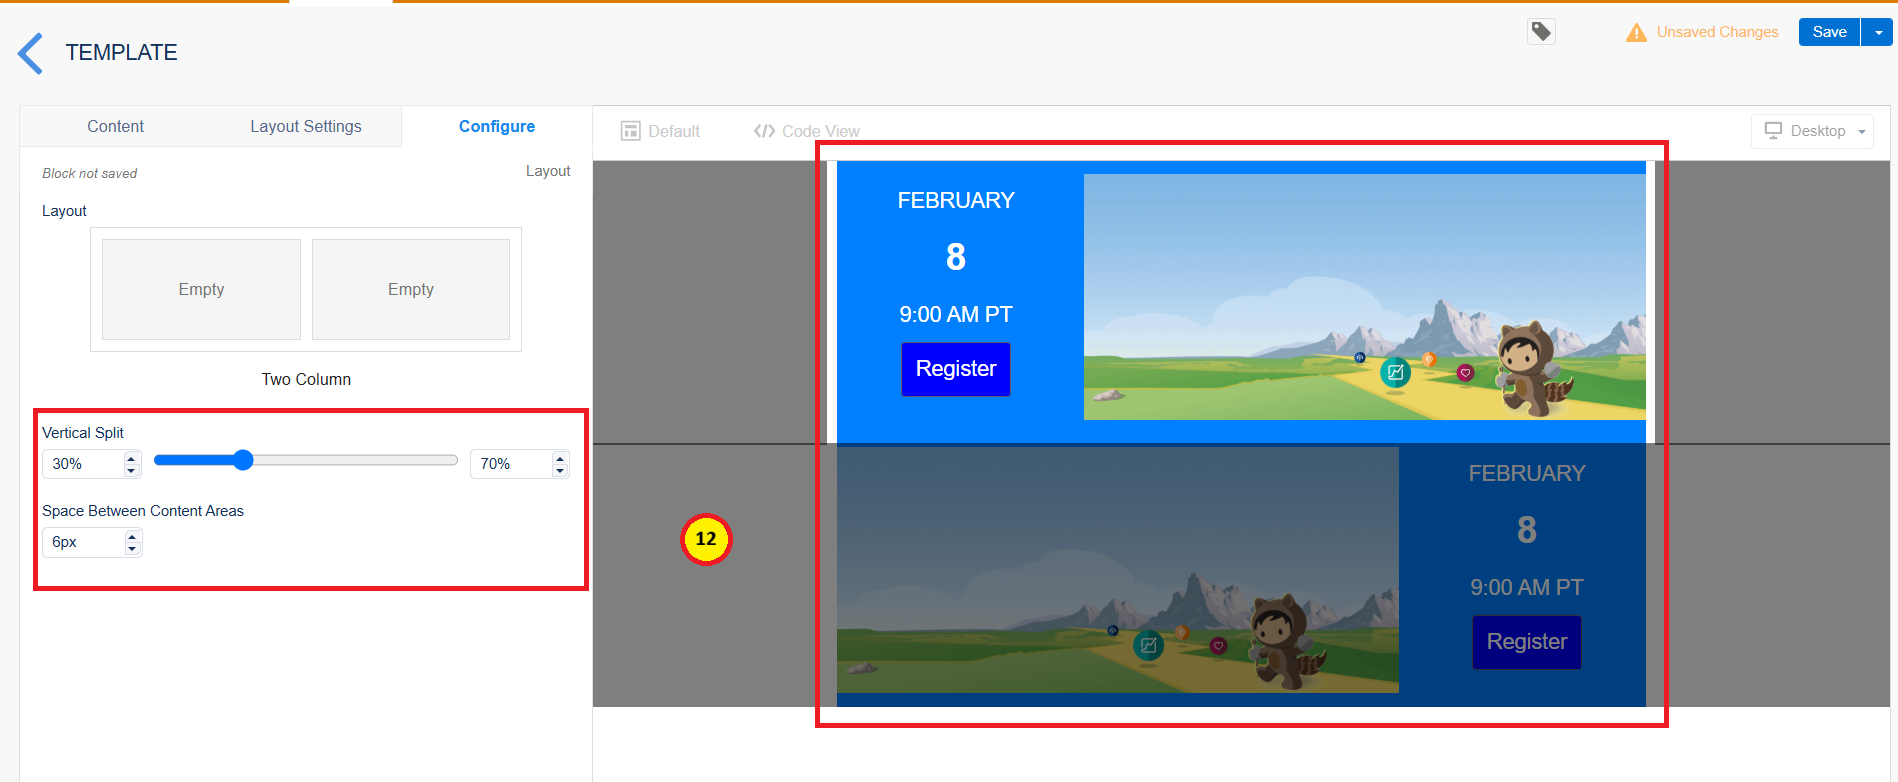
Next, navigate to layouts in the template. Select the two-column template as shown below (3). Configure the vertical split for both the columns as 30% and 70% respectively (4).
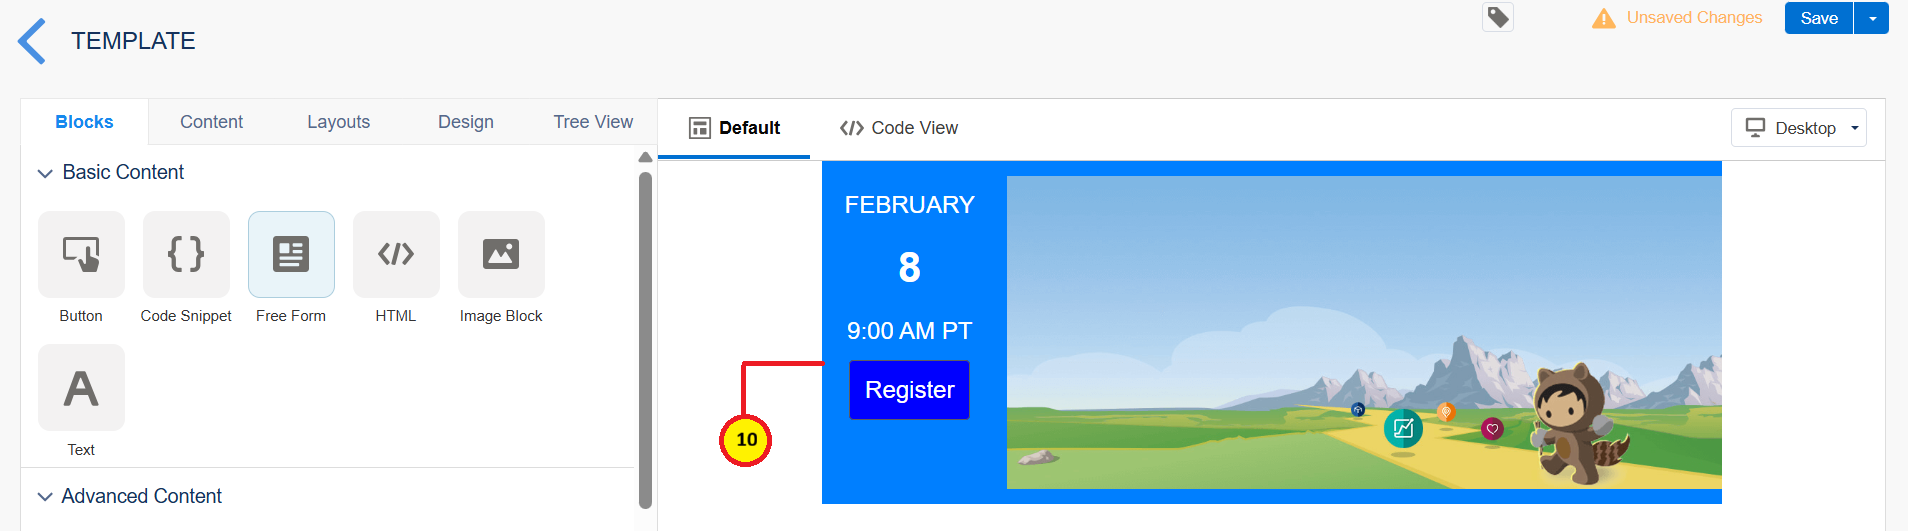
Just drag and drop image block and the free form. In the content sections, just drag and drop Free Form and Image Block to the two columns as shown below (5).

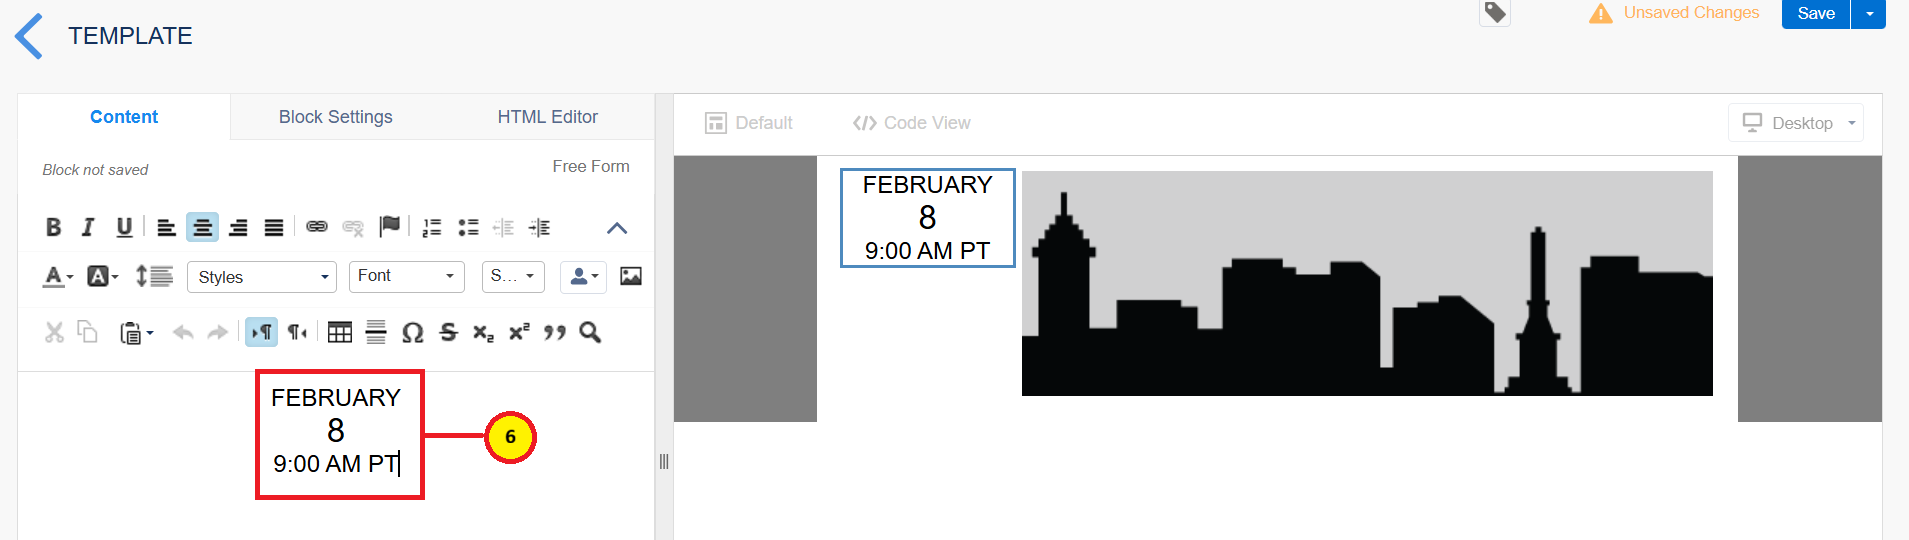
Edit the free form and add the content to it as shown below (6).
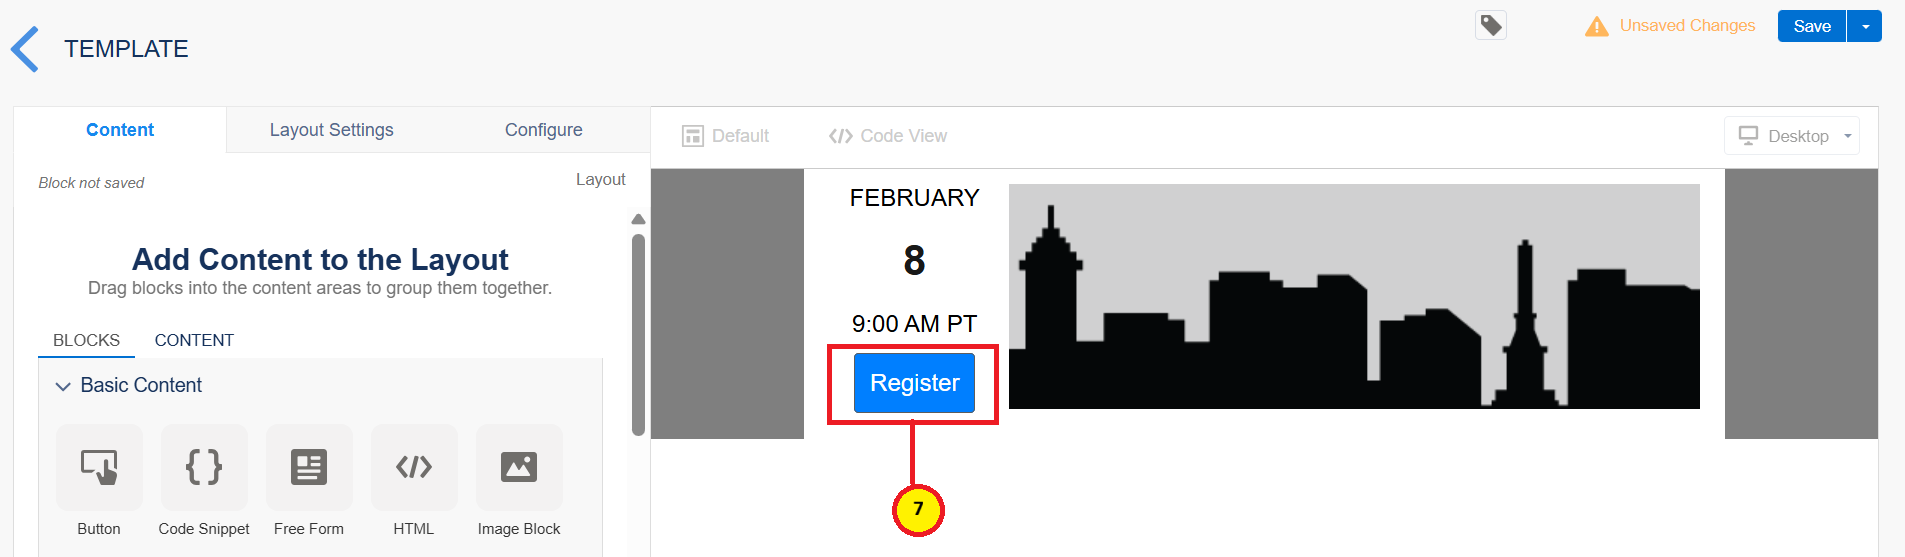
Also, drag the button below the free form and name it as Register (7).
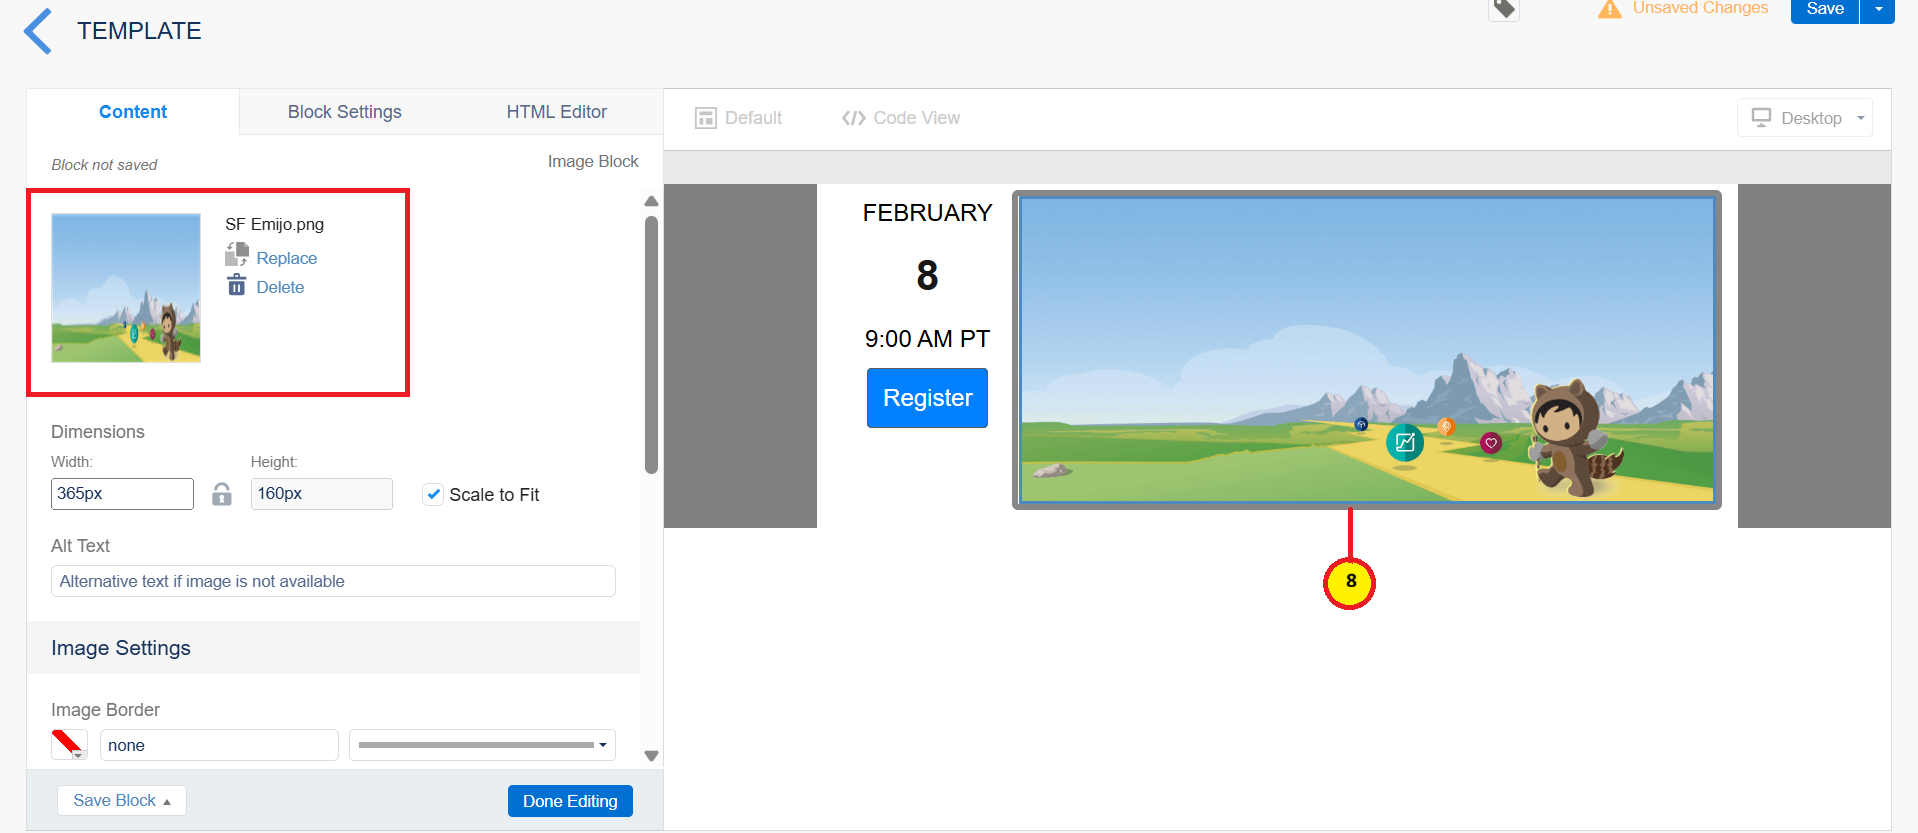
Apply padding to the free form in the layout settings. Click on the image placeholder and add the sample image from your local computer (8).
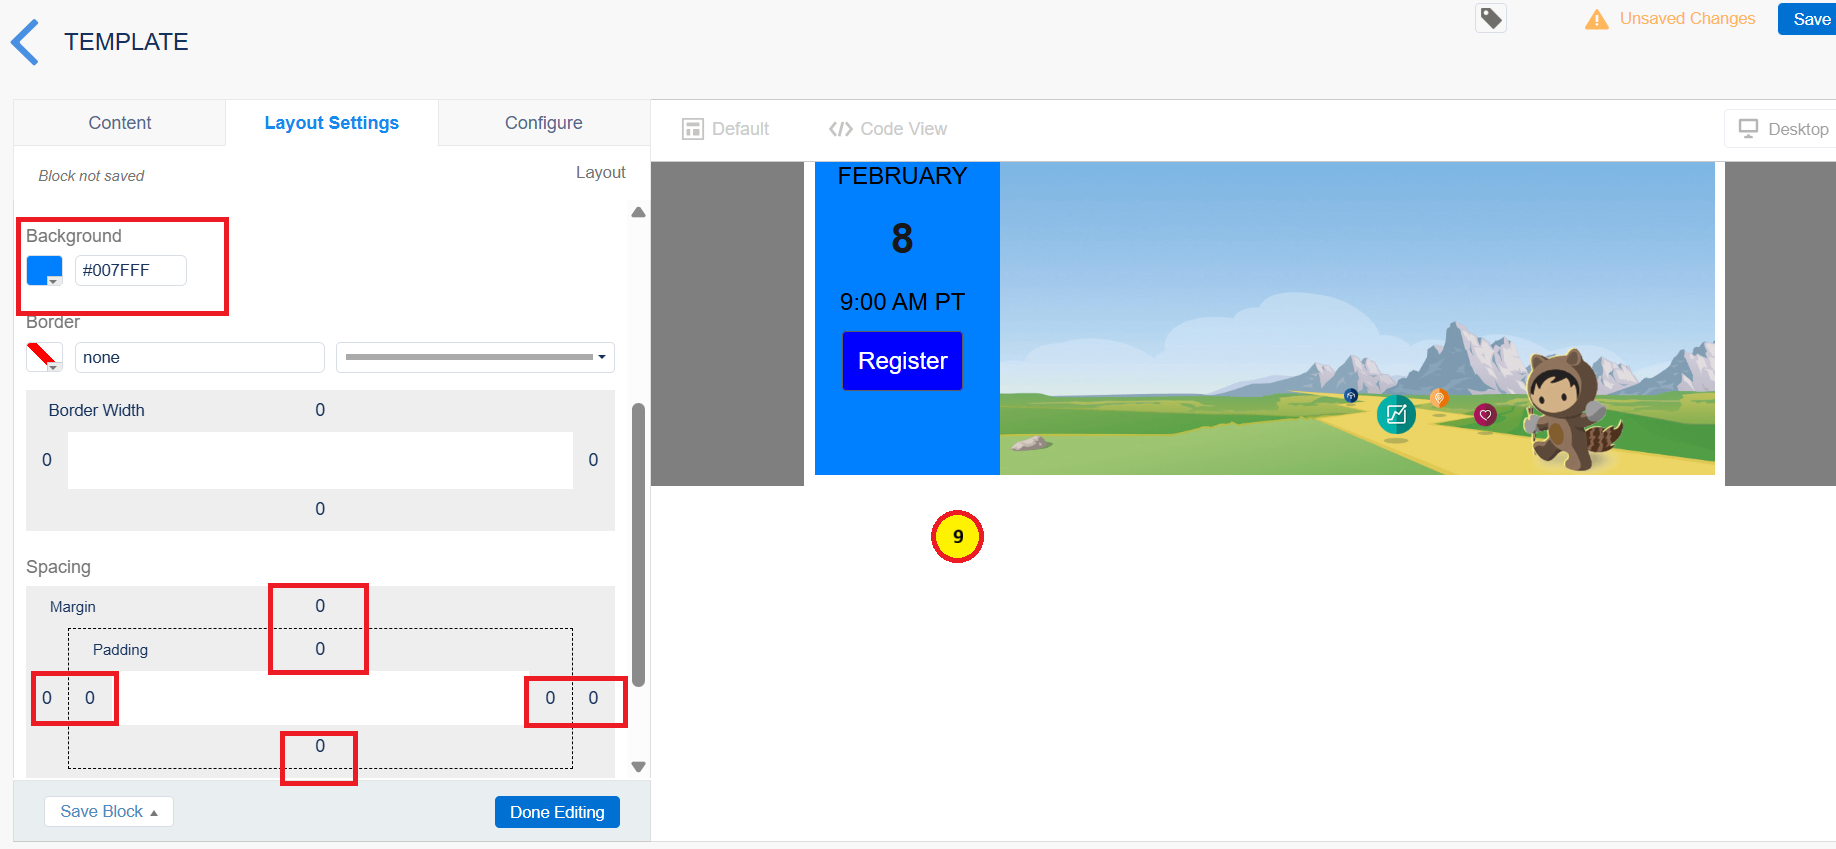
Add the background to both the columns in the layout styling section of the layout settings. And apply some zero padding for better representation (9).
Add some padding to the free form for month to appear little below. Change the font color to white (10).
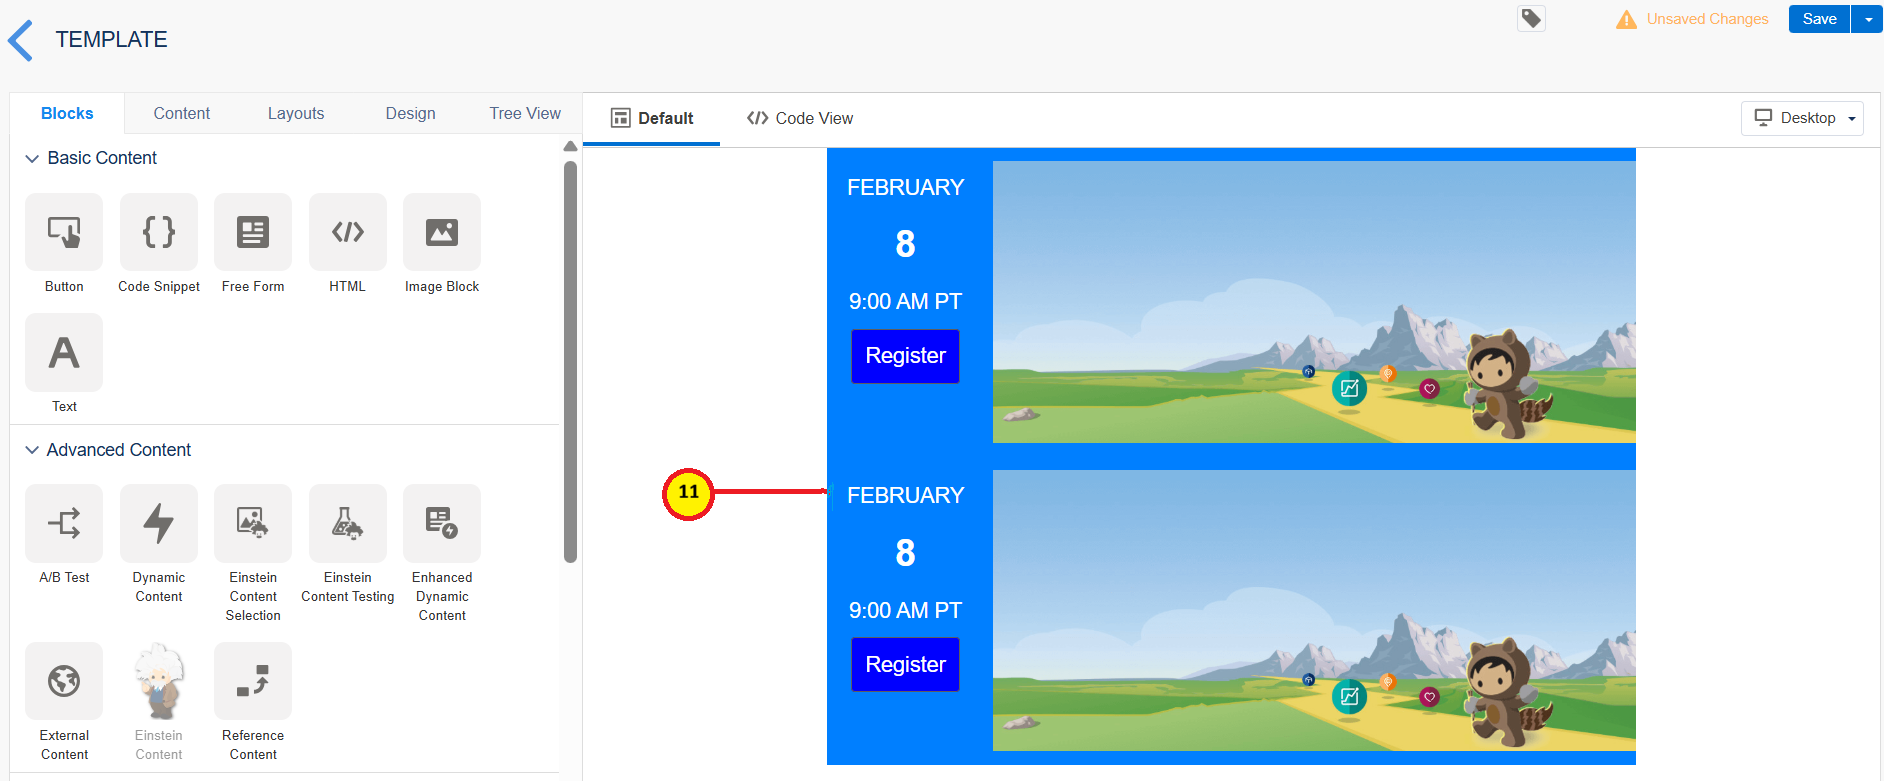
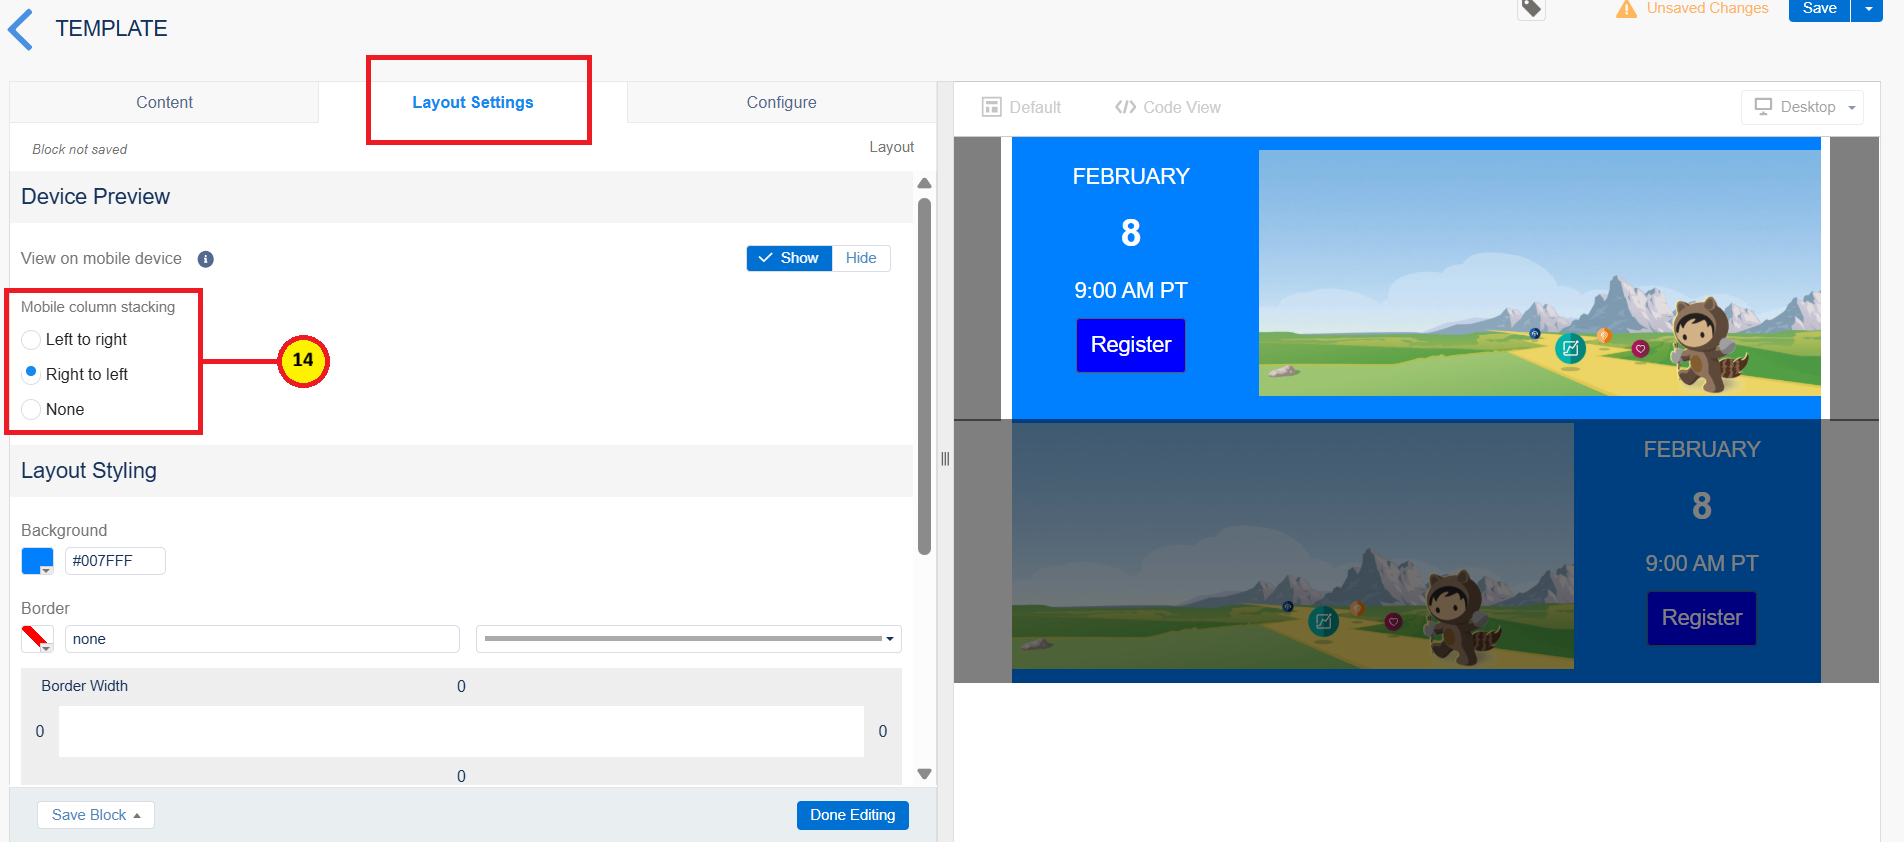
Since we are building a responsive design, create the duplicate for the one we have created to check the responsive alignments (11). Just drag and rearrange the images as shown below. For the image to be appear more appealing. Change the column’s vertical split to 30% and 70% for the first image and 70% and 30% for the second one (12). While we are minimizing the screen to mobile view, we could see the image first, then the date and time details (13). For that, I have configured the layout to appear from right to left for the first one (14).
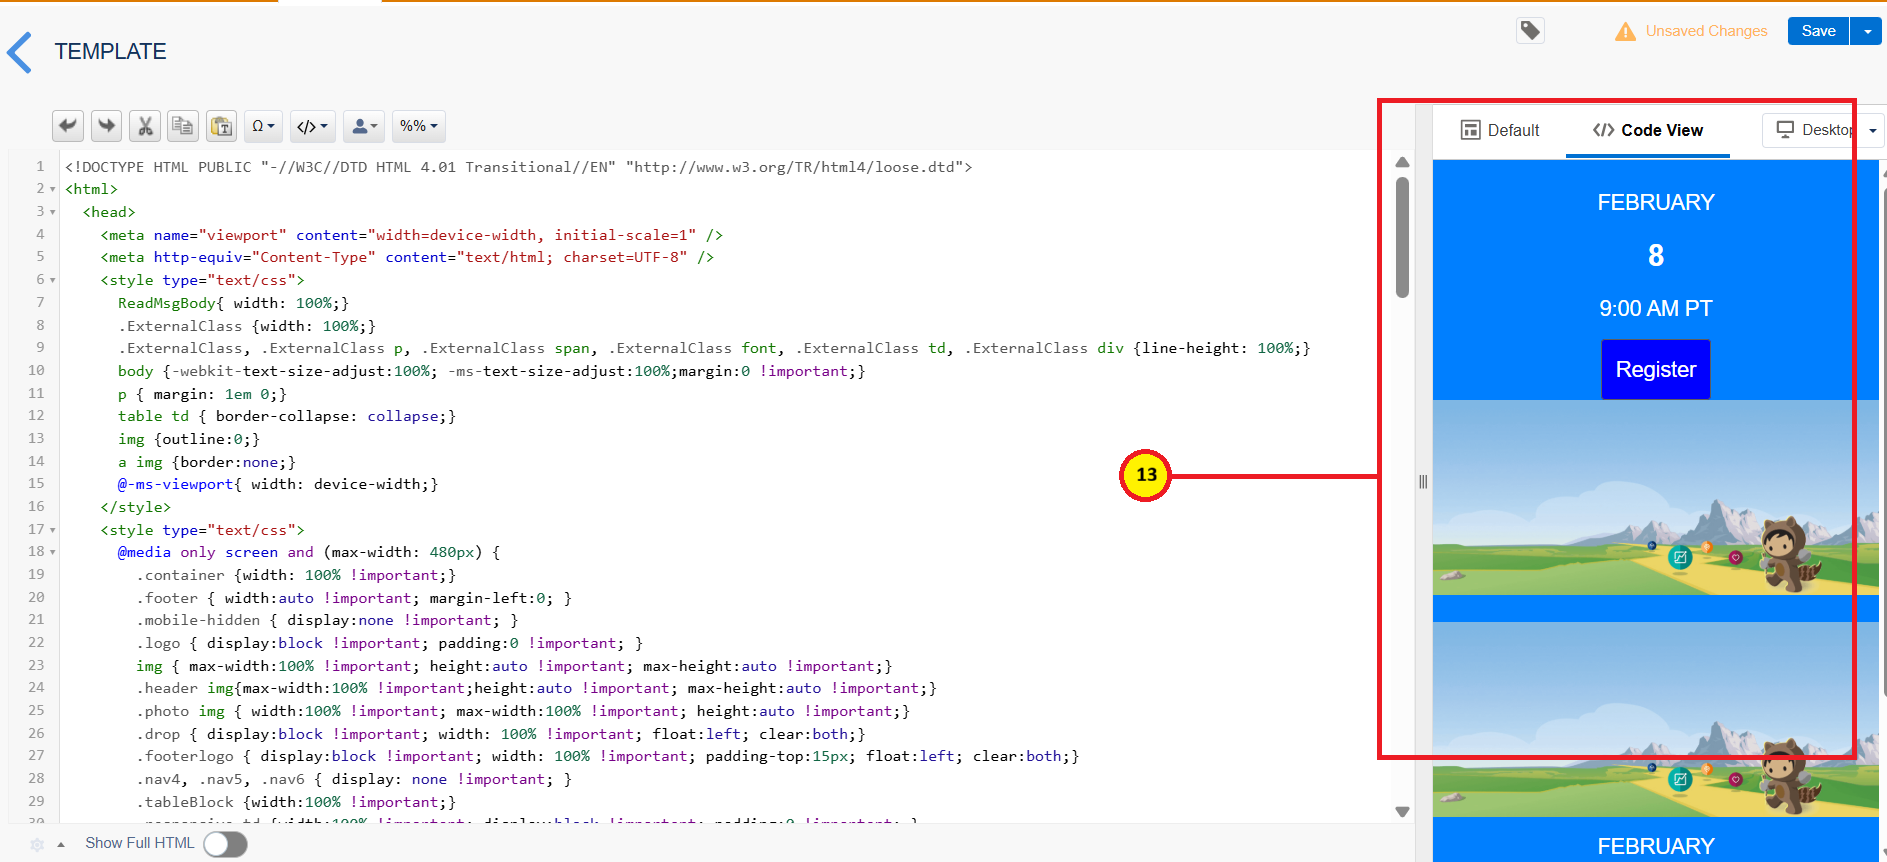
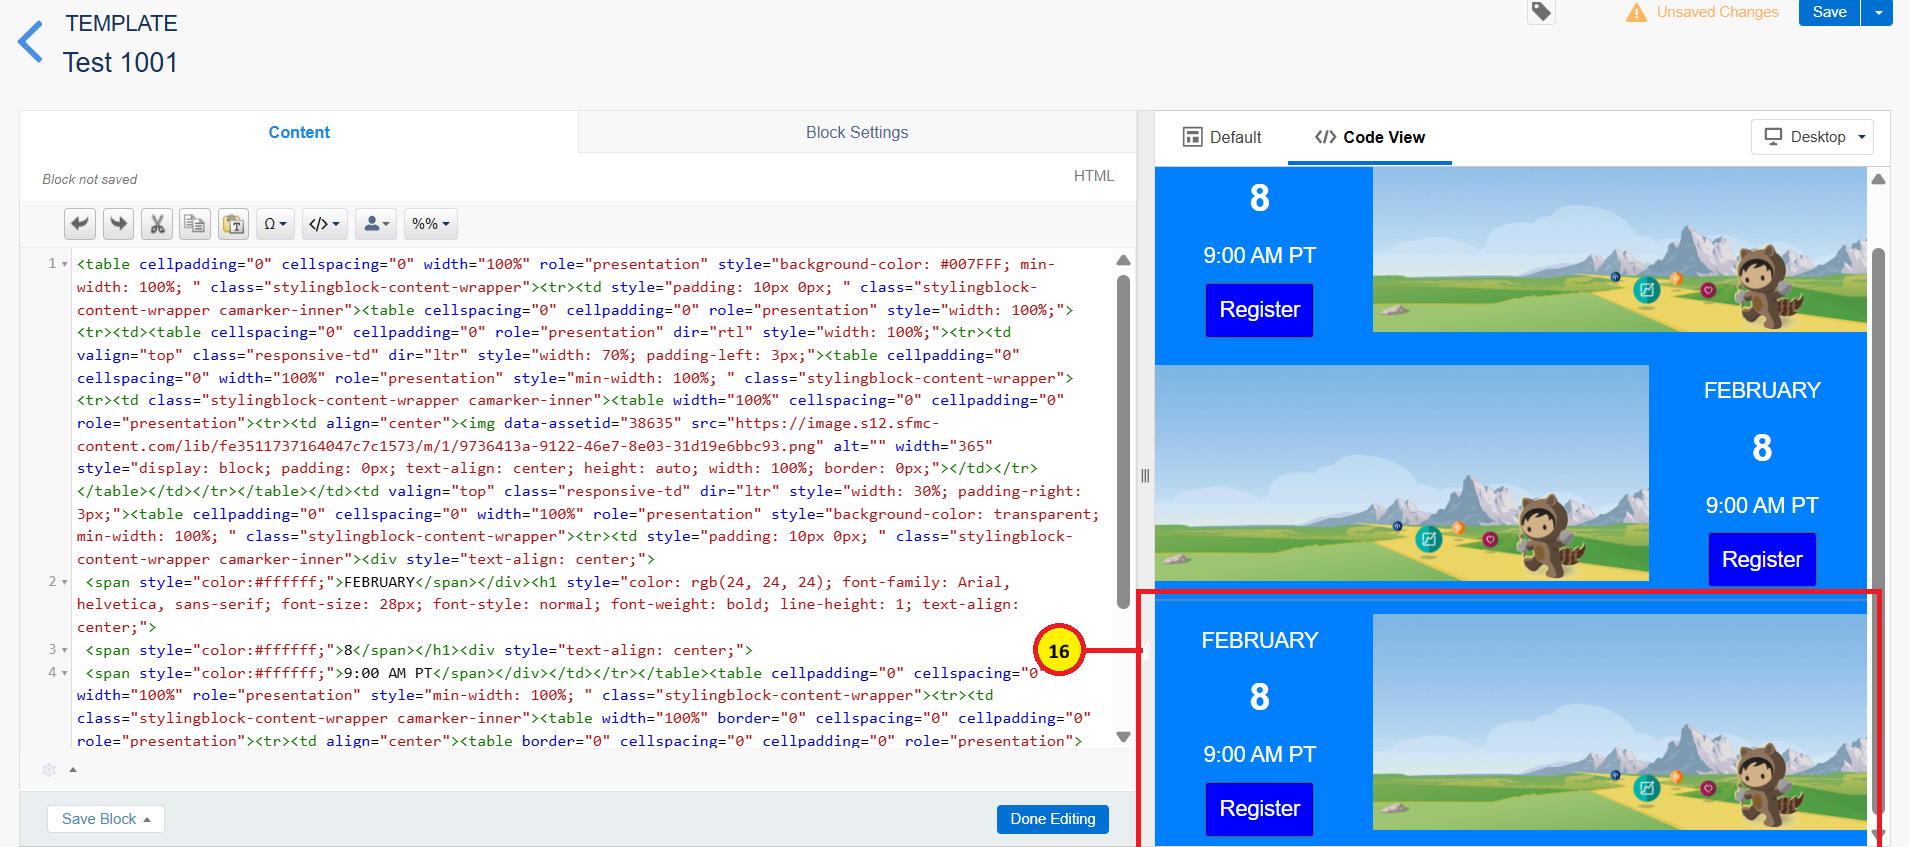
Just copy the code for the second one, from the code View. The yellow highlighted one is the code for the block created by dragging and dropping (15). Now, add the HTML block inside the template and paste the copied code. By copying the code you will get a same design as shown in image below (16).

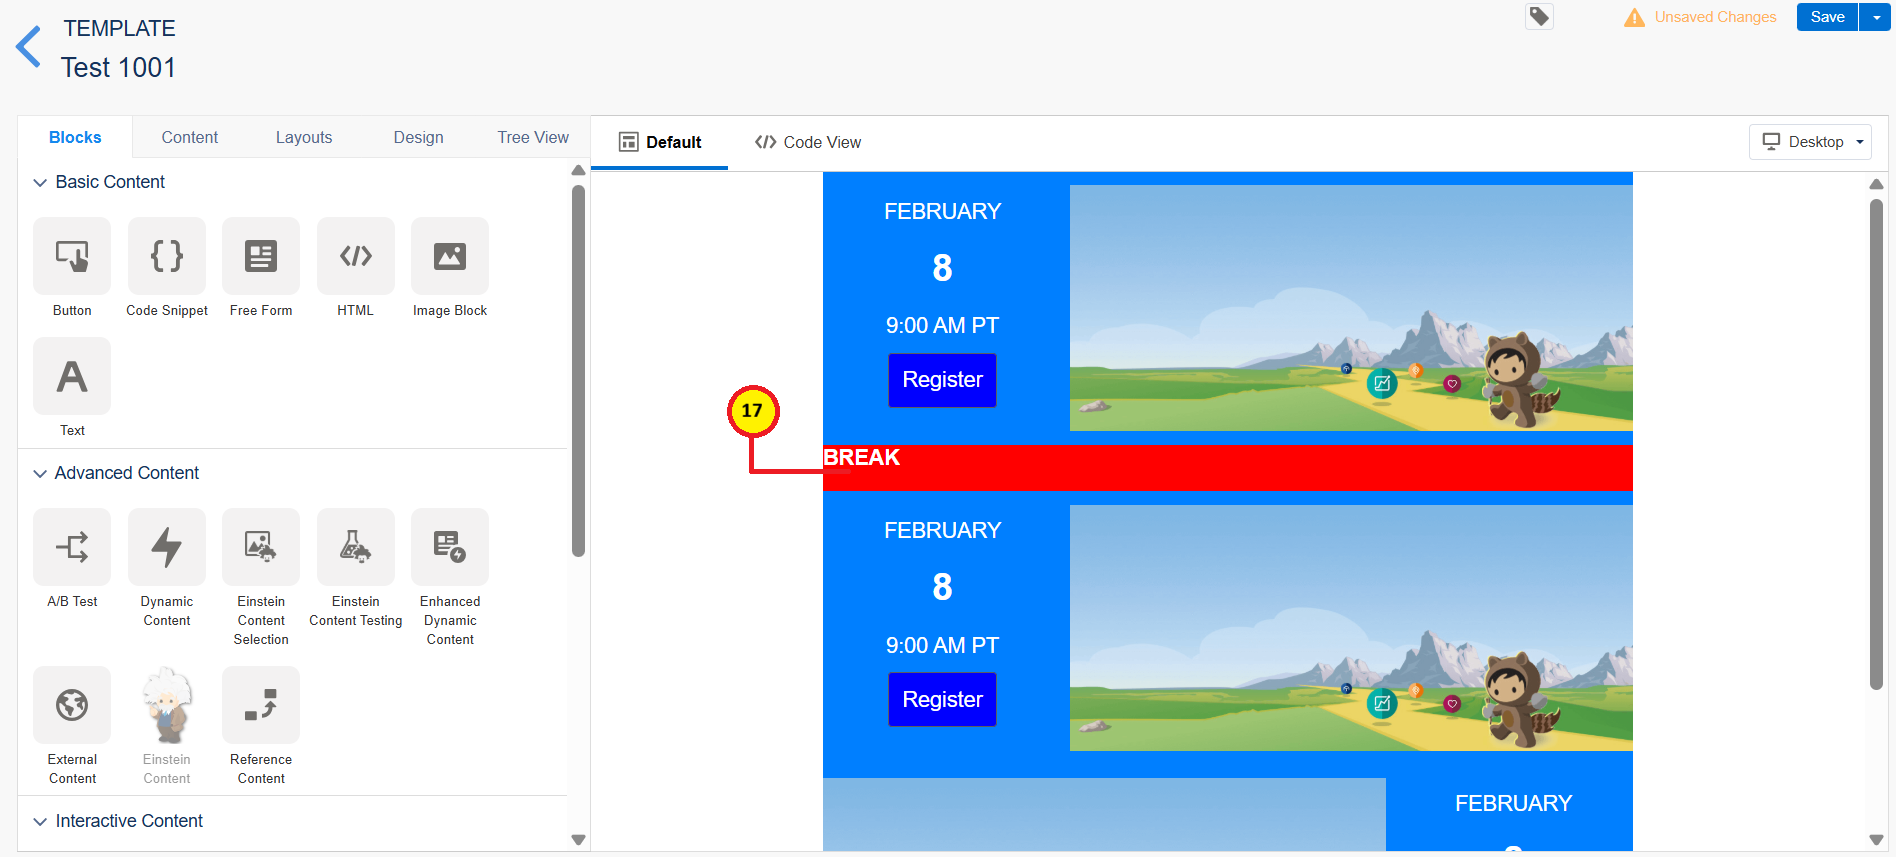
Now, we are almost done with step 2, we need to apply source formatting so that we can visualize clearly. I have moved the code block above and below that I have added the break by adding another text block for break (17).
Step 3: Apply conditions using AMPScript coding
If you are not aware of AMPScript, do not worry about it. Our upcoming blogs will help you understand AMPScript from scratch. Please paste the code as per the instructions and as per the demonstration video. Please find the entire code here.
%%[
SET @rows = LookupOrderedRows('EventData',4,'Date ASC','Region',region)

FOR @i=1 TO RowCount(@rows) DO

IF Field(Row(@rows,@i),'Date') < Now() THEN

SET @lr = IIF(Mod(@i,2),"ltr","rtl")
]%%


<table cellpadding="0" cellspacing="0" width="100%" role="presentation" style="background-color: #007FFF; min-width: 100%; " class="stylingblock-content-wrapper">
  <tr>
    <td style="padding: 10px; " class="stylingblock-content-wrapper camarker-inner">
      <table cellspacing="0" cellpadding="0" role="presentation" style="width: 100%;">
        <tr>
          <td>
            <table cellspacing="0" cellpadding="0" role="presentation" dir="%%=v(@lr)=%%" style="width: 100%;">
              <tr>
                <td valign="top" class="responsive-td" dir="ltr" style="width: 70%; padding-left: 3px;">
                  <table cellpadding="0" cellspacing="0" width="100%" role="presentation" style="min-width: 100%; " class="stylingblock-content-wrapper">
                    <tr>
                      <td class="stylingblock-content-wrapper camarker-inner">
                        <table width="100%" cellspacing="0" cellpadding="0" role="presentation">
                          <tr>
                            <td align="center">
                              <img src="%%=Field(Row(@rows,@i), 'Banner')=%%" alt="" width="1000" style="display: block; padding: 0px; text-align: center; height: auto; width: 100%; border: 0px;">
                            </td>
                          </tr>
                        </table>
                      </td>
                    </tr>
                  </table>
                </td>
                <td valign="top" class="responsive-td" dir="ltr" style="width: 30%; padding-right: 3px;">
                  <table cellpadding="0" cellspacing="0" width="100%" role="presentation" style="background-color: transparent; min-width: 100%; " class="stylingblock-content-wrapper">
                    <tr>
                      <td style="padding: 10px; " class="stylingblock-content-wrapper camarker-inner">
                        <div style="text-align: center;">
                          <span style="color:#ffffff;">%%=FormatDate(Field(Row(@rows,@i),'Date'),'MMMM','','')=%%</span>
                        </div>
                        <h1 style="color: rgb(24, 24, 24); font-family: Arial, helvetica, sans-serif; font-size: 28px; font-style: normal; font-weight: bold; line-height: 1; text-align: center;">
                          <span style="color:#ffffff;">%%=FormatDate(Field(Row(@rows,@i),'Date'),'d ','','')=%%</span>
                        </h1>
                        <div style="text-align: center;">
                          <span style="color:#ffffff;">%%=FormatDate(Field(Row(@rows,@i),'Date'),'','h:mm tt','')=%%</span>
                        </div>
                      </td>
                    </tr>
                  </table>
                  <table cellpadding="0" cellspacing="0" width="100%" role="presentation" style="min-width: 100%; " class="stylingblock-content-wrapper">
                    <tr>
                      <td class="stylingblock-content-wrapper camarker-inner">
                        <table width="100%" border="0" cellspacing="0" cellpadding="0" role="presentation">
                          <tr>
                            <td align="center">
                              <table border="0" cellspacing="0" cellpadding="0" role="presentation">
                                <tr>
                                  <td class="innertd buttonblock" bgcolor="#0000FF" style=" border-radius: 3px; -moz-border-radius: 3px; -webkit-border-radius: 3px; background-color: #0000FF;">
                                    <a target="_blank" class="buttonstyles" style=" font-size: 16px; font-family: Arial, helvetica, sans-serif; color: #FFFFFF; text-align: center; text-decoration: none; display: block; background-color: #0000FF; border: 1px solid #5D5D5D; padding: 10px; border-radius: 3px; -moz-border-radius: 3px; -webkit-border-radius: 3px;" href="%%=Field(Row(@rows,@i), 'EventLink')=%%" title="" alias="" conversion="false" data-linkto="http://">REGISTER</a>
                                  </td>
                                </tr>
                              </table>
                            </td>
                          </tr>
                        </table>
                      </td>
                    </tr>
                  </table>
                </td>
              </tr>
            </table>
          </td>
        </tr>
      </table>
    </td>
  </tr>
</table>
%%[ENDIF
NEXT @i
]%%
Explanation
I have applied the AMPScript coding for the copied to function same as expected that is displaying events based on the region in ordered manner and it should be maximum of four values (Only display four events).
I have set the variable @rows and stored the values from the data extension to store the ordered four events using ordered lookup row function.
Then, applied the loop to iterate from 1 to row count of the data extension that we have applied.
Inside that, I have set the direction to display using inline if condition. Also, I need a values for the upcoming event not for the past events. I have met those criteria by using date function that should be greater than today.
I have changed the banner image and description and registration links by assigning the respective field values extracting the value from the fields.
Advantages
Personalized content will increase the click through rates, open rates and improves the client engagement.
It will reduces a time for creating a specific content for specific audience.
It will improve the customer experience.
Conclusion
I hope this blog will helps you understand, what dynamic content is and how to build the dynamic content using basic AMPScript. Let we explore more on AMPScript in our upcoming blogs. Follow us for more content related to Salesforce Marketing Cloud.