

Salesforce OmniStudio Data Raptors - Load and Transform
Learn how DataRaptors help simplify data tasks in Salesforce OmniStudio using low-code tools. The overview highlights how they handle load and transform.
By Nishanth Sargunam
Senior Salesforce Developer
Data Raptors - Load and Transform
Introduction
A Load and Transform Data Mapper is a crucial component in data integration processes, helping to efficiently move and modify data between different systems. Data mapping is the process of defining relationships between source and target data structures. Data is extracted from various sources, transformed into the required format and then loaded into a target system. It reduces the manual intervention and speeds up the workflows.
Load
Load refers to the process of storing or transferring data into a target system after extraction and transformation. Ensuring that data is properly structured and accessible for analysis or operational use.
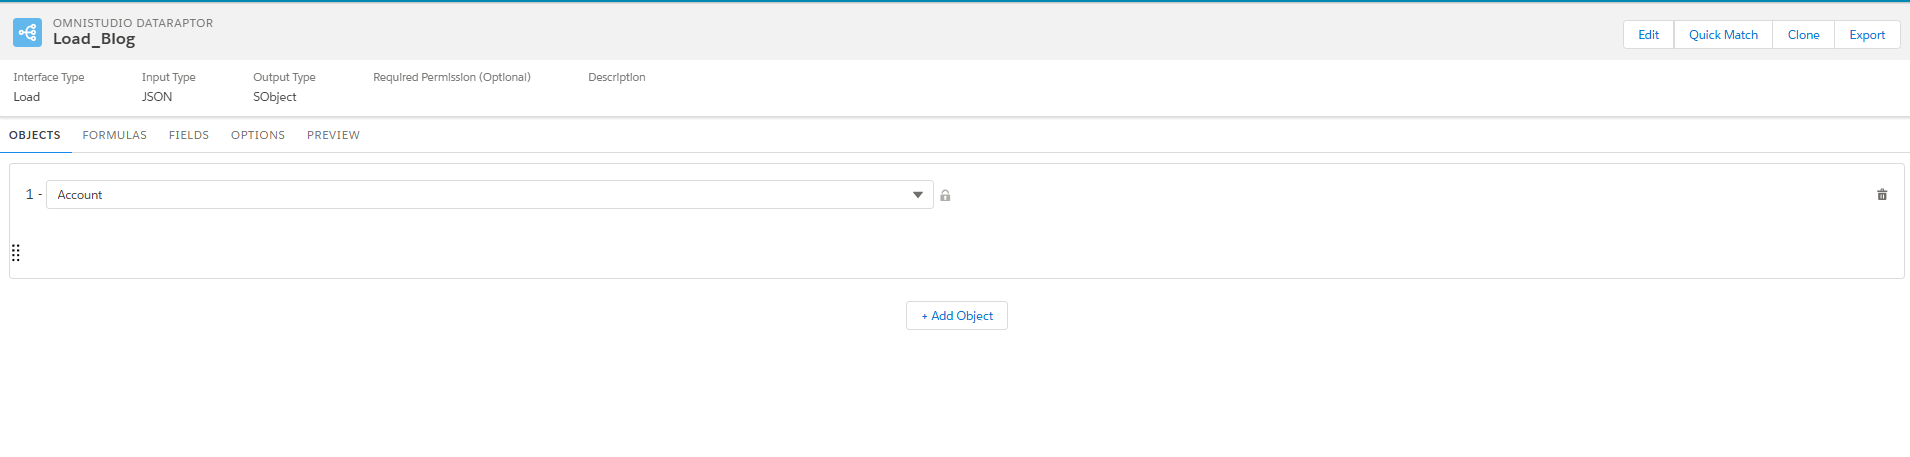
Loading Single object data
The input parameter for loading the data will be JSON format. The below example is to load the data into single object which is account.
OBJECTS Tab
Then tab which is to configure the object name to load the data into database.
FORMULAS Tab
On the Formula tab, we can configure the formula that needs to be calculated in the runtime.
- Formula: The place we can write the formula to get the desired value. I have attached the Salesforce Function reference documentation.
- Formula Result Path: The results from the formula will be stored in the variable
- Extraction Step JSON: The Schema of the JSON We configured.
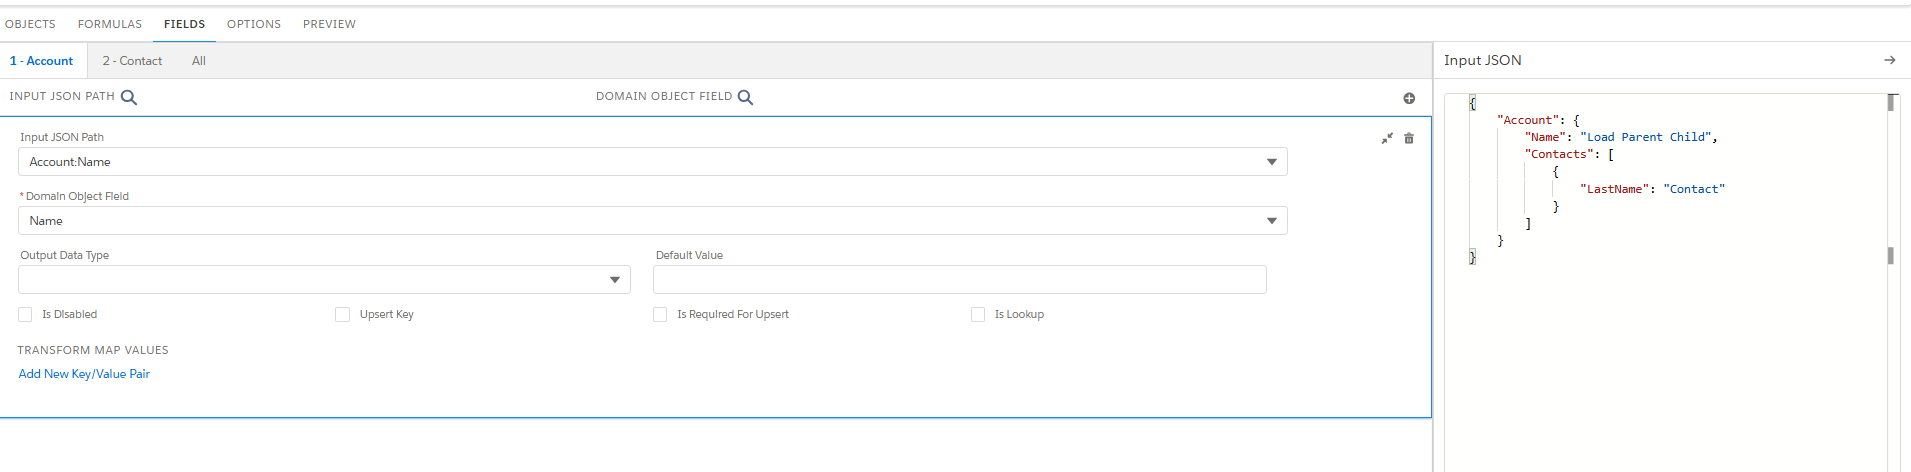
FIELDS Tab
In this tab, we need to map the JSON input path attribute to the fields available in the salesforce environment,
 {
  Name : 'Load DR'
 }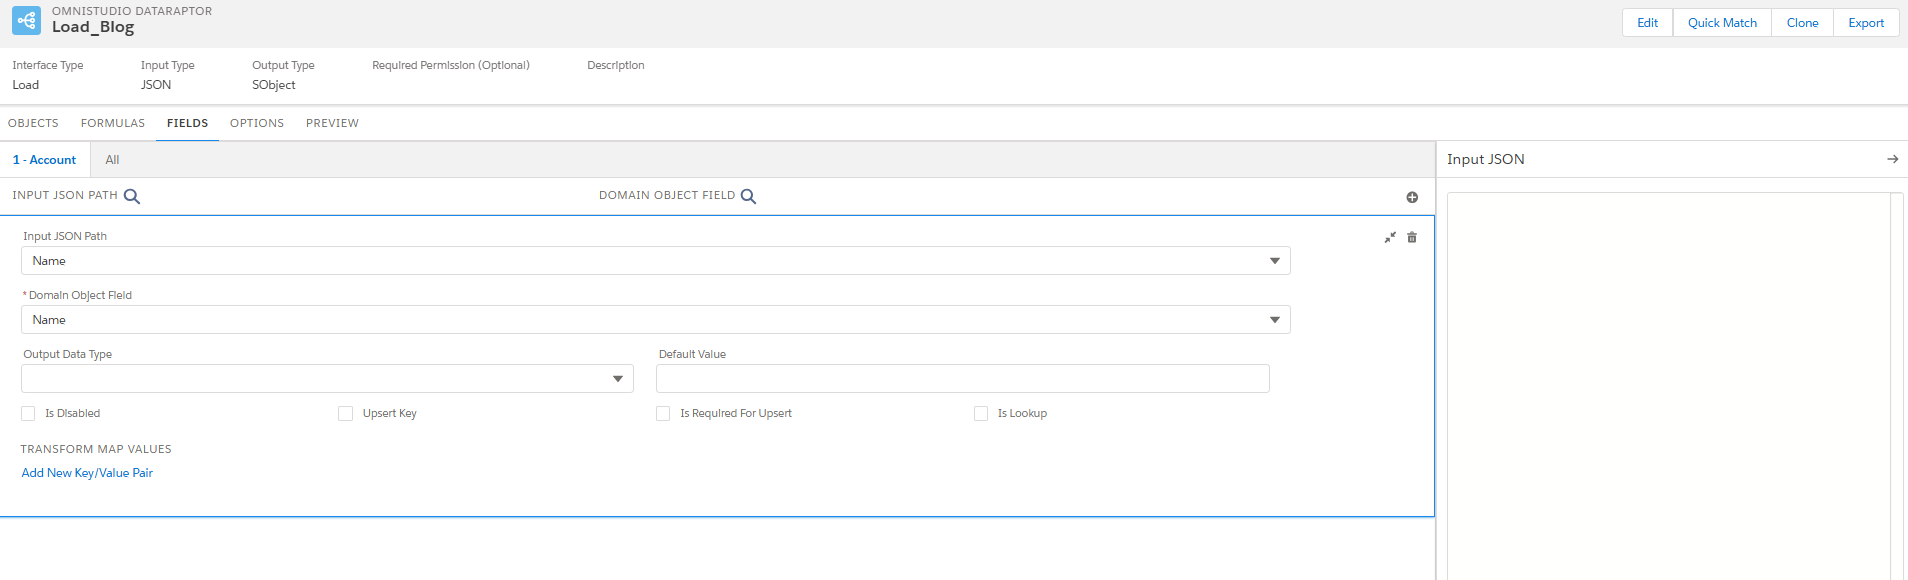
- Input JSON Path: Specify the key of the JSON node containing the data you want to write to the Salesforce object. JSON: Name is the field in JSON input path.
- Domain Object Field: Specify the field on the Salesforce object that you want to update.
- Upsert Key: If the checkbox is selected, the system checks for the presence of 18-digit salesforce Id in the input JSON. If present, it will update the data. Otherwise, insert the data in the database.
- Is Required For Upsert: This is the update call and if it is checked, system will expect the 18-digit id as the mandatory.
- Transform Map Values: This will transform any of the field value present in the JSON path.
OPTIONS Tab
On the Options tab, we can set advanced options such as whether to check the user's access permissions for the fields.
- Time to Live in Minutes setting determines how long the data remains in the cache.
- Check Field Level Security such as whether to check the user's access permissions for the fields before executing the Omnistudio Data Mapper.
- Salesforce Platform Cache Type to Session Cache for data related to users and their login sessions, or Org Cache for all other types of data.
PREVIEW Tab
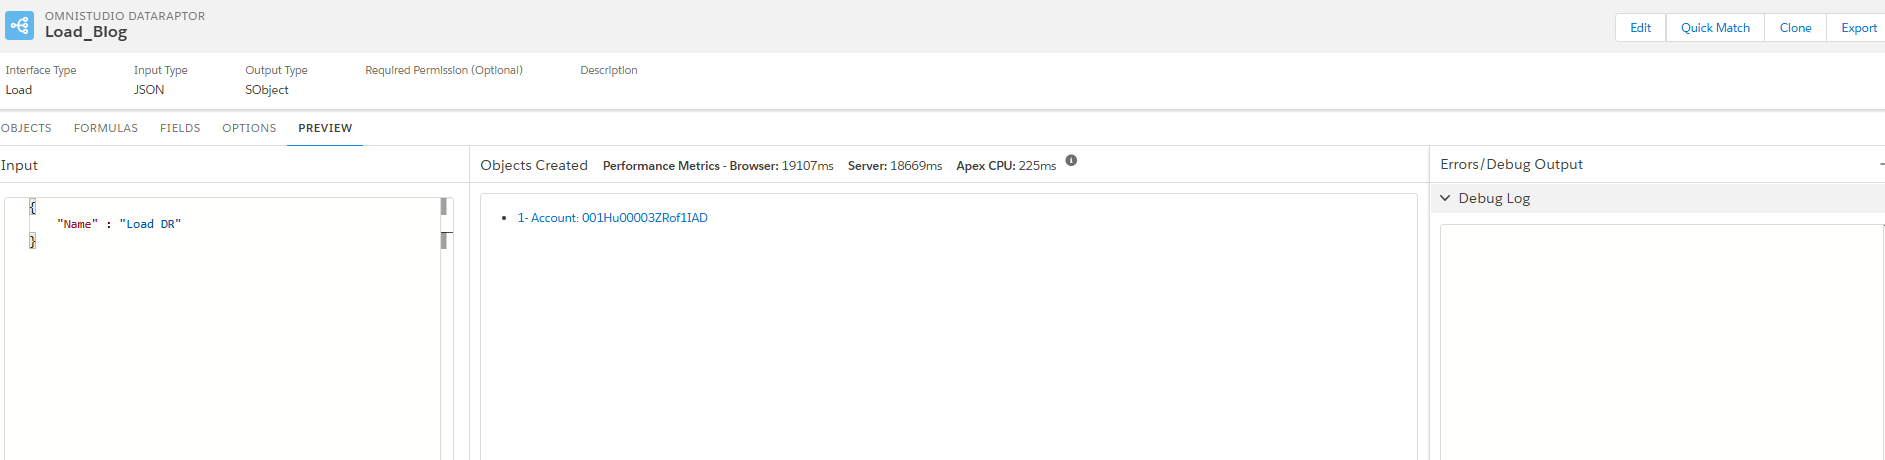
- Input: The section where we can provide the JSON input.
- Object Created with performance metrics: Created Id will be displayed.
- Error/Debug Output: This section will show if any error occurred during the transaction.
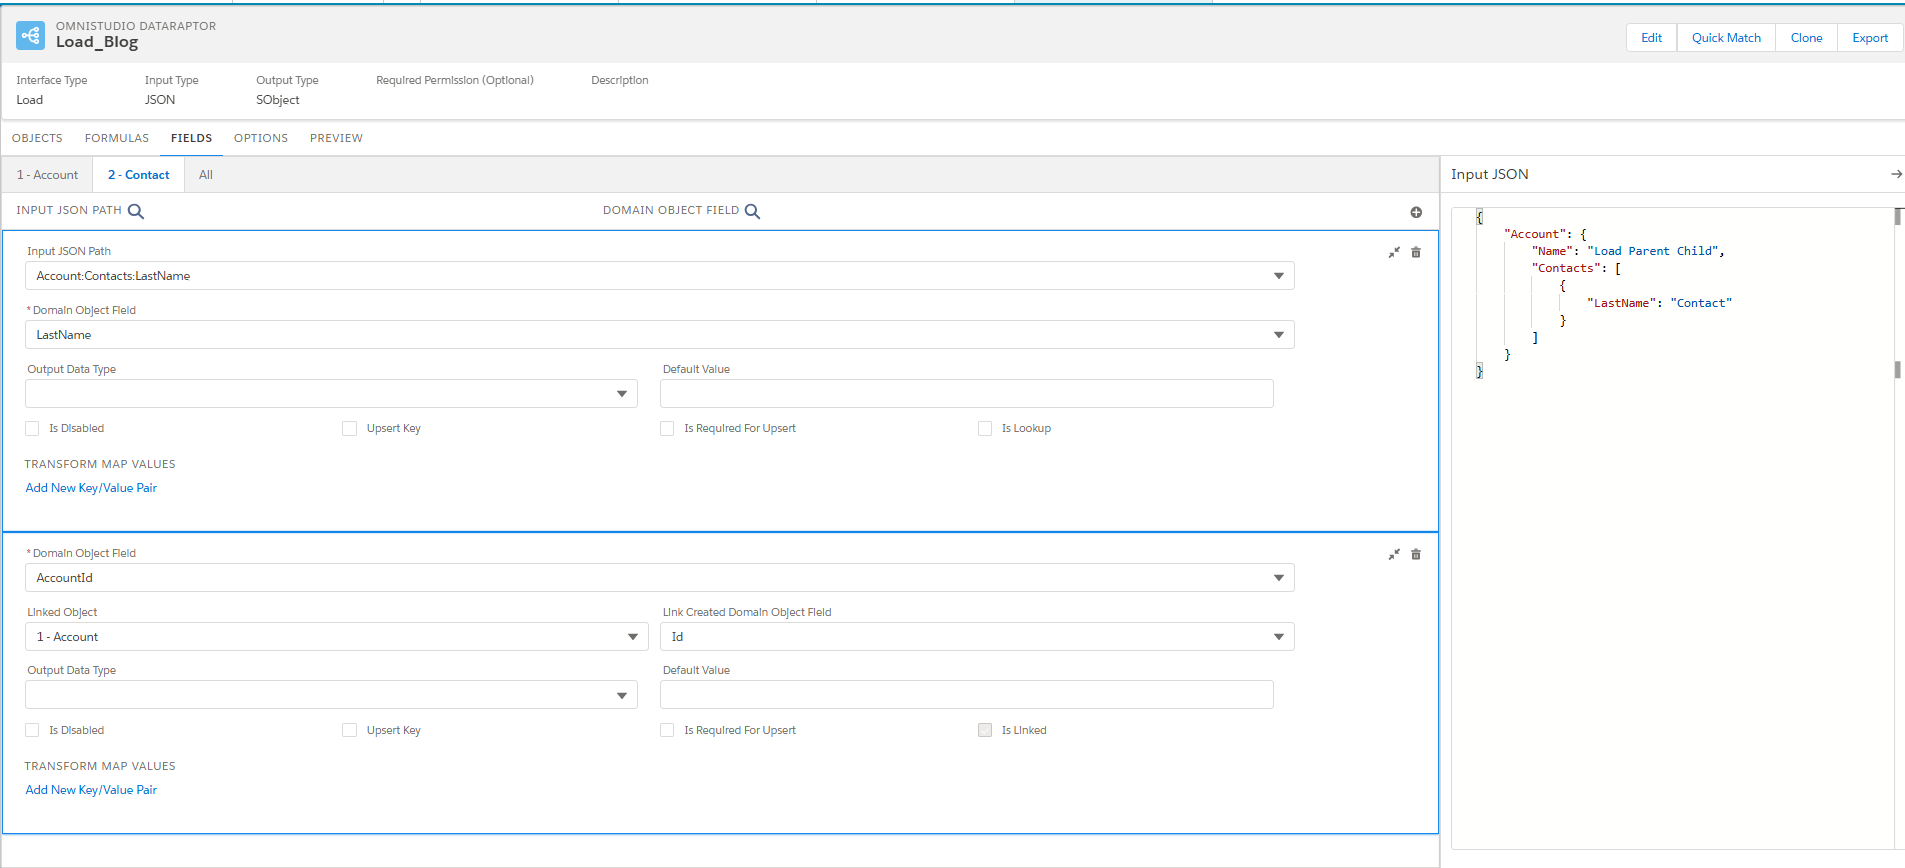
The below example is to load the data into parent account and the child contact data.
OBJECTS Tab
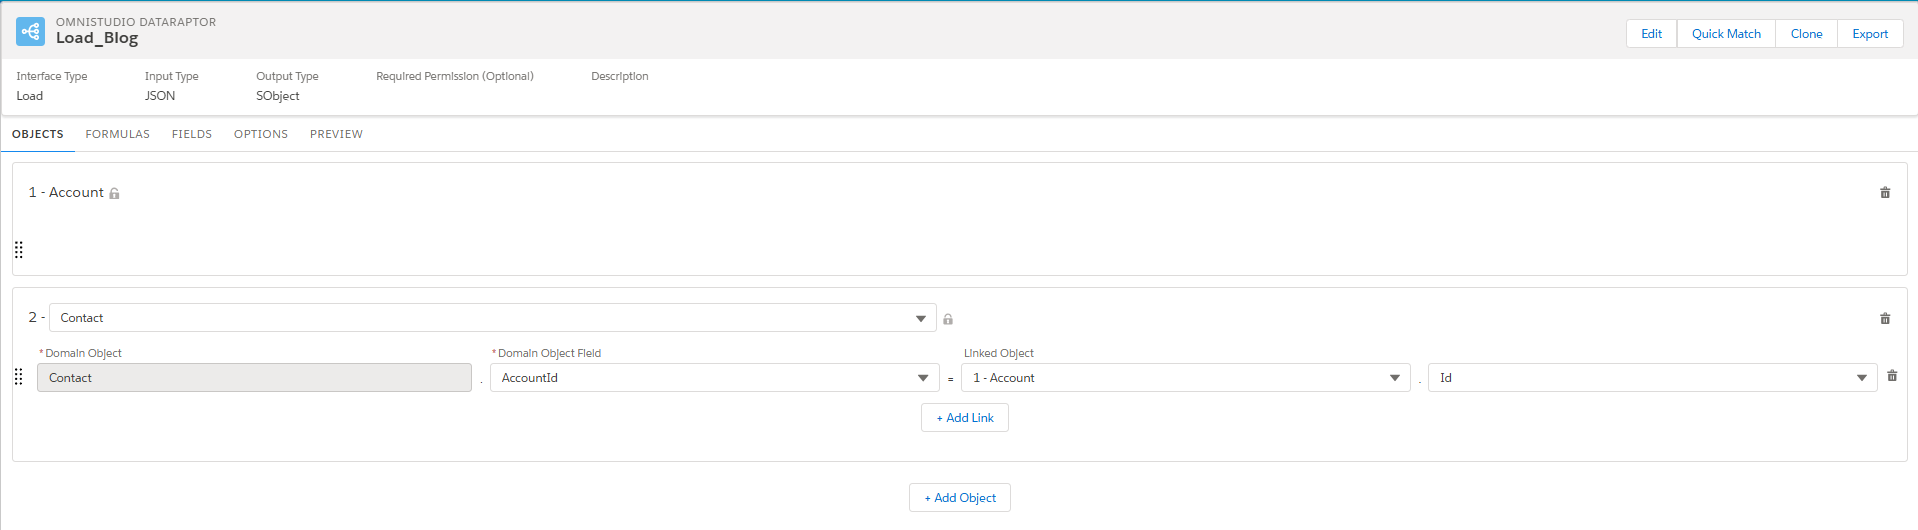
1 - Account: Parent object which is Account configured for loading the data.
2- Contact: Child object which need to be configured.
- Domain Object: Object name to place the data.
- Domain Object Field: AccountID is the field in the contact which is Lookup to Account.
- Linked Object: Need to place the account object which is created in the 1 - Account with the Id to make the relationship.
FIELDS Tab
The JSON prepared is mentioned below. The fields tab is the place that we can configure the JSON path node value into fields in the salesforce object.
{
  "Account": {
    "Name": "Load Parent Child",
    "Contacts": [
      {
        "LastName": "Contact"
      }
    ]
  }
}
For the provided JSON, Account:Name node will be mapped to name field of the Account, Account:Contacts:LastName node will be mapped to Last name field of the contact object. The relationship field that is AccountId in contact will be mapped in the initial level object config and that will be appeared in Fields tab.
All tabs will show the summary of field configuration, which is done in the separate object tab.
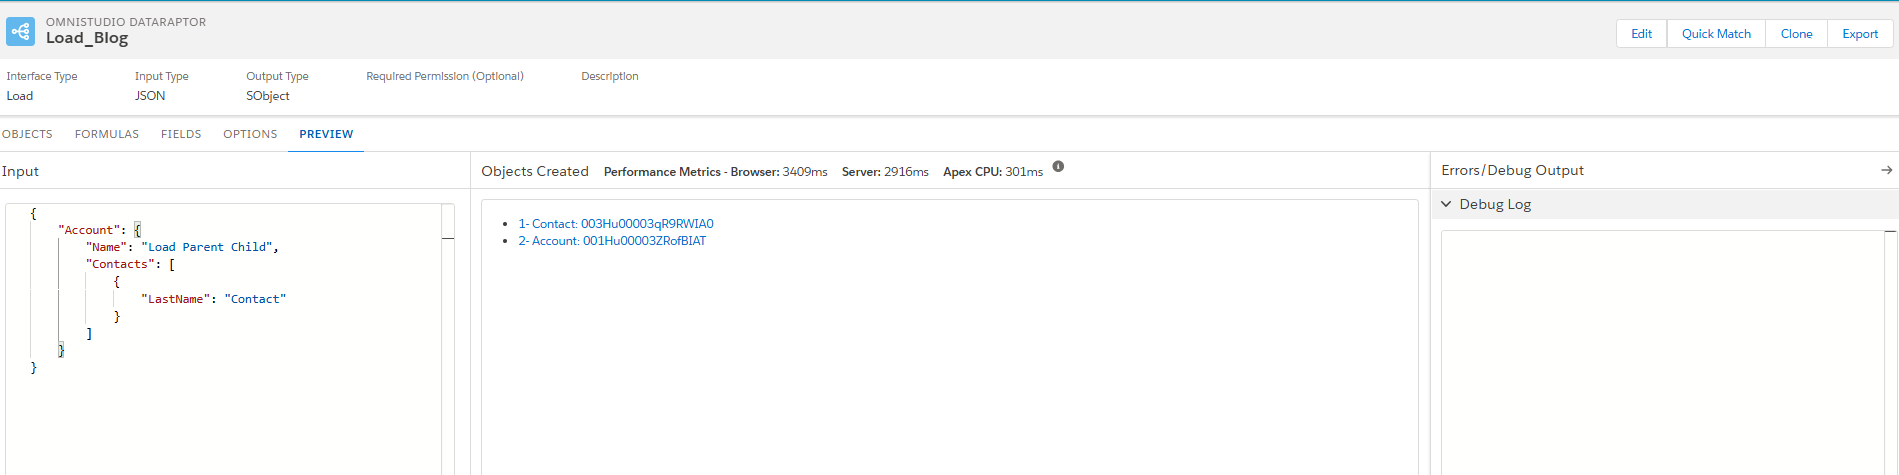
PREVIEW Tab
The provided input JSON is loaded into salesforce with the expected relationship and the details of the created record will be displayed. If there is any error in the runtime, it will be notified.
Transform
DataRaptor Transforms enable users to modify data at an intermediate stage without interacting with Salesforce directly. These transformations support formulas and facilitate conversions between JSON and XML formats. Users can reorganize input data, rename fields, replace values, and transform data into formats such as PDF, DocuSign, or Document Template
{
   "Account":[
      {
         "Name":"Test One",
         "Rating":"Hot",
         "Email":"testone@gmail.com",
         "IsValid":"Valid"
      },
      {
         "Name":"Test two",
         "Rating":"Cold",
         "Email":"testtwo@gmail.com",
         "IsValid":"In Valid"
      }
   ]
}
FORMULA Tab
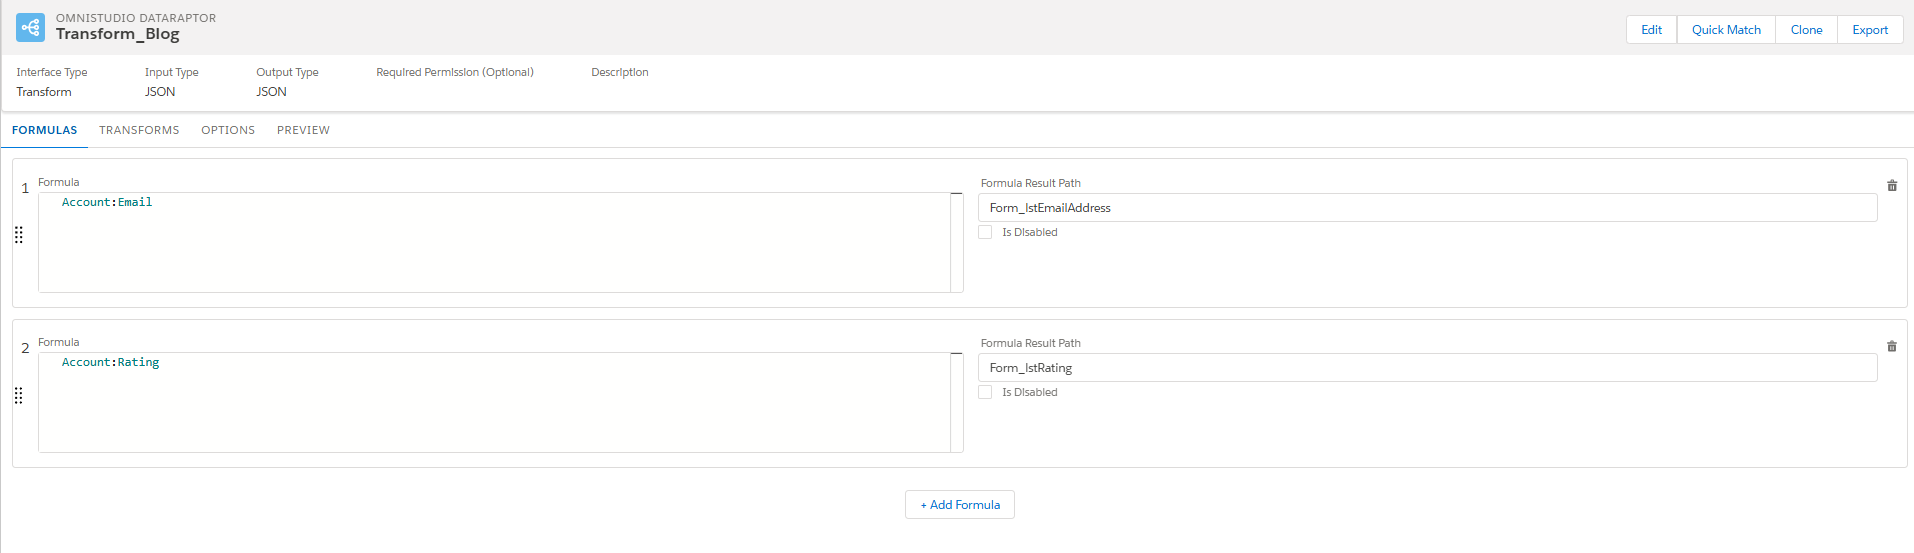
This tab enables us to include data in the output of our DataRaptor. Enables calculations, conditional logic, and dynamic value transformations. Navigate to the Formulas tab in your DataRaptor and select Add Formula to create a new one.
- Account:Email node will be appended to the Form_lstEmailAddress result path.
- Account:Rating node will be appended to the Form_lstRating.
The result path from the formula is used somewhere in the transform or in the real time.
TRANSFORM Tab
The DataRaptor Transform module is where users define and configure the expected input format and the desired output transformations. Allows users to modify and reorganize data fields to meet business needs. Helps in updating field names and replacing values to ensure consistency in processed data.
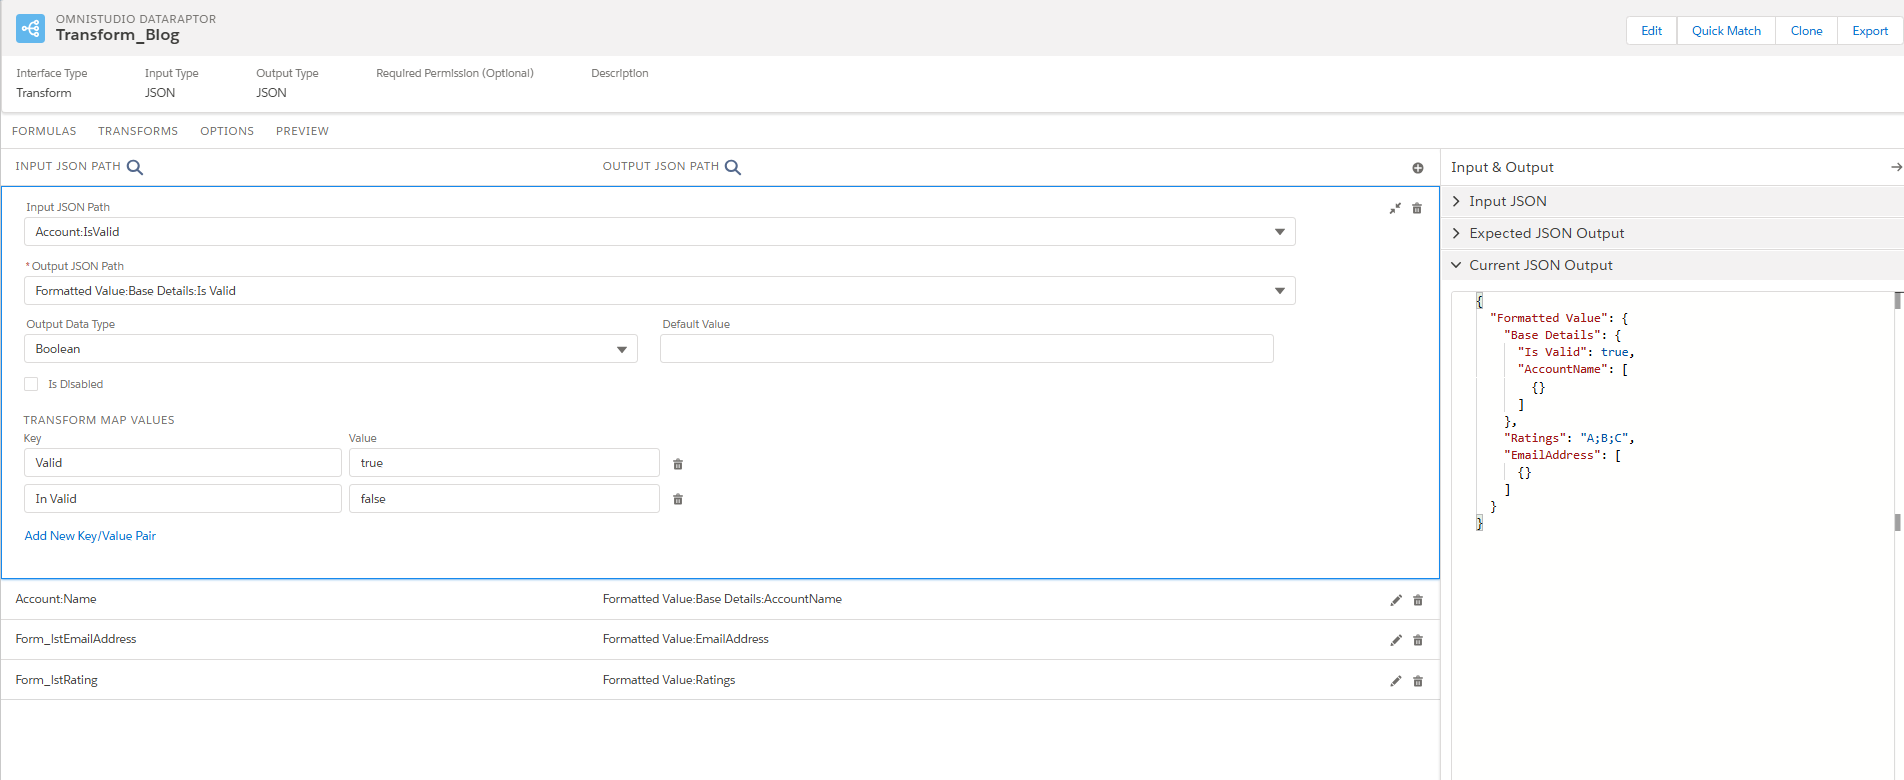
- Input JSON Path: Specify the node of the data in the input format by using colons (:) to indicate different levels within the data structure.
- Output JSON path: Specify the desired location for the data in the output format.
- Output Data Type: Specify the data type that you want to convert the desired node.
- Transform Map Values: It is helpful to change the runtime values in the expected value by configuring the Key/Values.
- Account:IsValid is the input node, and it is transformed to place in Formatted Value:Base Details:Is Valid. The expected data type for the node is configured as the Boolean, so am using the Transform Map Values to change the value as Boolean type.
- Output from the formula is embedded in the output JSON.
- Current JSON Output section shows the transformed output structure.
PREVIEW Tab
The Preview Tab in DataRaptor Transform allows users to test and validate their data mappings before deploying them. It provides a real-time view of how input data is transformed into the expected output format and also Users can paste sample input data to see how transformations are applied.
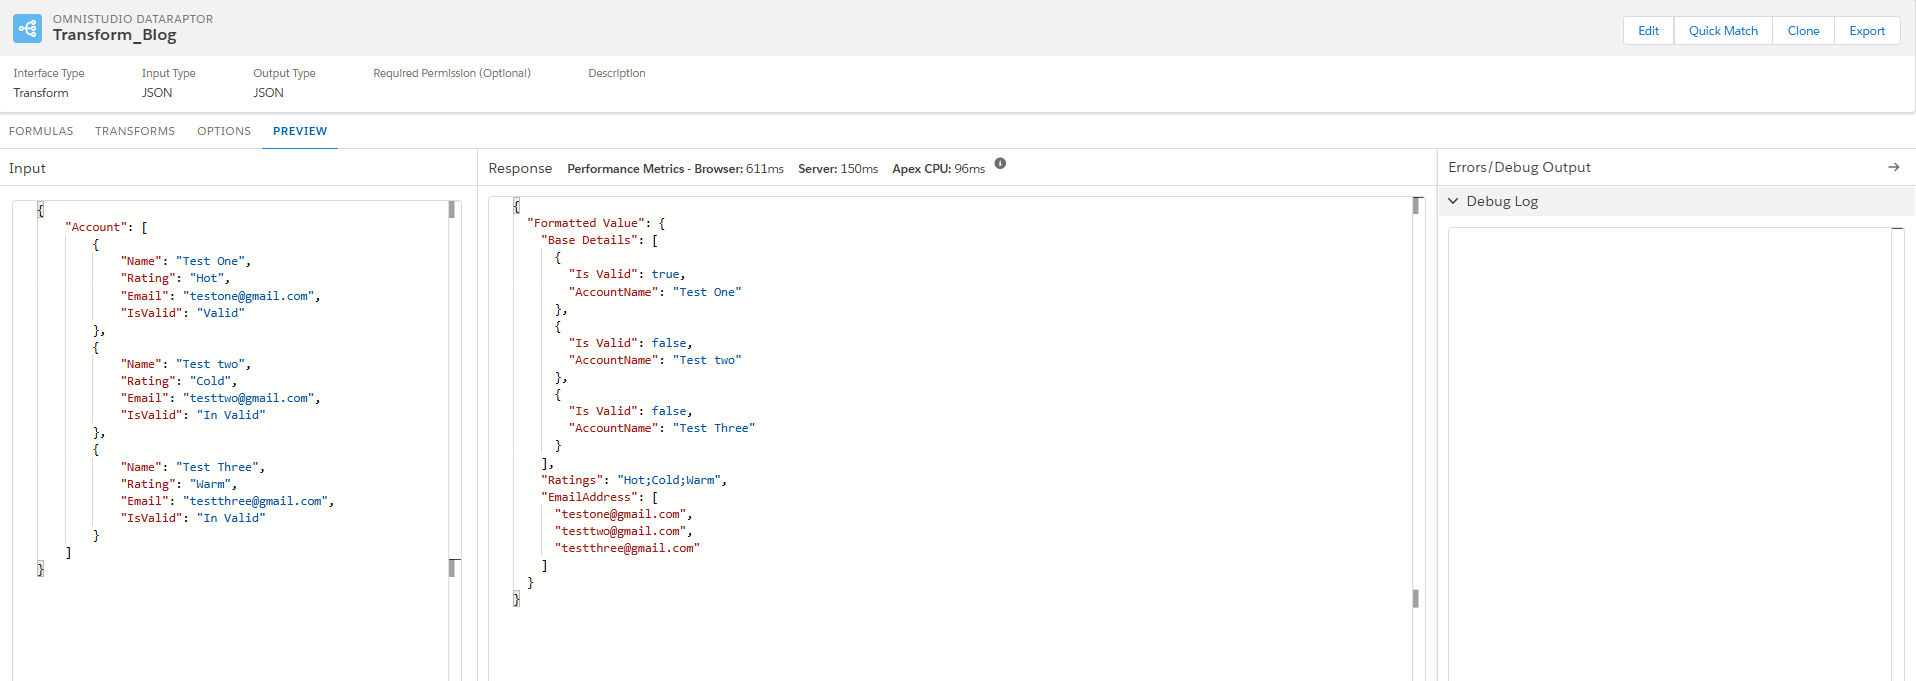
- Account node input JSON values are transformed to Formatted Value JSON.
- Email from the Account JSON are combined into the single list as Form_lstEmailAddress using the formula.
- Rating values are converted to Multi Select type in transform config by wrapping into the single list Form_lstRating using the formula.
- Name and Is valid node is appended to Base details node with Transform Map Values:
- It helps to identify mapping issues, missing fields, or incorrect transformations.
- Ensures that the output structure aligns with the required format (JSON, XML, etc.).
Limitations
- Performance Constraints: Turbo Extracts are optimized for speed but lack support for formulas and complex field mappings.
- Limited Customization: While DataRaptor can handle JSON and XML inputs, it has restrictions on custom data formats.
- No Code Dependency: It is a declarative tool, meaning it lacks the flexibility of Apex for complex logic.
- Formula Restrictions: Some custom field names with special characters may not be referenced in formulas.
- Error Handling: Incorrect query formulas may return null responses without displaying error logs.