

Salesforce OmniStudio Omniscripts
Creating Guided User Experiences with OmniStudio OmniScript in Salesforce
By Pradeepa Singaravelan
Associate Salesforce Developer
OmniStudio OmniScript
Introduction
An Omniscript is an omnichannel customer engagement and a business tool built on the Salesforce platform. Omniscripts allow you to craft dynamic customer interactions without code and deploy to multiple channels and devices. You can define a script once and then deploy the script within a Salesforce application or on a web page. Omniscript, users can easily make forms with the information they need to show in the UI. They can do this by dragging and dropping fields, images, and buttons on the screen.
OmniScripts Designer
The OmniScripts Designer is a visual, drag-and-drop tool in Salesforce OmniStudio that allows users to build guided interactions - called OmniScripts - without writing code. It provides a canvas where admins and developers can add and configure elements like inputs, decision branches, data operations, and UI steps. With OmniScripts Designer you can,
- Create forms and guided processes for users and agents.
- Configure logic flows using conditions, branching, and loops.
- Connect to data using DataRaptors and integration procedures.
- Preview and test scripts in real time.
- Reorder and manage steps easily with a clean visual layout.
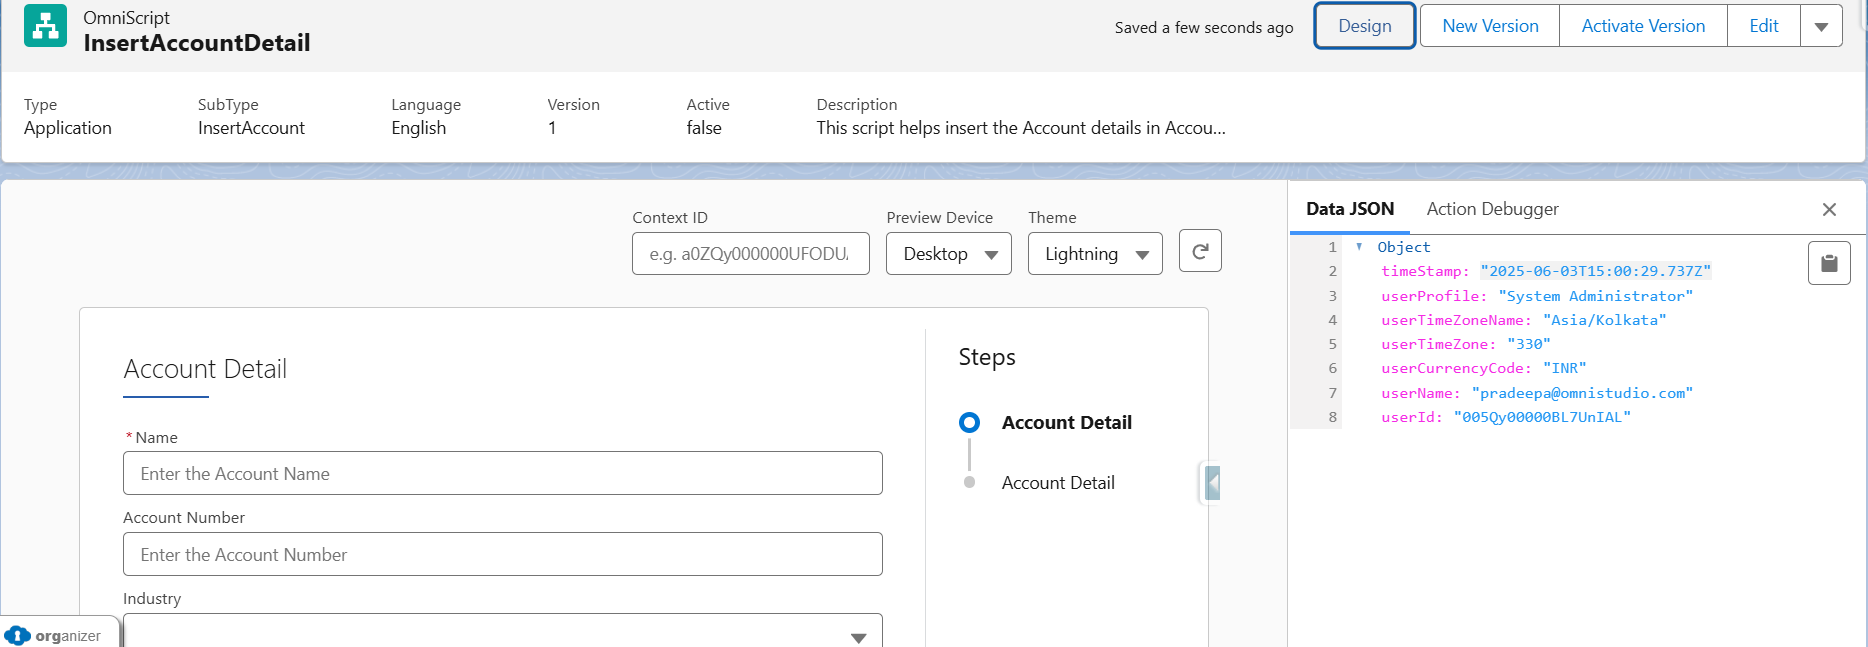
Header and Navigation Panel
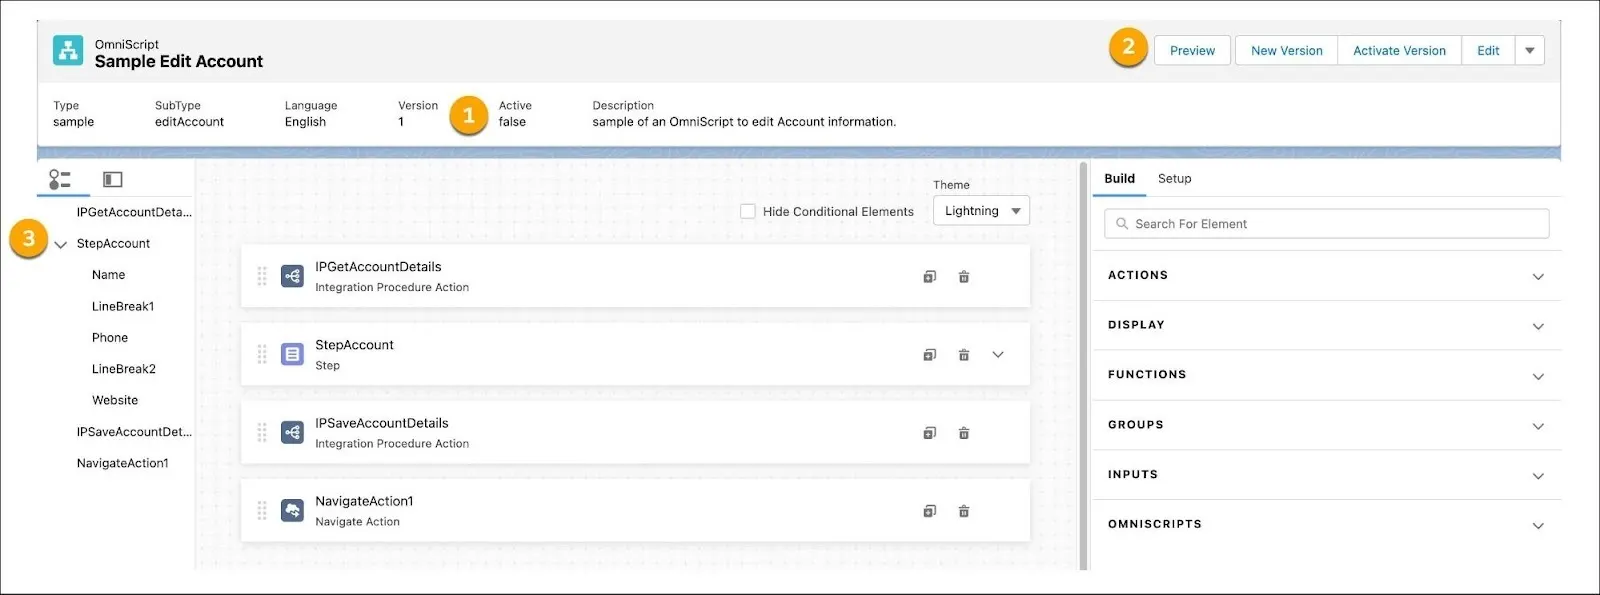
Header panel
- Perform actions related to your script using the navigation bar.
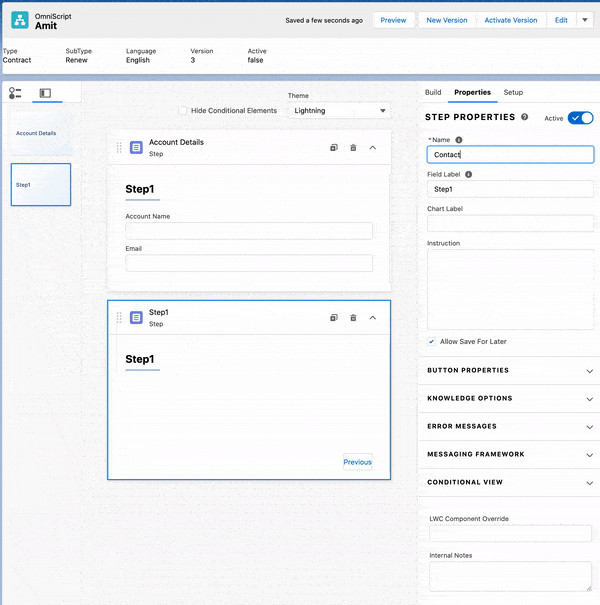
- View high-level metadata about your OmniScript, such as Type, SubType, Version, Language, and Activation status.
Navigation panel
In the actions navigation bar (2) in the header, you
- Toggle between Design and Preview views.
- Create a New Version and Activate or Deactivate the current Version.
- Edit basic settings.
- Download your OmniScript.
- Get launch instructions.
In the Navigation Panel (3):
- Let's you move between active and inactive steps, actions, and elements in your script.
- Slide View gives you a big-picture look at the script. Click a slide to see its details.
- Tree View shows a detailed outline of the script. Click any part to see its settings. You can also find inactive steps here.
Canvas and Build Panel
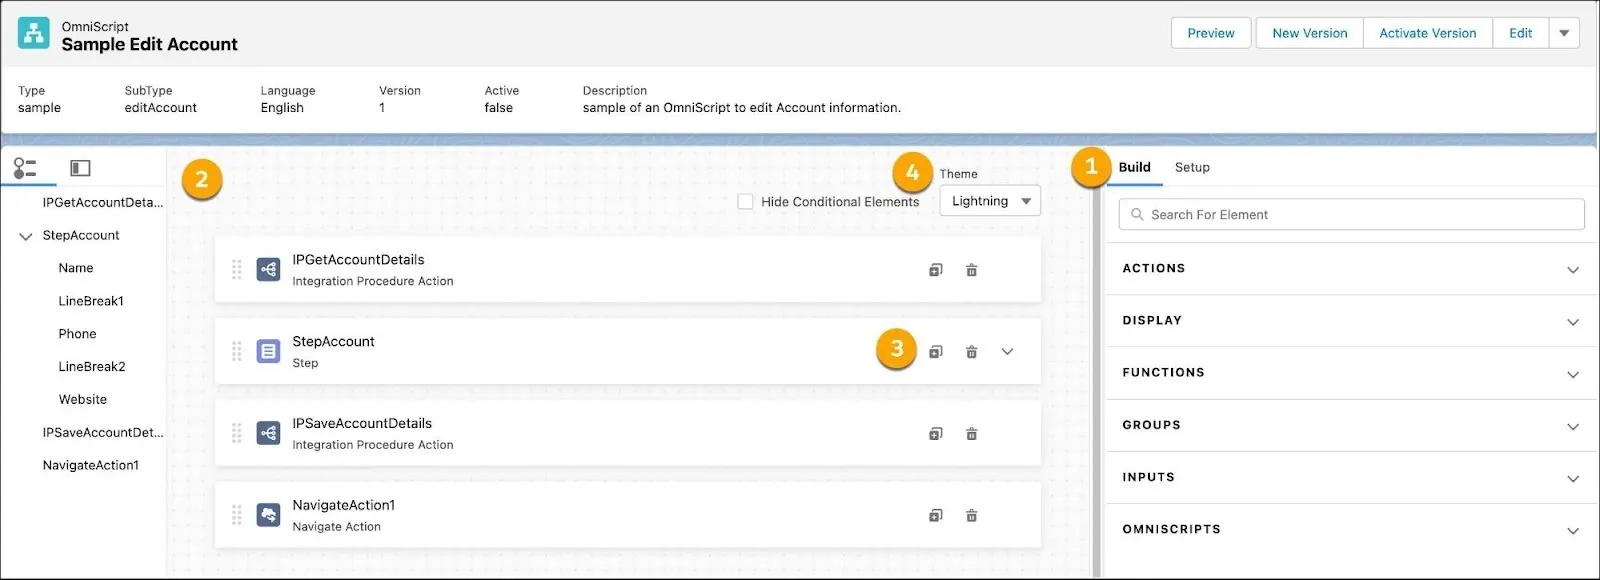
- Build your scripts by dragging elements from the Build panel (1) onto the canvas (2).
- Rearrange, clone, and delete elements as needed.
- Adjust the width of the canvas from either side.
- Expand steps (3) to preview and configure elements within them. Adjust the width of elements on a 12-column grid and drag elements next to each other so that they automatically take up the remaining width of the grid.
- See how your scripts look with a Newport or Lightning theme (4) without switching to Preview.
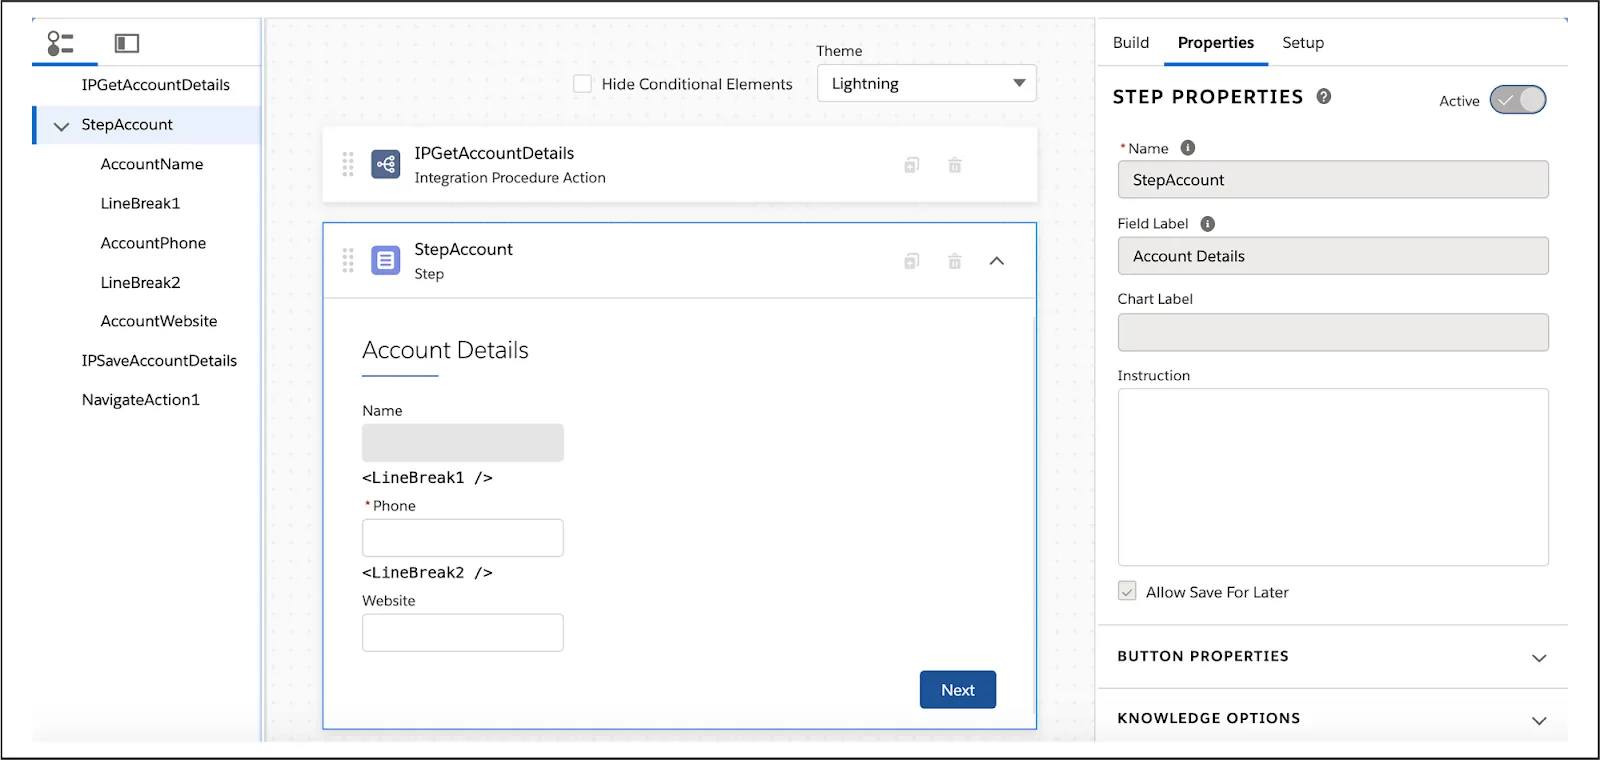
What are they in the Builder panel that is used to make the OmniScript
Input Fields - such as Text, Text Area, Date, Date/Time, Time, Phone, Email, Dropdown or Select, Checkbox, Radio buttons, Multi-Selected, Password, URL, Image
Display - Text Block, Line break
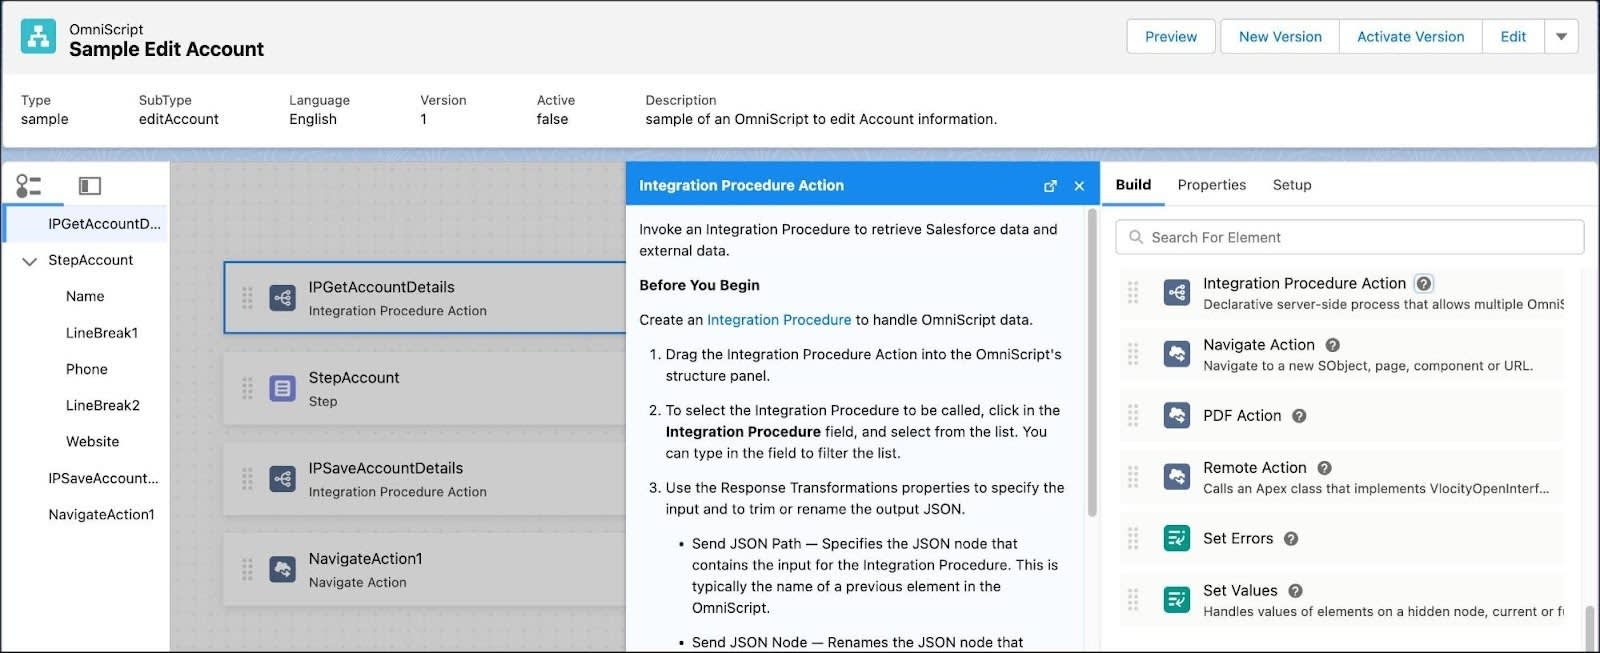
Actions - DataRaptor Extract Action, DataRaptor Load Action, DataRaptor Transform Action, DataRaptor Turbo Action, Decision Matrix, Delete Action, Email Action, Expression Set Action, HTTP Actions, Integration Procedure Action, Navigate Action, PDF Action, Set Error, Set Values
Functions such as Aggregate, Formula, Messaging
Groups such as Action Block, Block, Edit Block, Radio Group, Step, Type Ahead Block.
Properties Panel
- The Properties Panel appears when you click on an element, step, or action in your script. It lets you
- Change the label or name
- Set input types (text, date, etc.)
- Add conditions (like show/hide logic)
- Set required fields or default values
- It's used to customize how each part of the script behaves in Screen.
Setup Panel
The setup area lets you change how your OmniScript works and appears in Screen or UI.
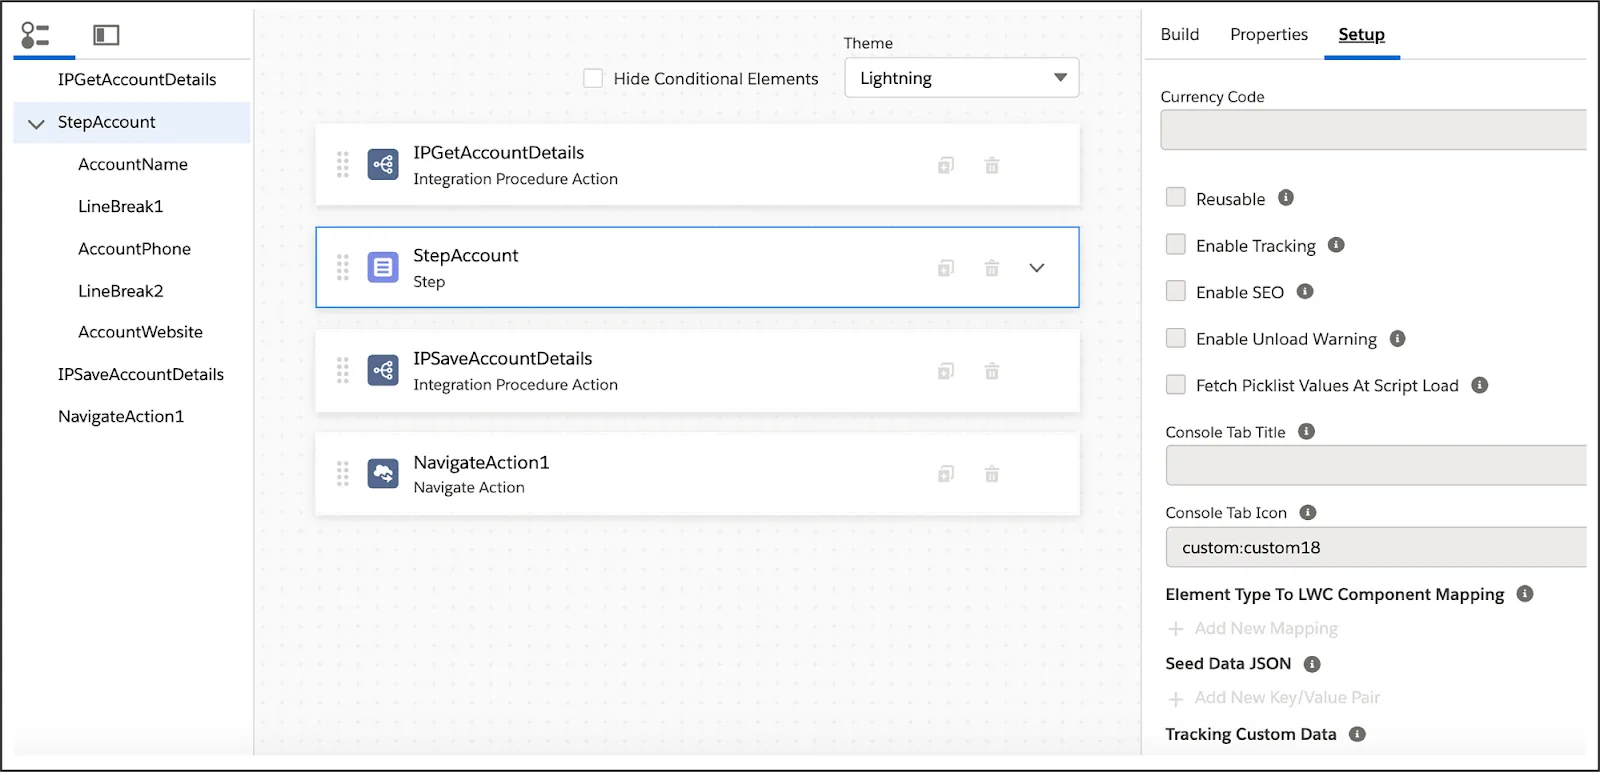
Options in the Setup Panel
- Currency Code - Set the currency for your script (e.g., USD, INR).
- Reusable (Checkbox) - Makes this OmniScript reusable in other OmniScripts or components.
- Enable Tracking - Allows tracking of what users do in the script.
- Enable SEO - Makes the script searchable on the internet (for public scripts).
- Fetch Picklist Values at Script Load - Loads picklist/dropdown values when the script starts and ensures all picklists are ready as soon as the page loads.
- Console Tab Title - Sets the name of the tab if you’re using the script inside the Salesforce console.
- Console Tab Icon - Shows a small icon in the console tab next to the title.
- Element Type to LWC Component Mapping - Connects a custom element in OmniScript to a Lightning Web Component (LWC).
- Seed Data JSON (again here) - Pre-fills the form with data using key-value pairs and speeds up the experience and reduces manual entry.
- Cancel Options - Set what happens when a user clicks "Cancel"—like show a message or redirect to another page.
- Error Messages - Add the custom error message in Omniscript.
- Styling Options - Change the look and feel of the script (e.g., use the custom JS to style the fonts, spacing, colors, padding).
- Knowledge Options - Use this to link knowledge articles if your OmniScript is part of a help or support experience.
- Save Options - Control how data is saved temporarily or permanently while users move through the script.
- Messaging Framework - Message framework help to show the message in window post Message.
Preview Options
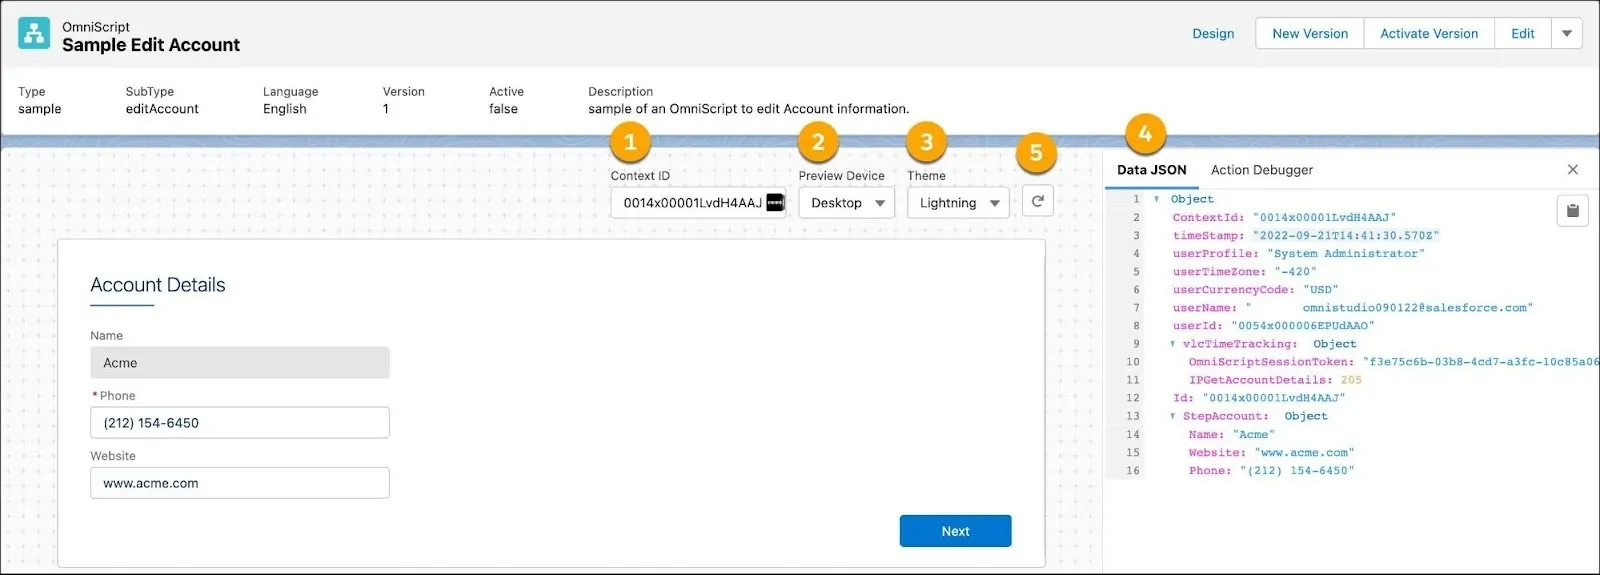
- To preview your form with live data, enter a recordId in the Context ID field (1) and then refresh to see your script in real-time. Context would assist in passing the data to the integration process, and Dataraptor would assist in retrieving the data from the backend.
- Preview Device dropdown (2) help us navigate to different devices, such as mobile, desktop, and tablet
- Theme dropdown (3), see how your OmniScript looks with a Lightning or Newport theme. If a custom Newport stylesheet is in the org, it overrides the out-of-the-box Newport stylesheet.
- The Data JSON (4) gives you a JSON format that is simple to read and changes as you fill in data fields on the canvas.
- You can restart the canvas and make changes to the Data JSON and the Action Debugger by pressing Reset data(5).
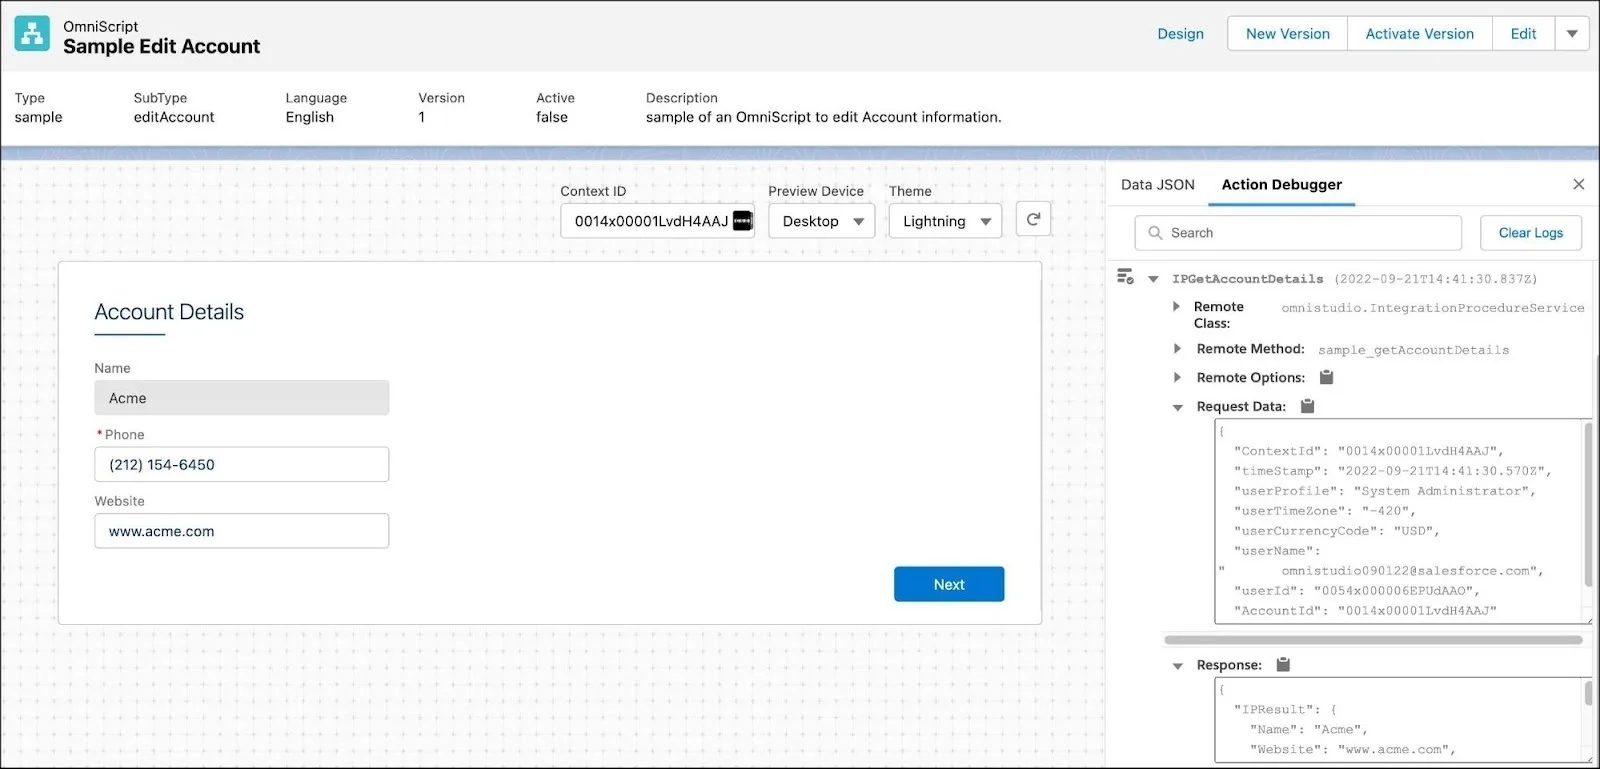
Action Debugger
The Action Debugger helps you check what’s happening behind the scenes. You can:
- Search for actions
- See the data being sent and received
- Copy parts of the data easily
- Clear the log when you're done
In-Product Help
In-Product Help instructs users on how to use the element and provides guidance on how to develop it in Omniscript.
For a better understanding below are the steps to create an Account using a simple Omniscript
Click the setup and Search the OmniStudio App in App Launcher and click the OmniScript tab in OmniStudio App.
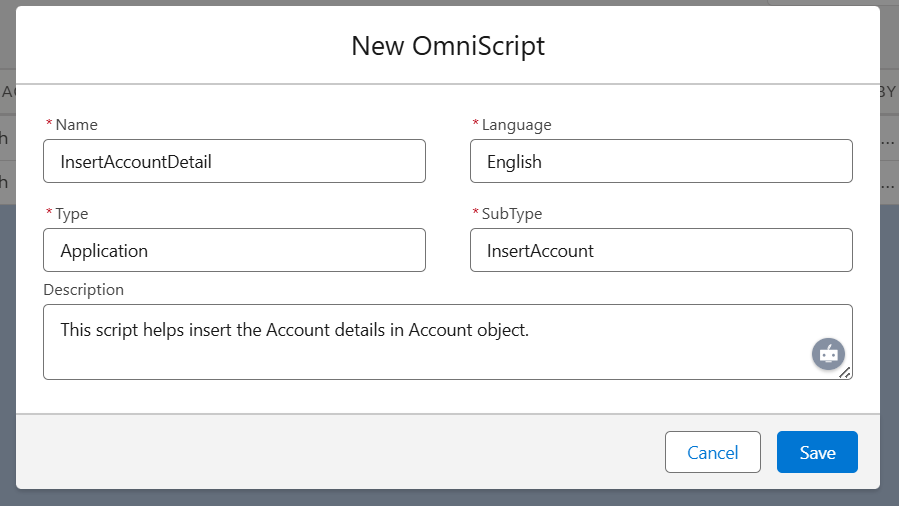
Click the New Button in the right of the page and enter the basic details in your Omniscript.
- Drop the text Input box fields from build element.
- Enter the field name and make the Account name field required. Click the required check box and enter placeholder 'Enter Account Name'.
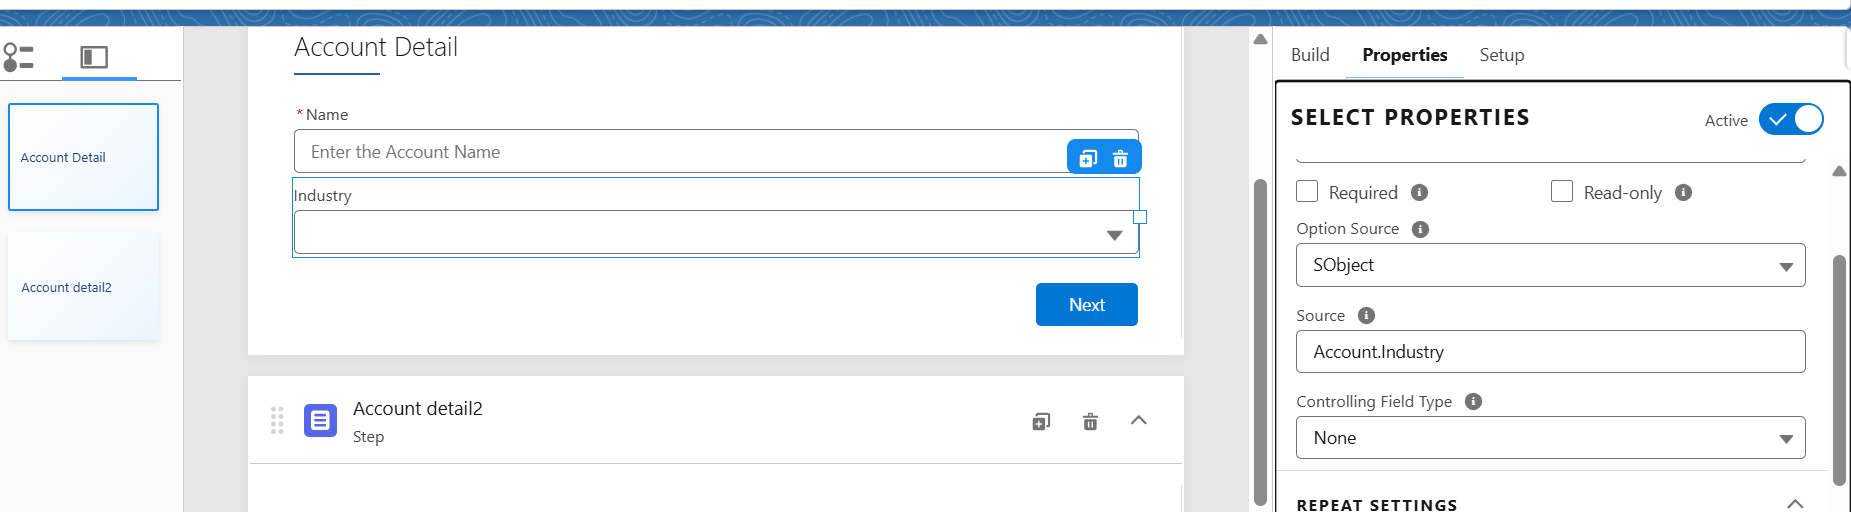
- Drag and drop the Select element in the OmniStudio, name it 'Industry,' and configure it to retrieve data from the 'Industry' field on the Account object.
- Click on the Option Source, select SObject, and enter the Source Field enter object name and Full stop after picklist name ('Account. Industry') name to retrieve picklist values from any SObject field in Salesforce
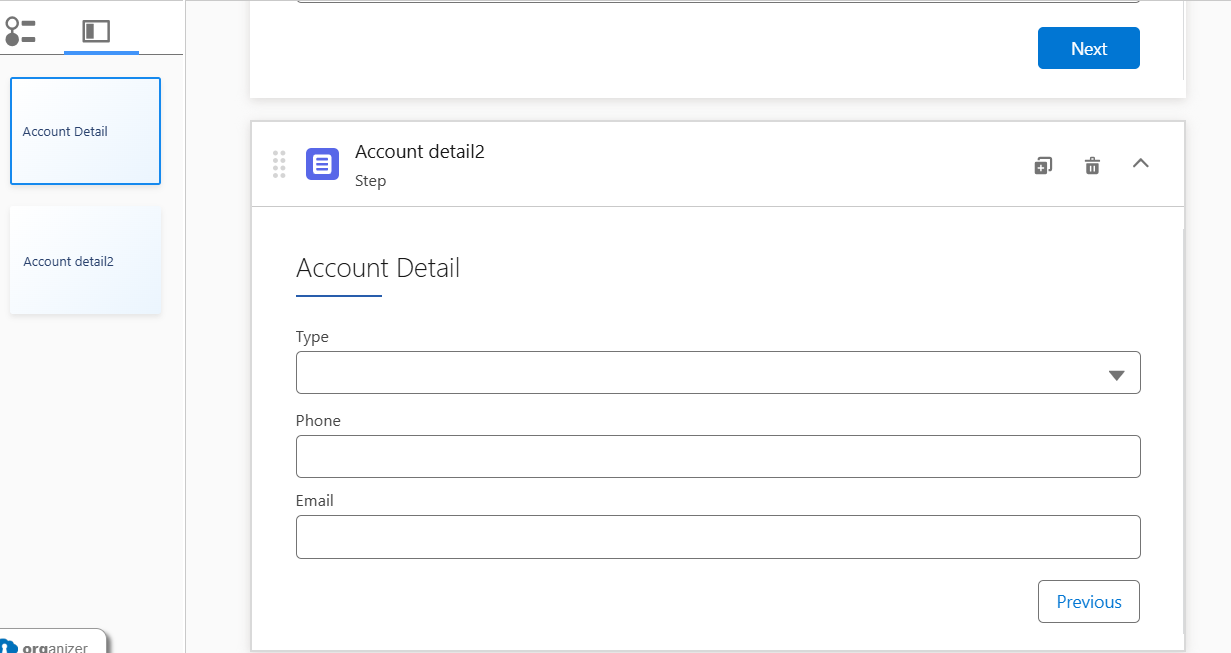
- Drag and drop the fields you need from your component. I used the following fields: Account Name, Type, Industry, Account Number, Email, and Phone to insert the Account in Account object.
- Create a new Step element and set the Phone, Email, and Type fields.
- Insert the Account Detail by calling the DataRaptor.
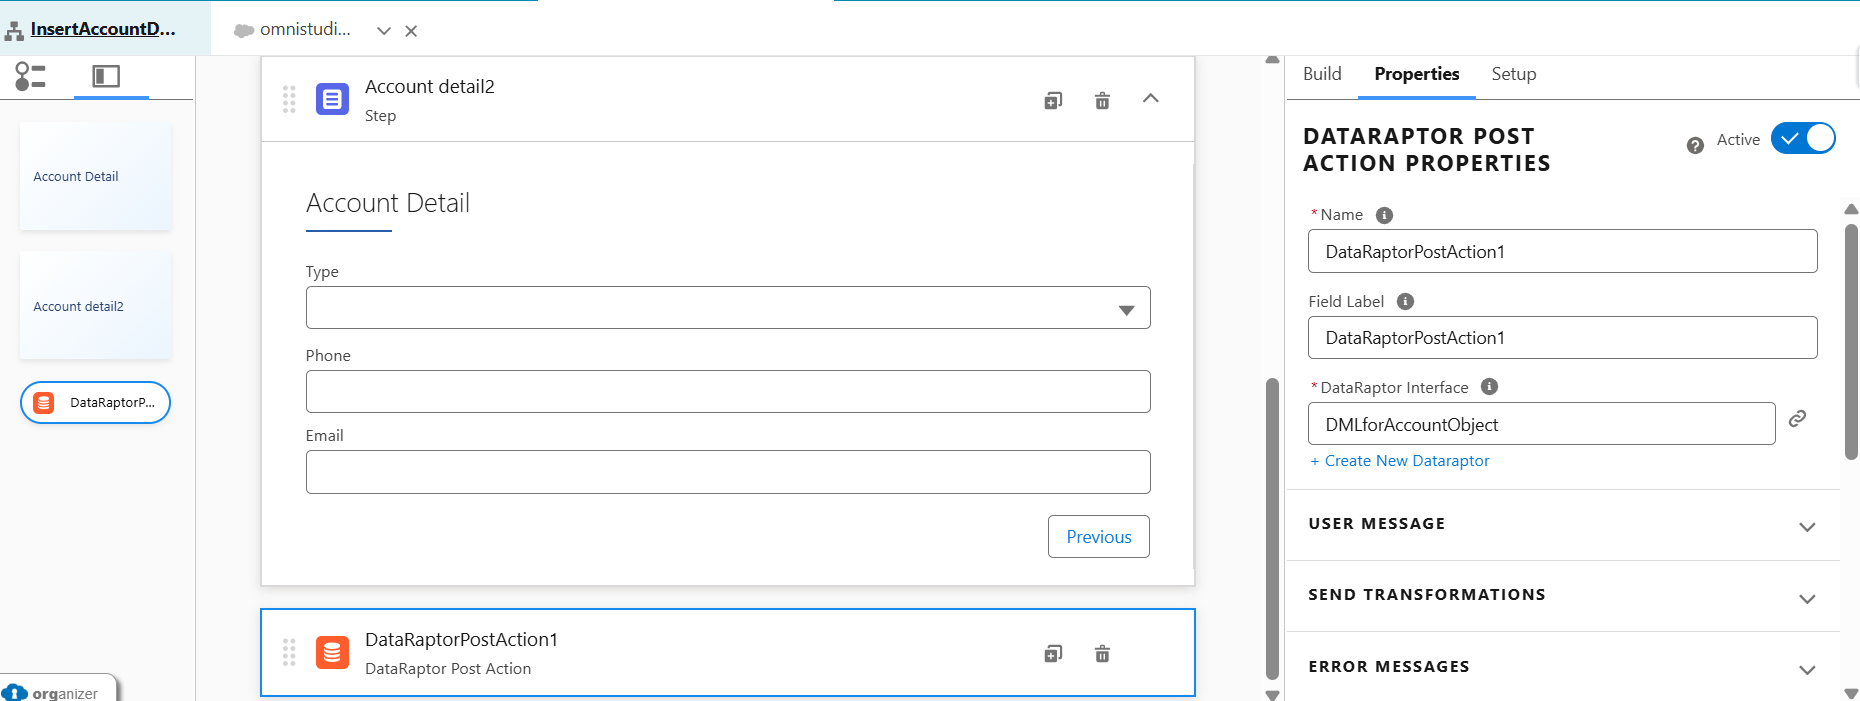
- So, we need a data raptor to save the Account to the database.
- Choose the object name (In our case Account).
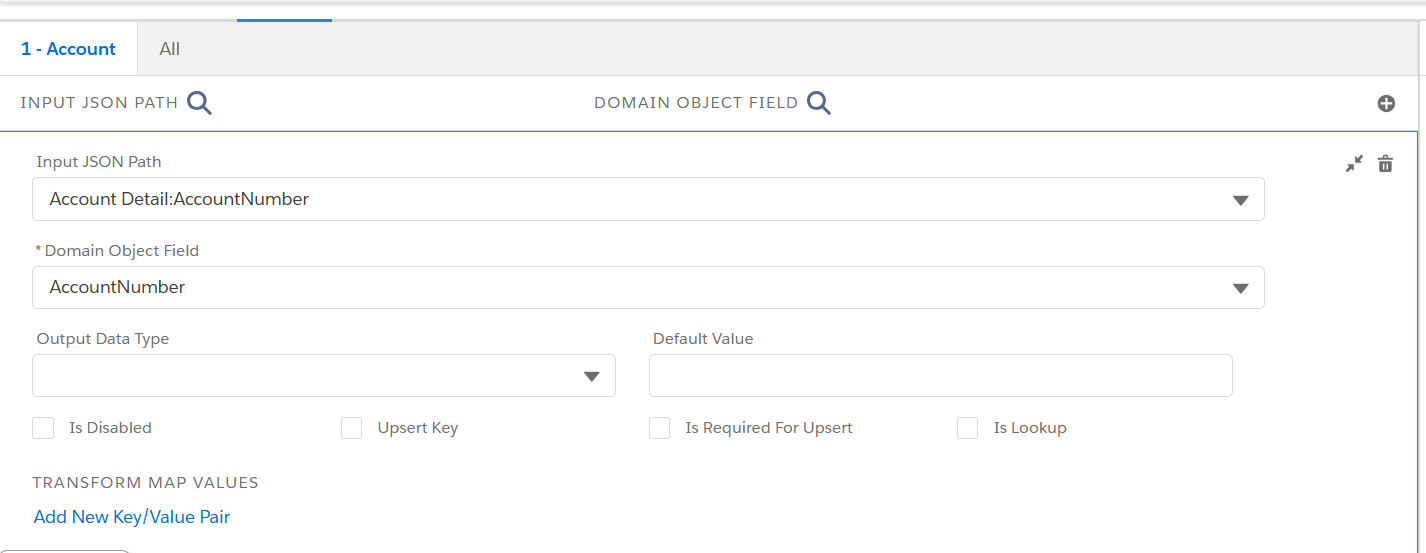
- Map the field values in the Account object by selecting the option tab in DataRaptor.
- Map every script field in the Account object
- After creating the DataRaptor, Click the preview button, enter the same information in these boxes, click the save button, and then verify that the data has been saved.
- Once your Omniscript has been reviewed, activate it and put your home page there.
Advantages of OmniScript
- Drag and drop with no or low code
- Rapid prototyping, with built-in troubleshooting tools
- Ease of maintenance
- Branching capability built-in
- Integrating data from internal salesforce or external salesforce
- The look and feel (front end) separated from functionality (back end)
Conclusion
OmniScript empowers businesses to streamline user interactions by building dynamic, no-code forms and guided experiences within Salesforce. Through its drag-and-drop interface and powerful integration with tools like DataRaptor, users can easily design, configure, and deploy guided processes directly on key pages like the Home Page. This not only improves data collection efficiency but also enhances user experience by reducing navigation and simplifying input. OmniScript provides the flexibility, scalability, and user-friendliness needed to support real-time business needs across industries.