

Journey Builder Overview In Salesforce Marketing Cloud
Explore how Journey Builder helps you design personalized, automated customer journeys that boost engagement and create seamless marketing experiences
By Sharan Kumar Mariappan
Assistant Software Developer
Journey Builder In Salesforce Marketing Cloud: An Overview
In this blog, I am going to introduce the Journey Builder features and functionality so that you are ready to start building your own journey. What is Journey Builder? Journey builder is a communication orchestration component of the Salesforce Marketing Cloud. It gives the marketer the ability to create a sequence of events in which they are used to initiating and respond to interactions made by the subscribers. So, in other words, you can use the journey builder as a tool to chain together multiple individual decisions and communications to create elaborate sequences of engagement and interactions for your subscribers.
Journey Builder
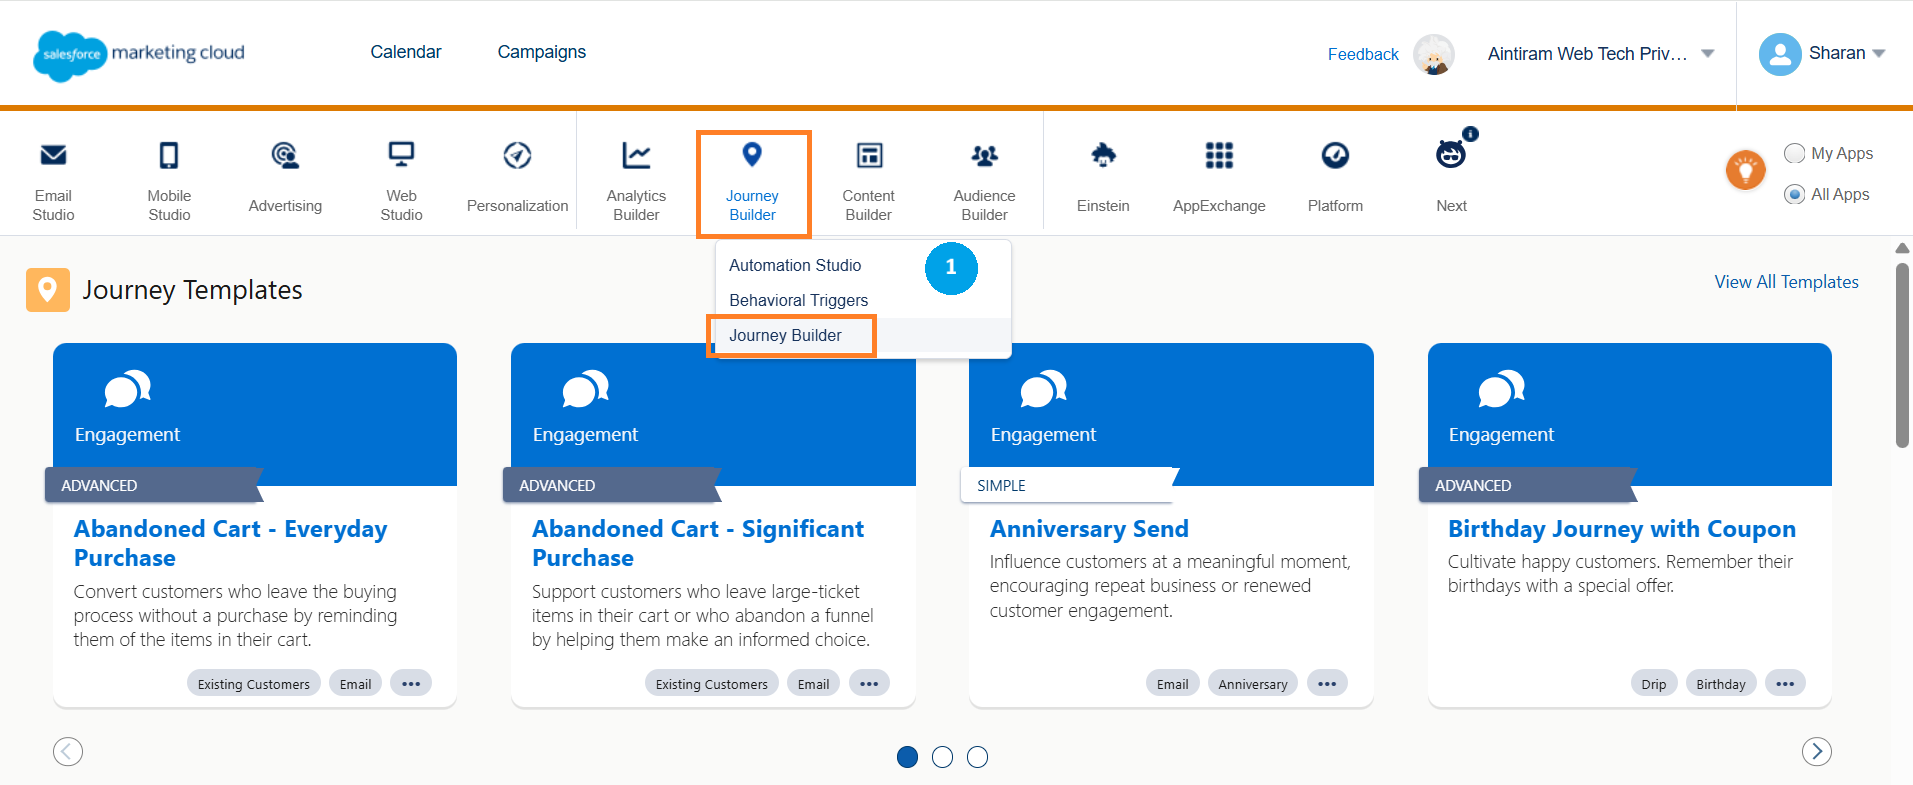
In Salesforce Marketing Cloud, we can access journey builders by navigating to the top left-hand side and hovering over the blue cloud icon and scrolling across Journey Builder and then Journey builder from the drop-down.
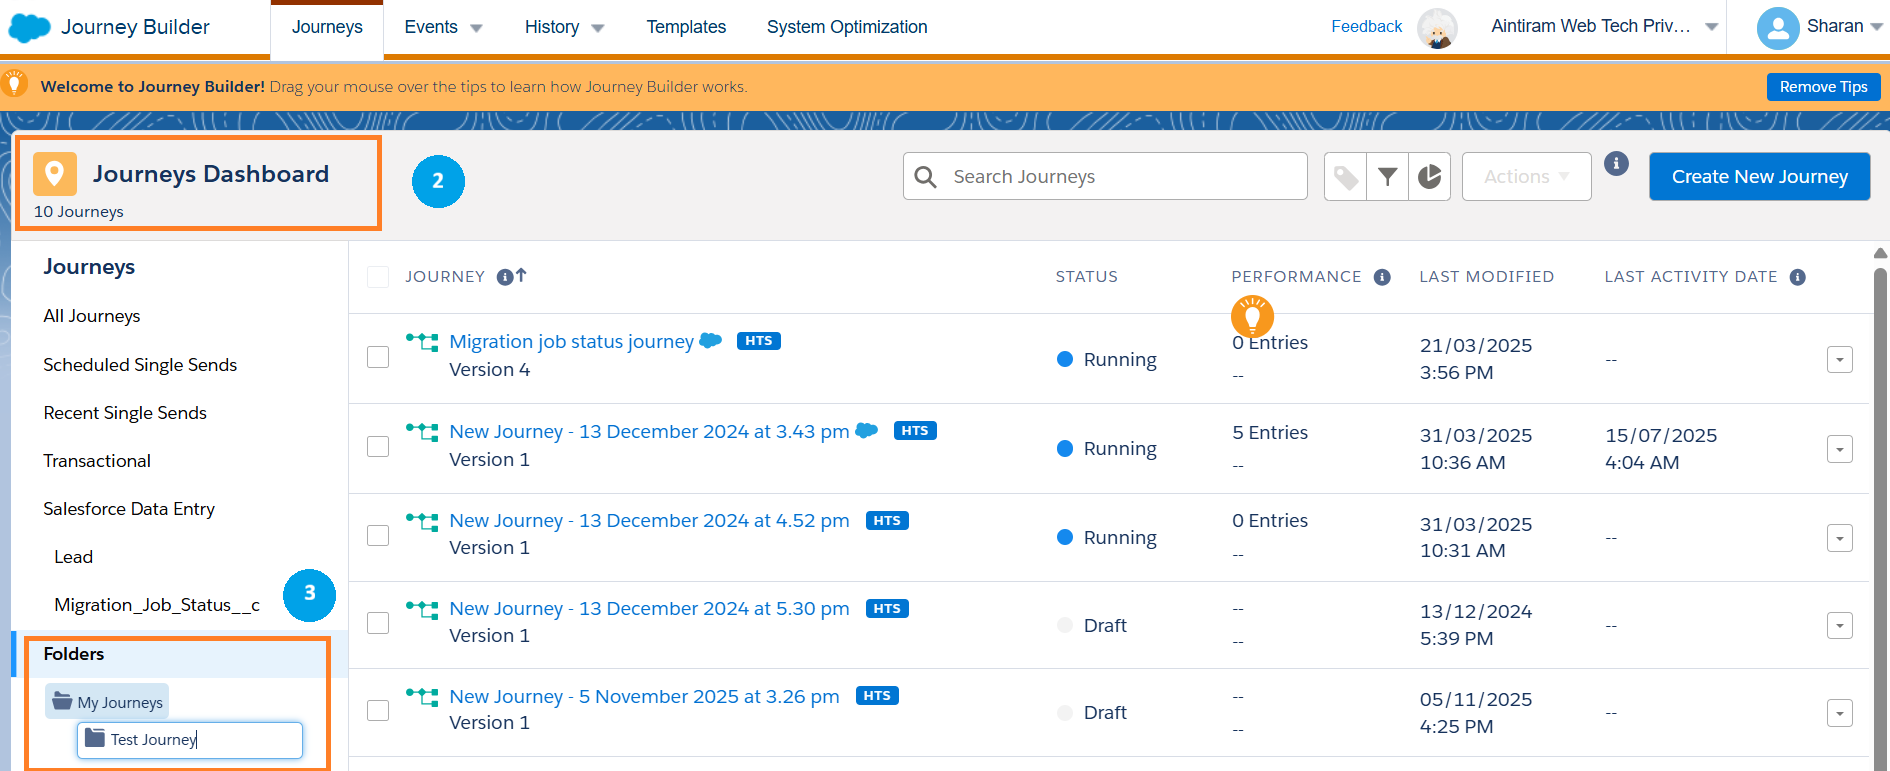
Once a page is loaded, you will find a journey dashboard (2). This is your main landing page of the journey builder. Here you will find on this screen all the journeys ordered by name also with their status, number of records on the current journey, and their last modified date. Now as you make more journeys. It is a good idea to use the folder function (3) to organize your journeys. You can hover over the side as highlighted below to create additional folders to organize your journeys.
We can also filter out (4) our journeys. We have lots to search through. We can go through and filter as per the journey type, status, channel or by the tags.
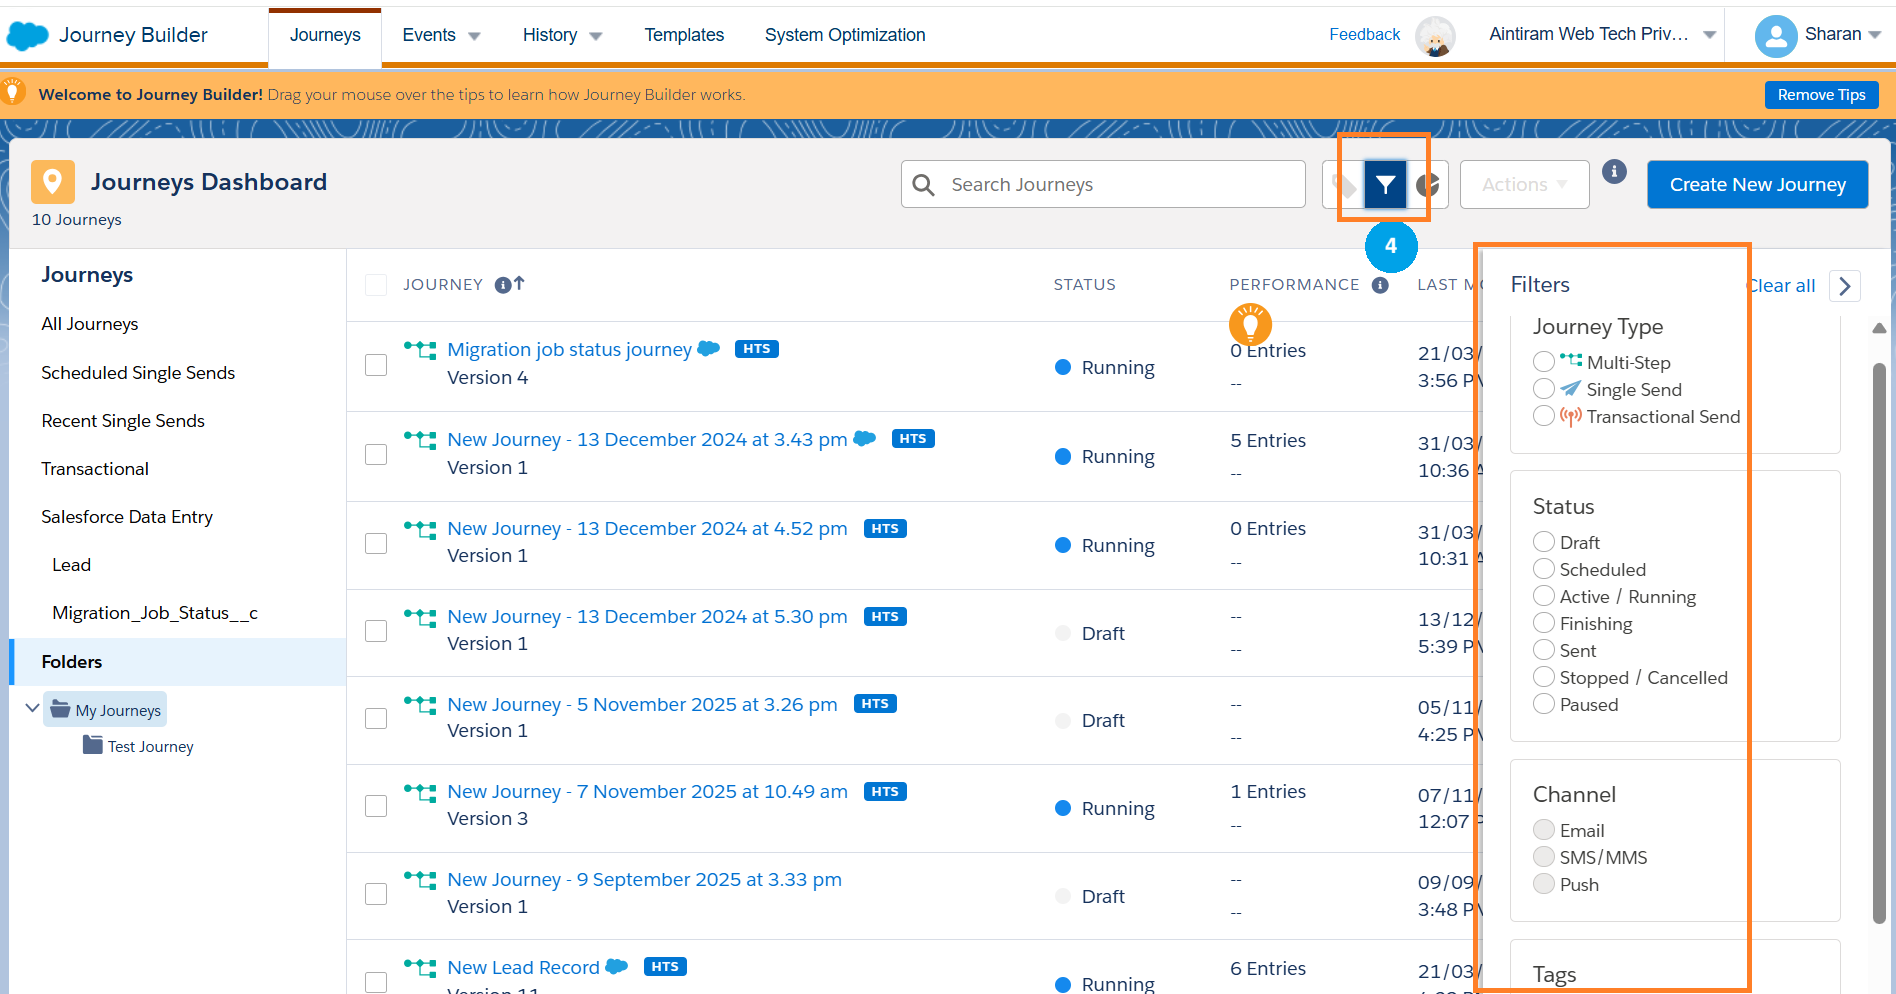
Journey type filter: we can filter whether the journey type is multistep, single send or transactional send.
Status filter: We can filter based on the status of to send. We can filter the journey by status whether the email content is in draft, scheduled, Active / Running, Finishing, Sent, Stopped / Canceled and paused.
Channel filter: We can filter based on the channel that we are using, whether it is an Email message, SMS notification or through push notifications.
Tag filter: In a Journey Builder filter, tags are customizable labels that you apply to your journeys to categorize them and make them easier to find, search, and manage. We can apply filters based on the tags as well.
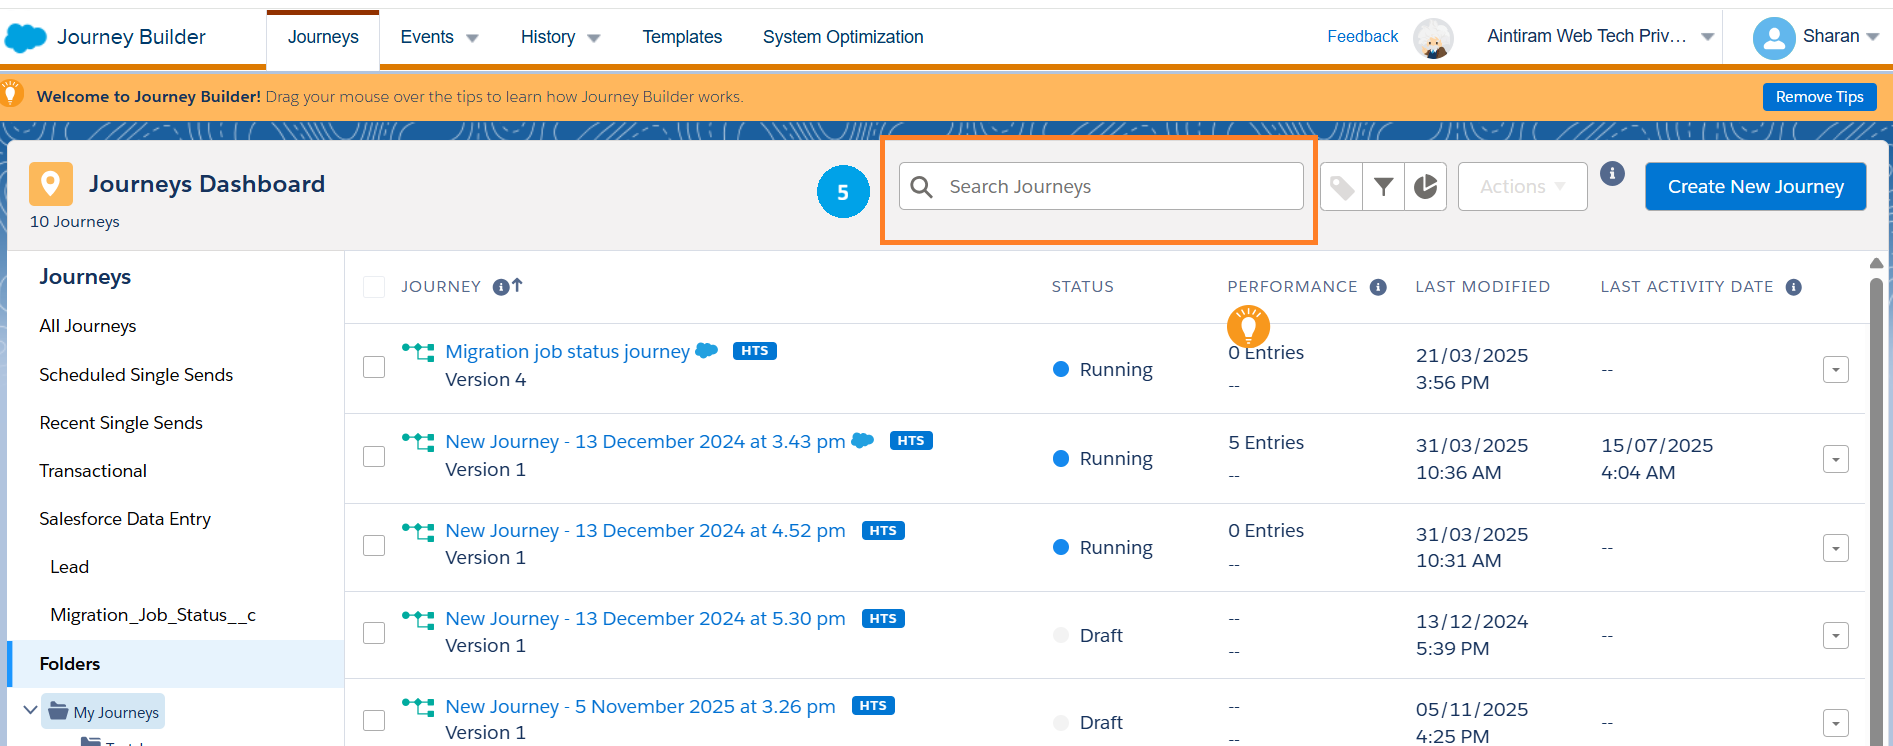
You can also search for the created journey (5) at the top of the dashboard highlighted in the image below.
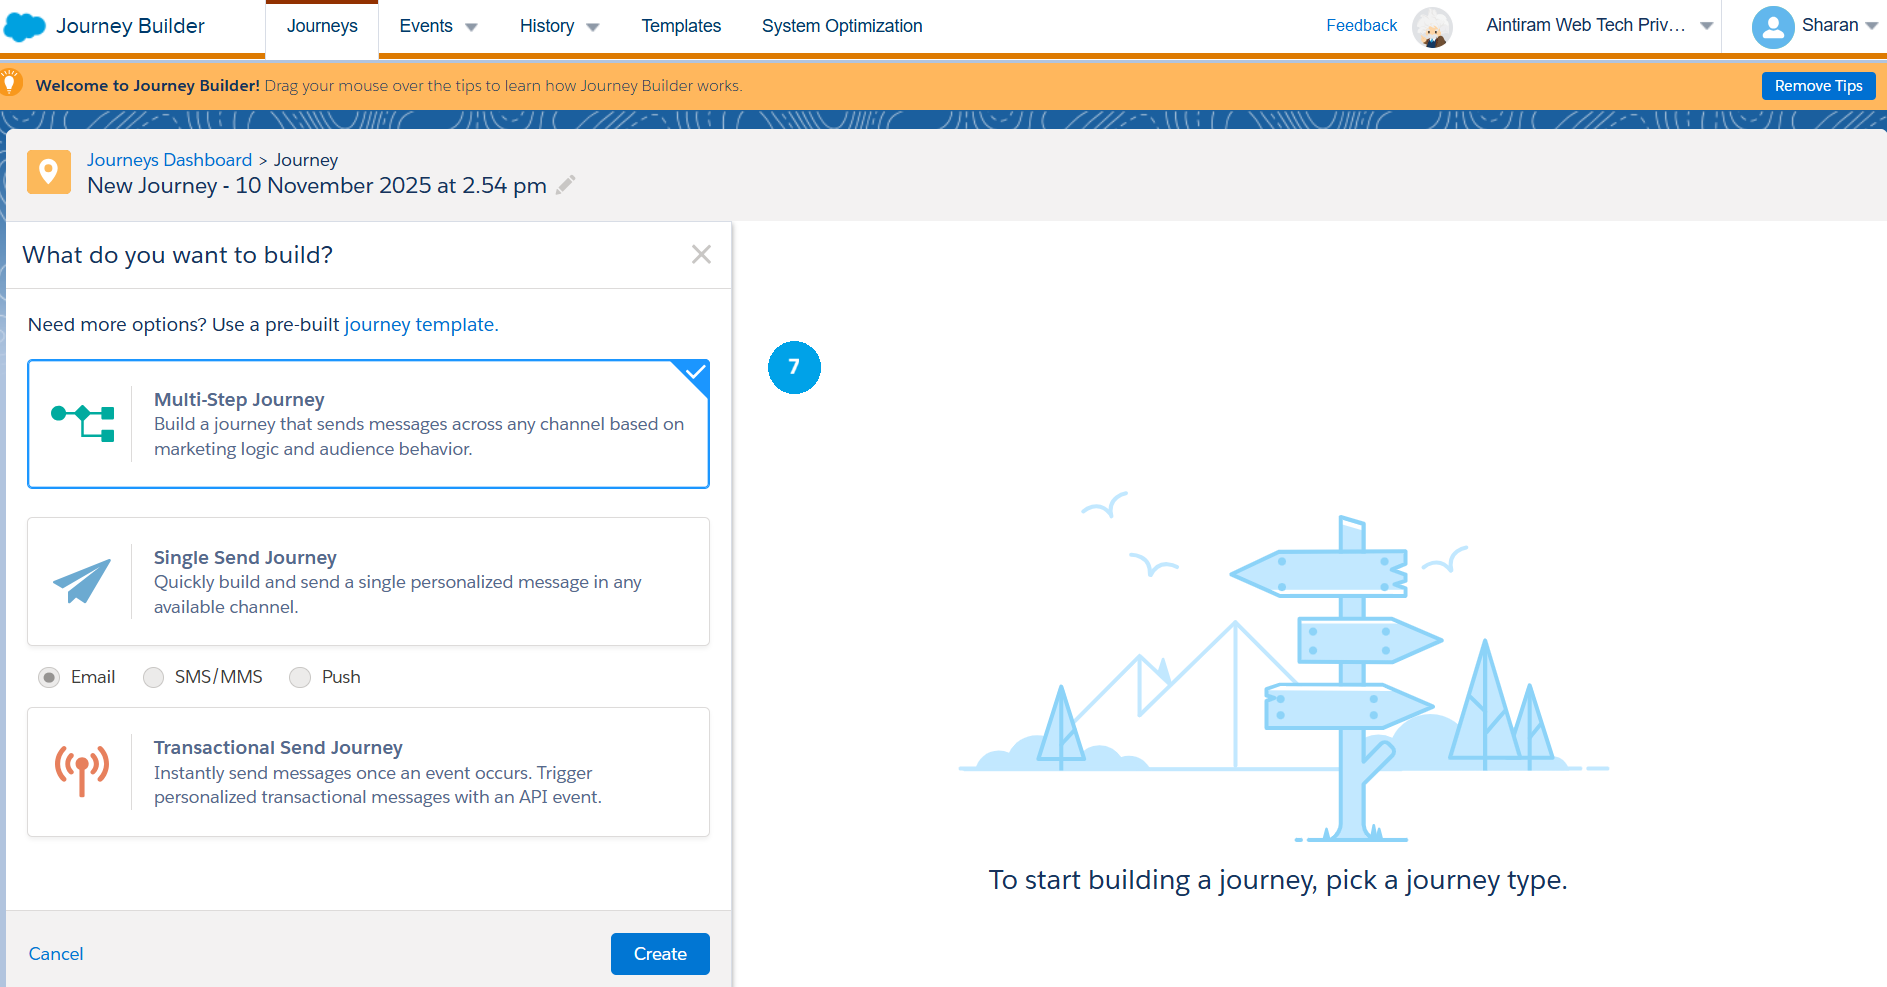
You can create a new journey by clicking the top right corner of the journey dashboard as highlighted (6) below. We can build a multistep journey, single-send journey, or transactional sending journey. Single-send journeys usually build and send single personalized messages to any available channel (i.e., Email, SMS and Push Notifications). Transactional send is used for your API transactional messages, similar to things like your password to reset emails. For this demonstration, we have used a multistep journey. In the multistep journey, we could send multiple Emails based on the conditions that we are set.

Once, after clicking the Multi-step journey, it will take you to the canvas screen. So, let me take you through what the interface has to offer. On the top we have a journey name, and you can modify this by clicking the pencil icon (8) as highlighted in the image below. We can see what the current version (9) of the journey is in.
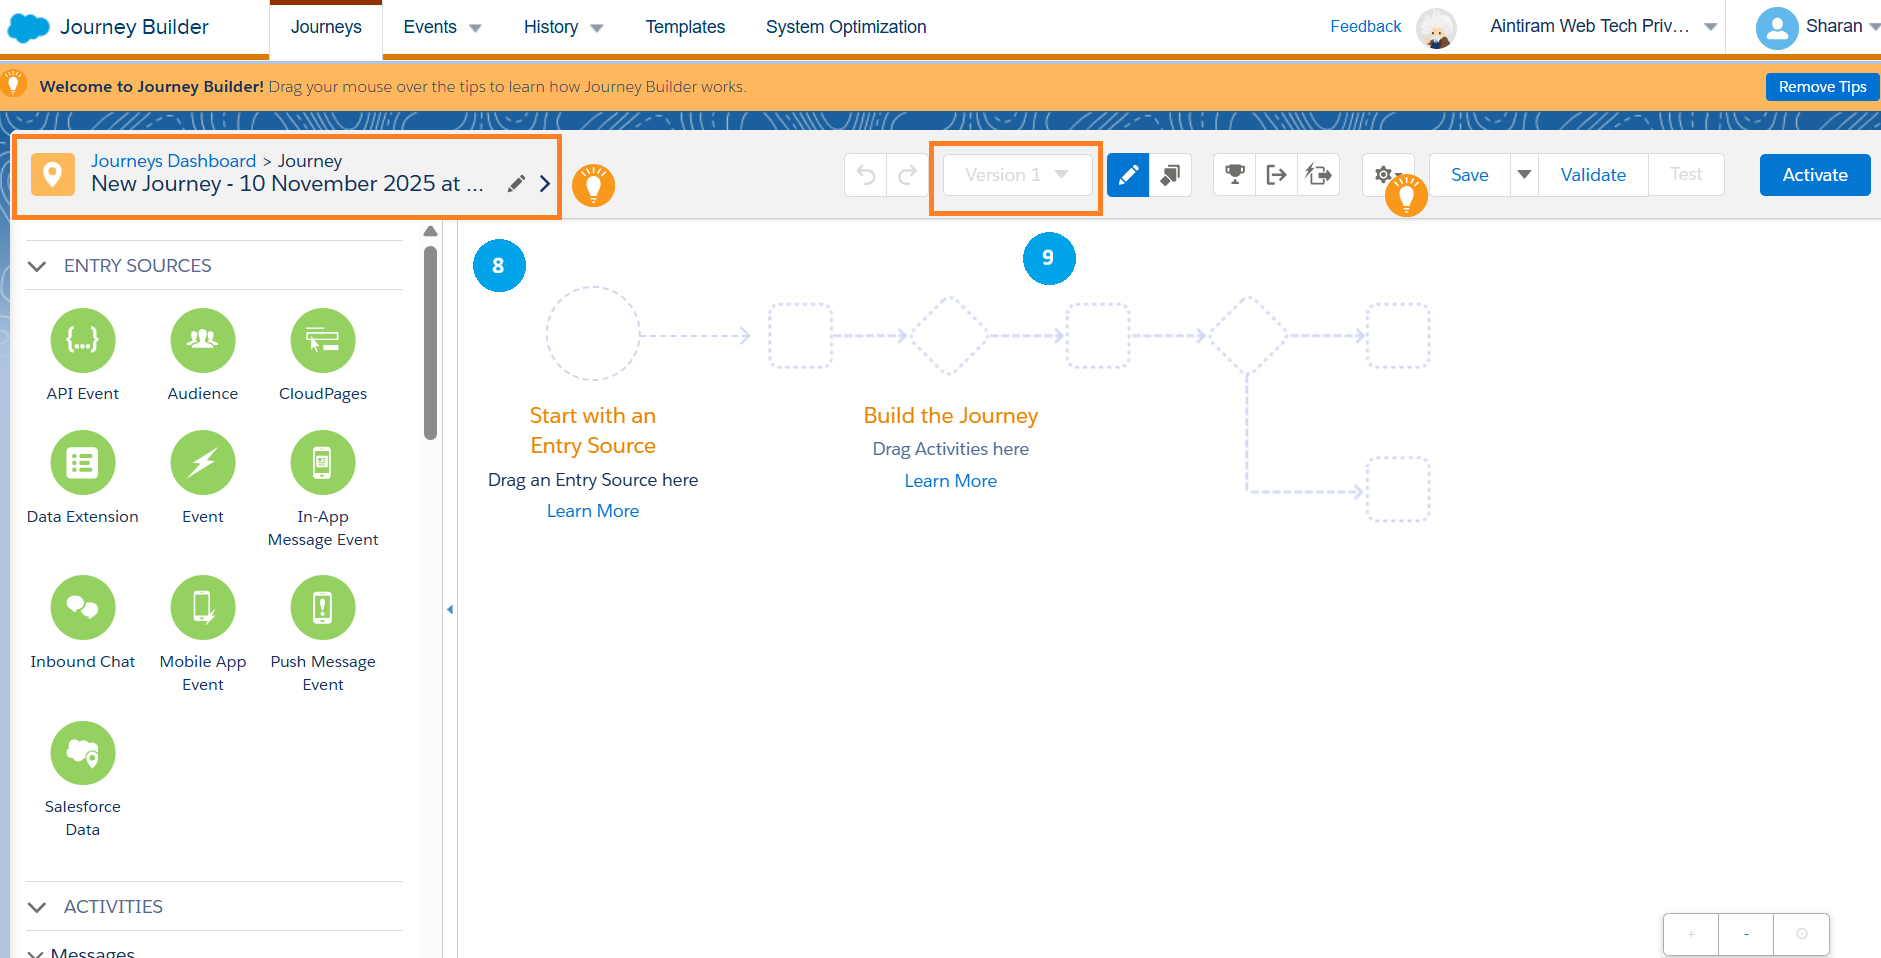
We can use the Toggle sidebar for edit mode (10).

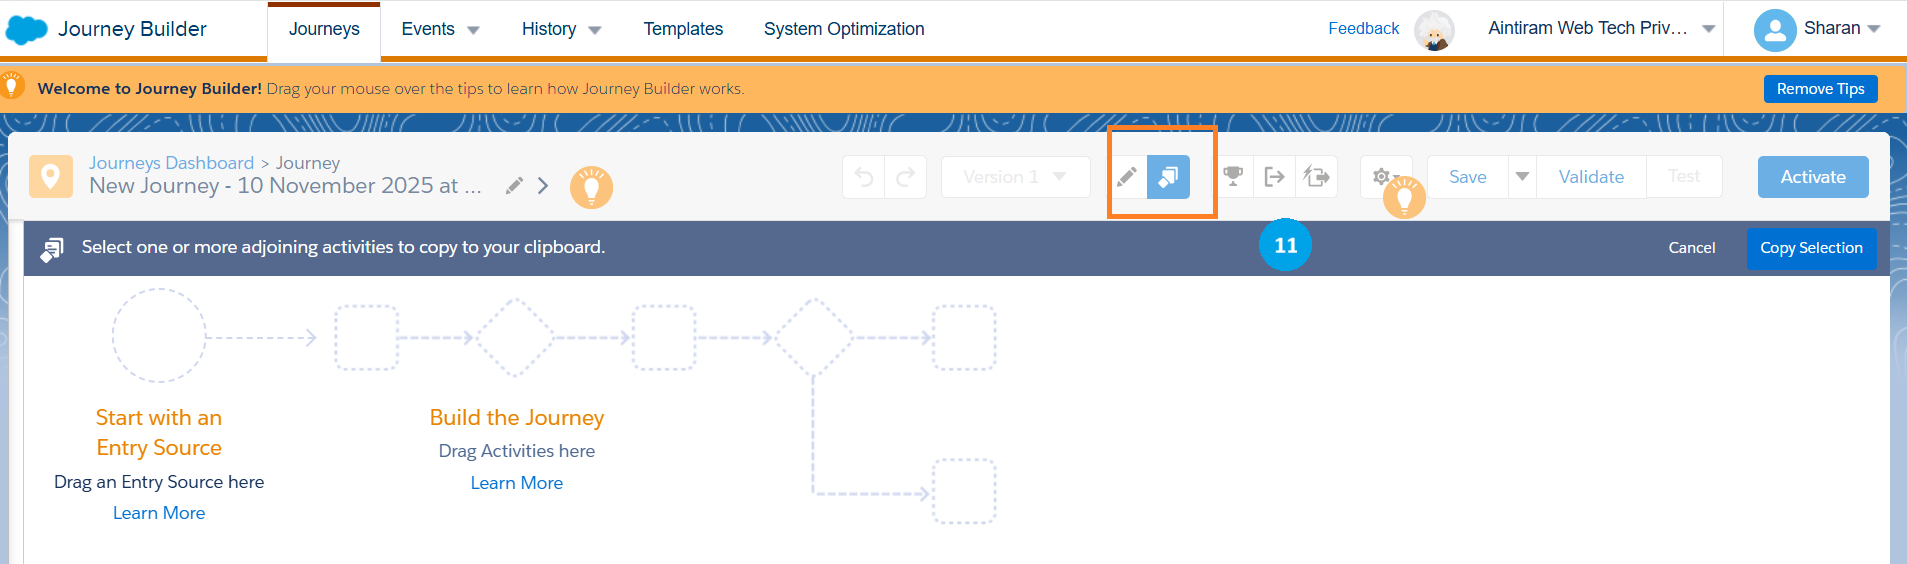
We can copy the journey by clicking the icon as shown below (11).
We can set goals, exit criteria for the journey, and mobile exit criteria (12).

The really important function here is Journey settings and also, we can copy the journey (13).

The first thing is the
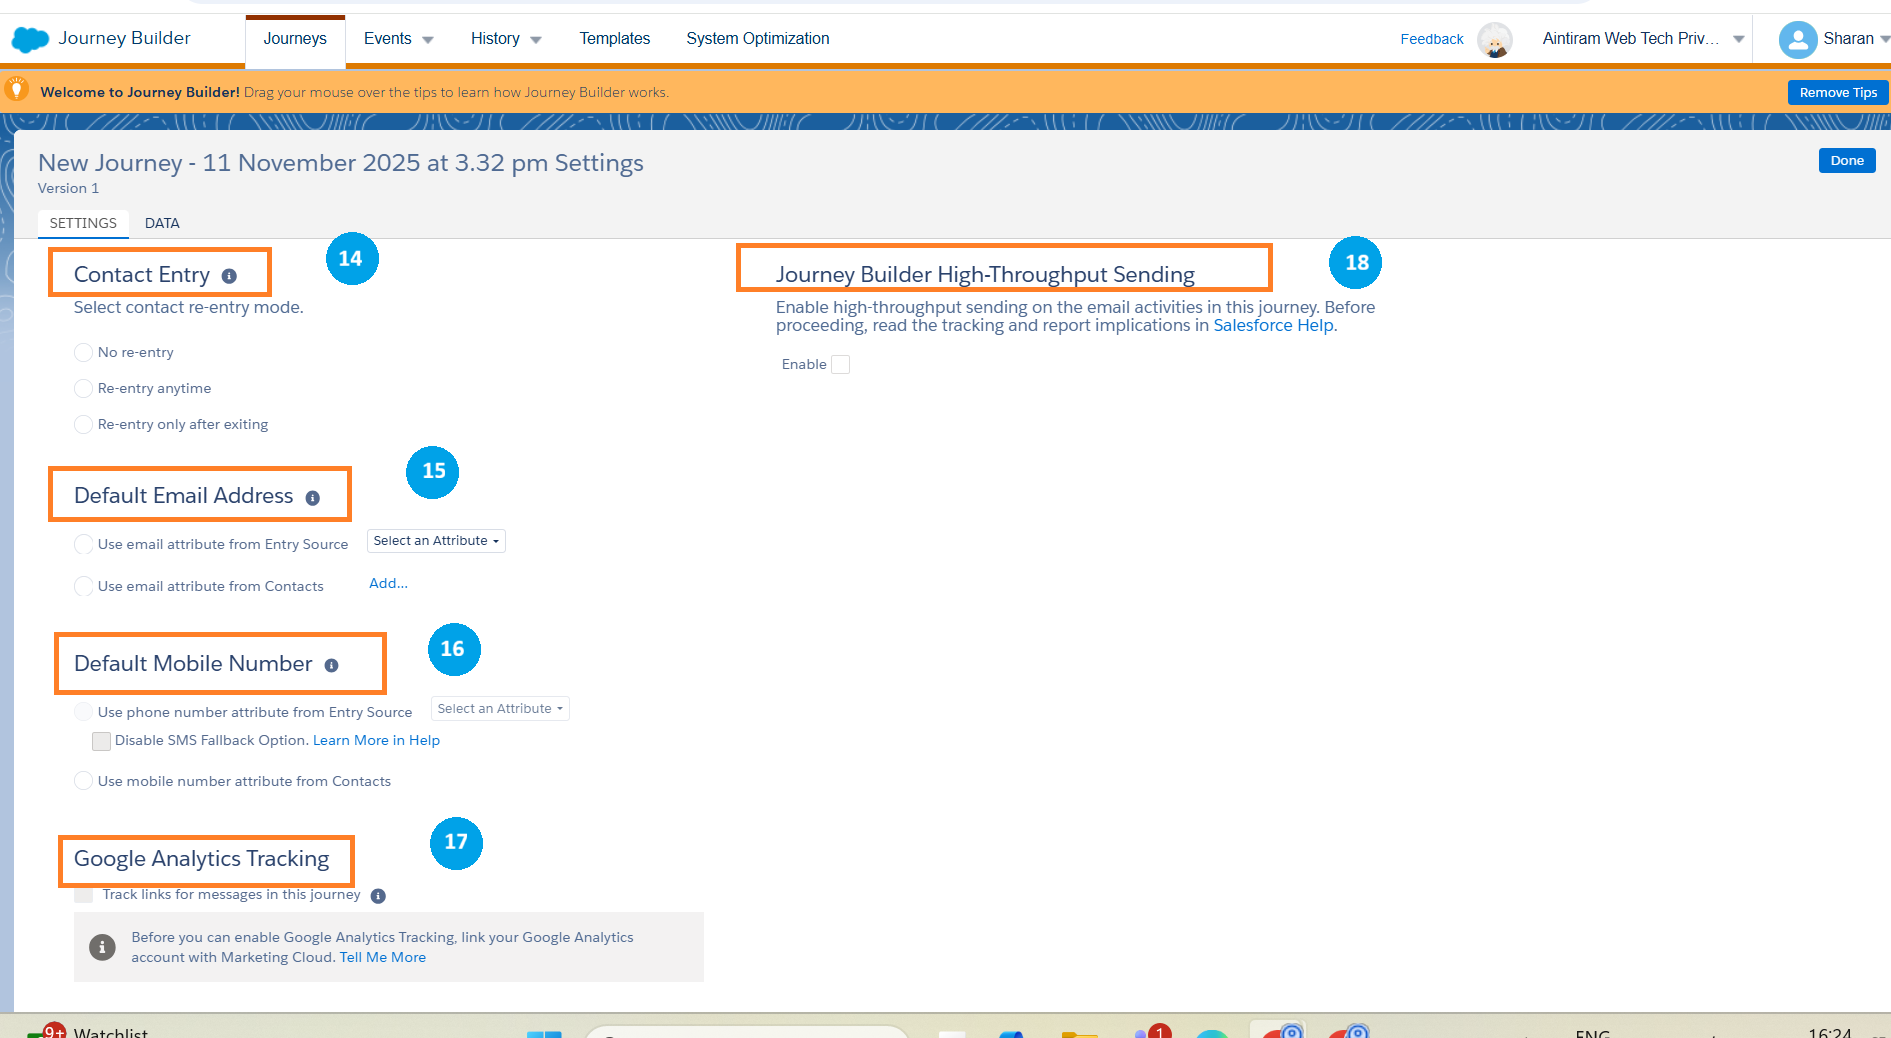
Contact Entry selector: we can choose whether a contact needs to re-enter the journey. We can set the contact not to re-enter, re-enter anytime (i.e., it allows some of the contacts to enter more than once) or re-enter only after exiting (i.e., if you don’t want the contacts more than once) (14).
Default Email Address selector: Here, we can choose the incoming fields for data (i.e., email addresses of the subscriber for data from the attributes). Else, we can use the default email addresses from the contacts (15).
Default Mobile Number selector: Here, like the email address, we can choose the phone number from the attributes or from Contacts (16).
Google Analytics Tracking: We can track the links for messages in the Journey (17).
High-Throughput Sending: You can enable HTS for an individual journey in Journey Settings. After you activate HTS during a journey, it can't be deactivated for that specific journey. You can also ask your admin to turn on the default HTS for all new journeys in a business unit (18).
We can save (we can save as a template), validate, and test with the same records and, finally, we can activate the journey (19).

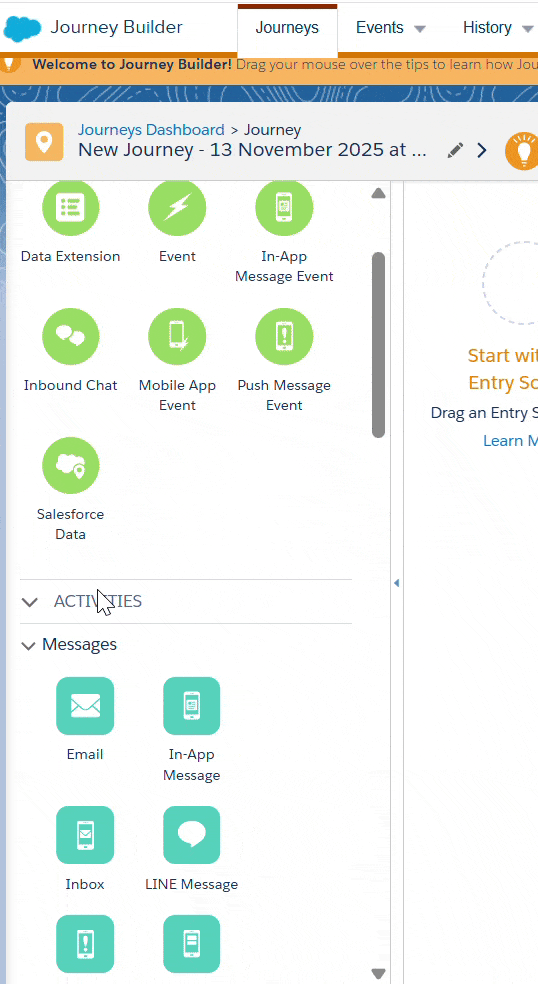
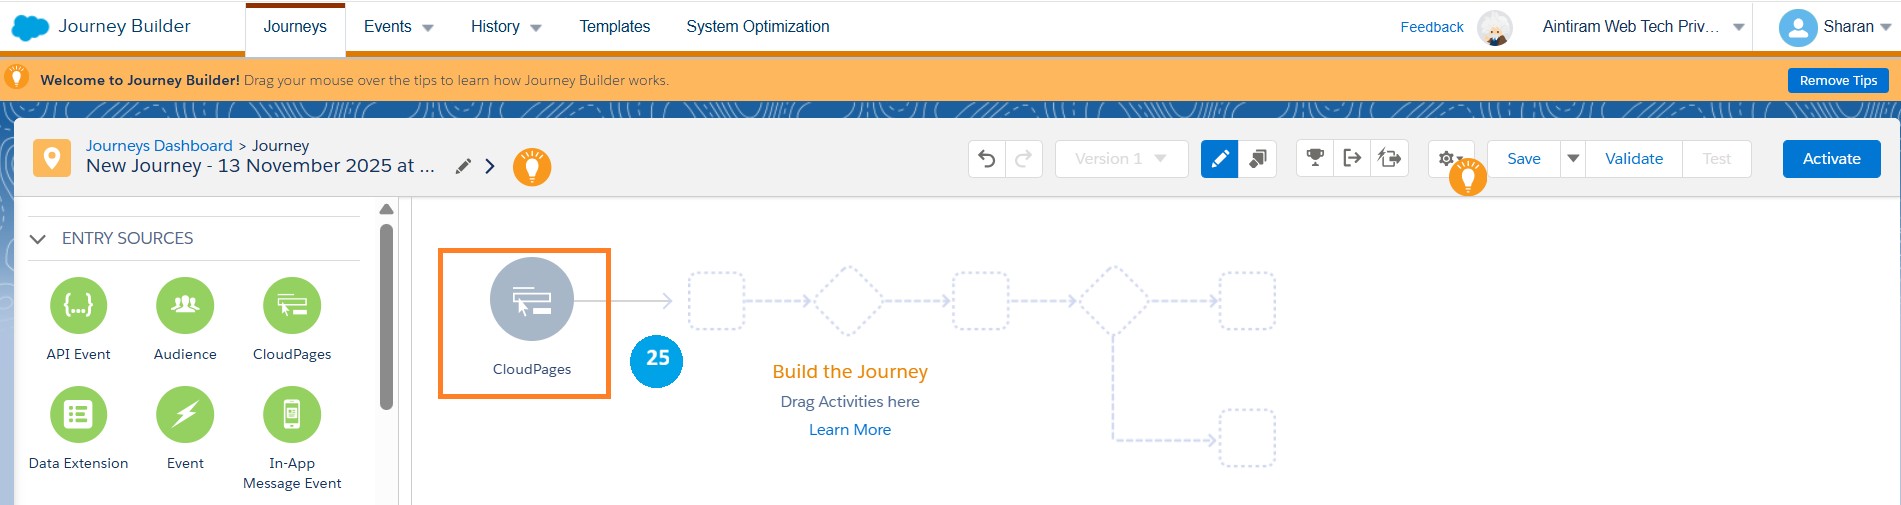
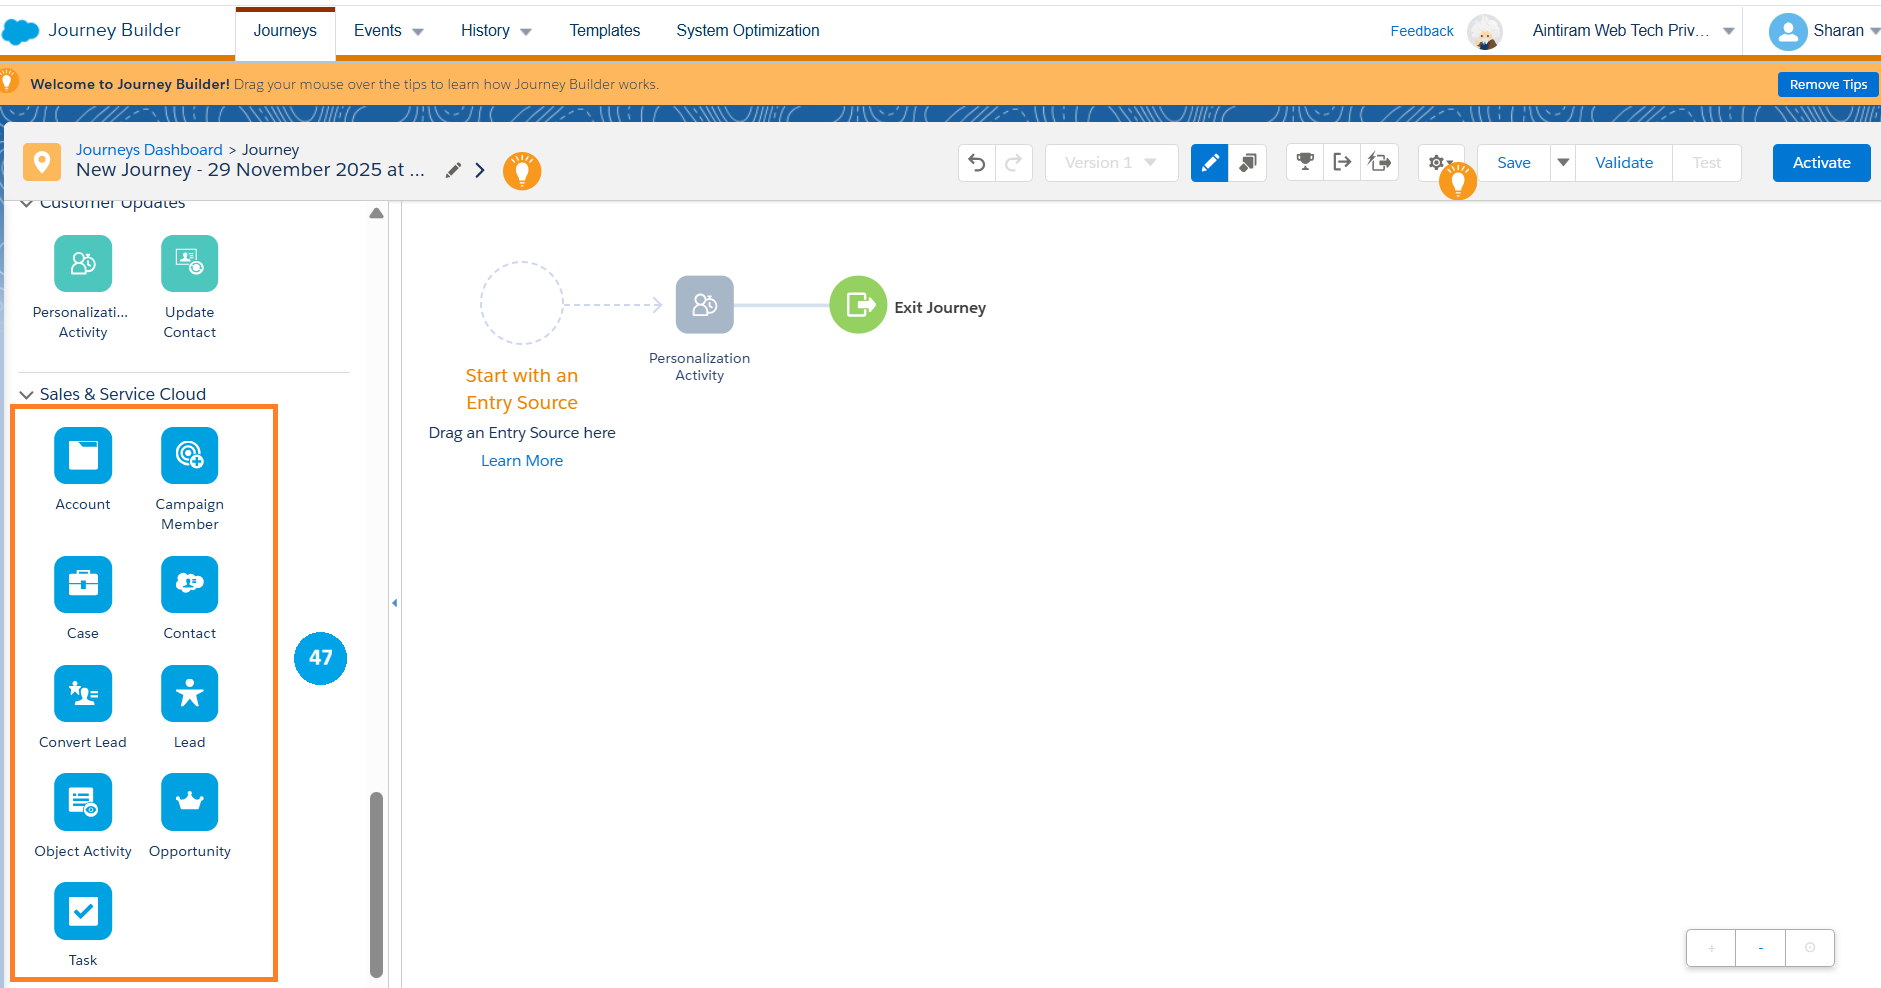
We have entry sources, through which subscribers enter into the journey. Below that we have activities starting with messages with different channels of communication we send on this journey. Next there is an advertising campaign activity. Below that, flow control has an ability to split and make decisions based on some specific criteria. We have customer updates for personalization activities in Salesforce or update a data extension. We also have a sales and service cloud integration using marketing cloud connectors. You also may not have activities active on your canvas based on your purchase.
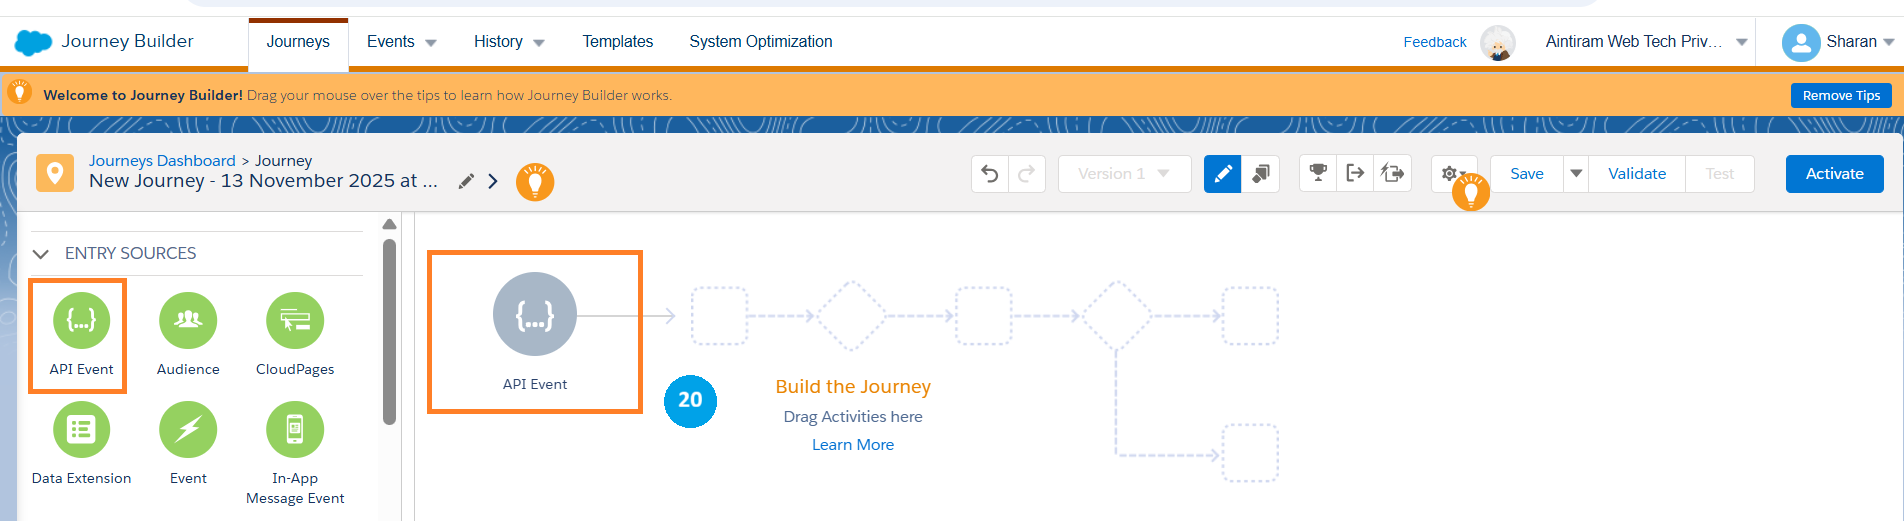
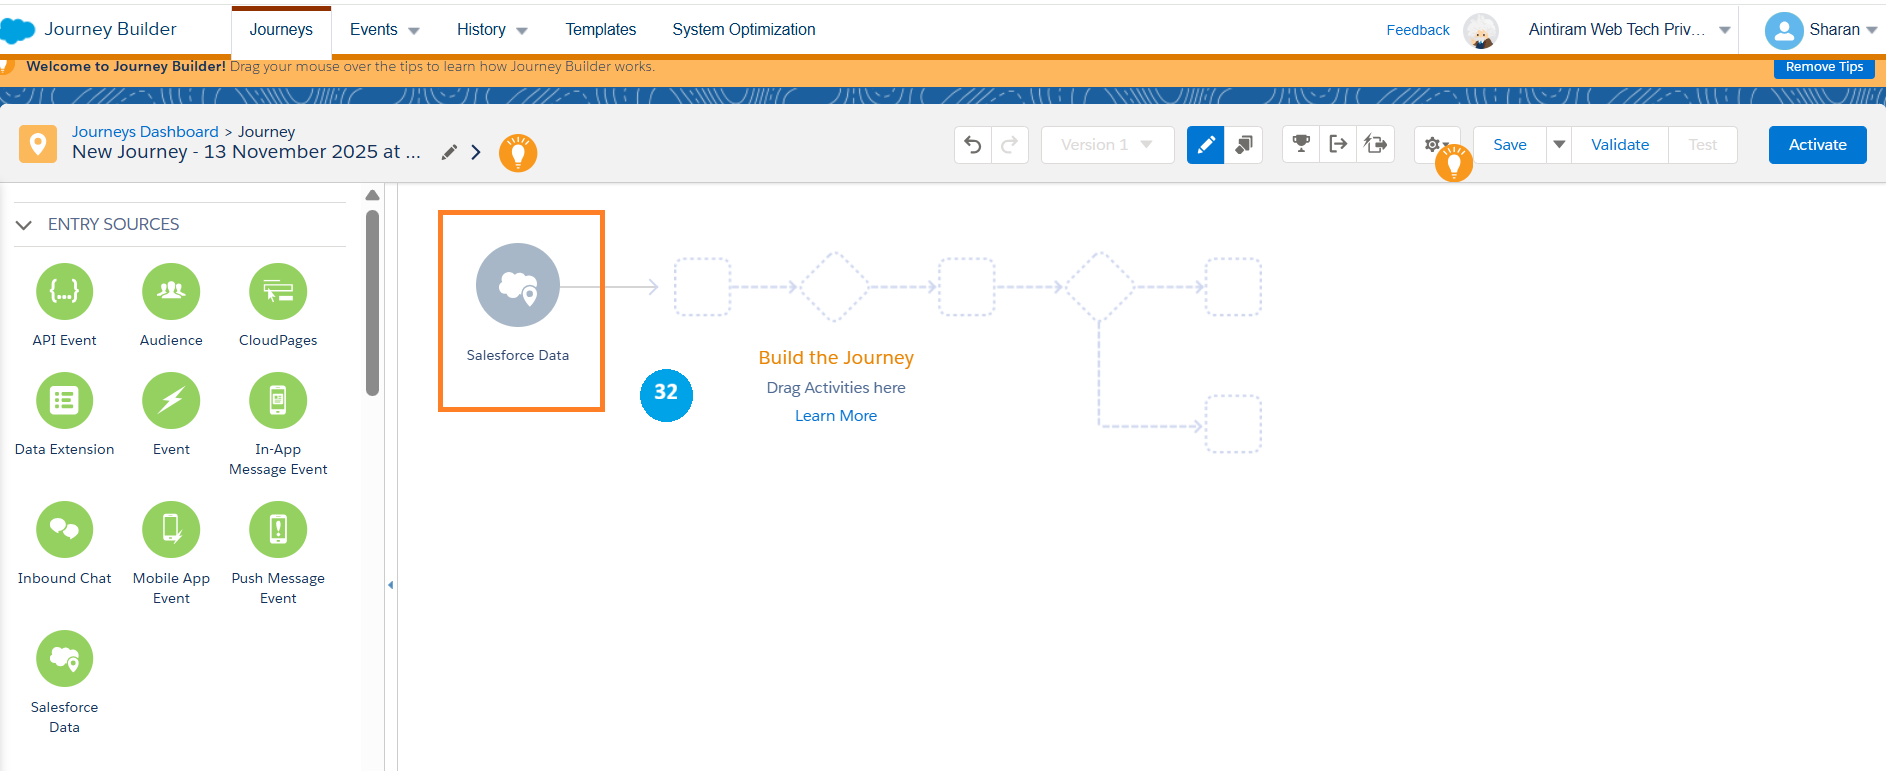
Entry Sources
API events in Marketing Cloud Journey are used to initiate the journey based on real-time data from the external systems. (No worries, let us do hands-on for the API event in our upcoming blog.)
How it will work in Journey Builder:
Entry source→ We can set the entry source for the journey as “API Event” in the marketing cloud (20).
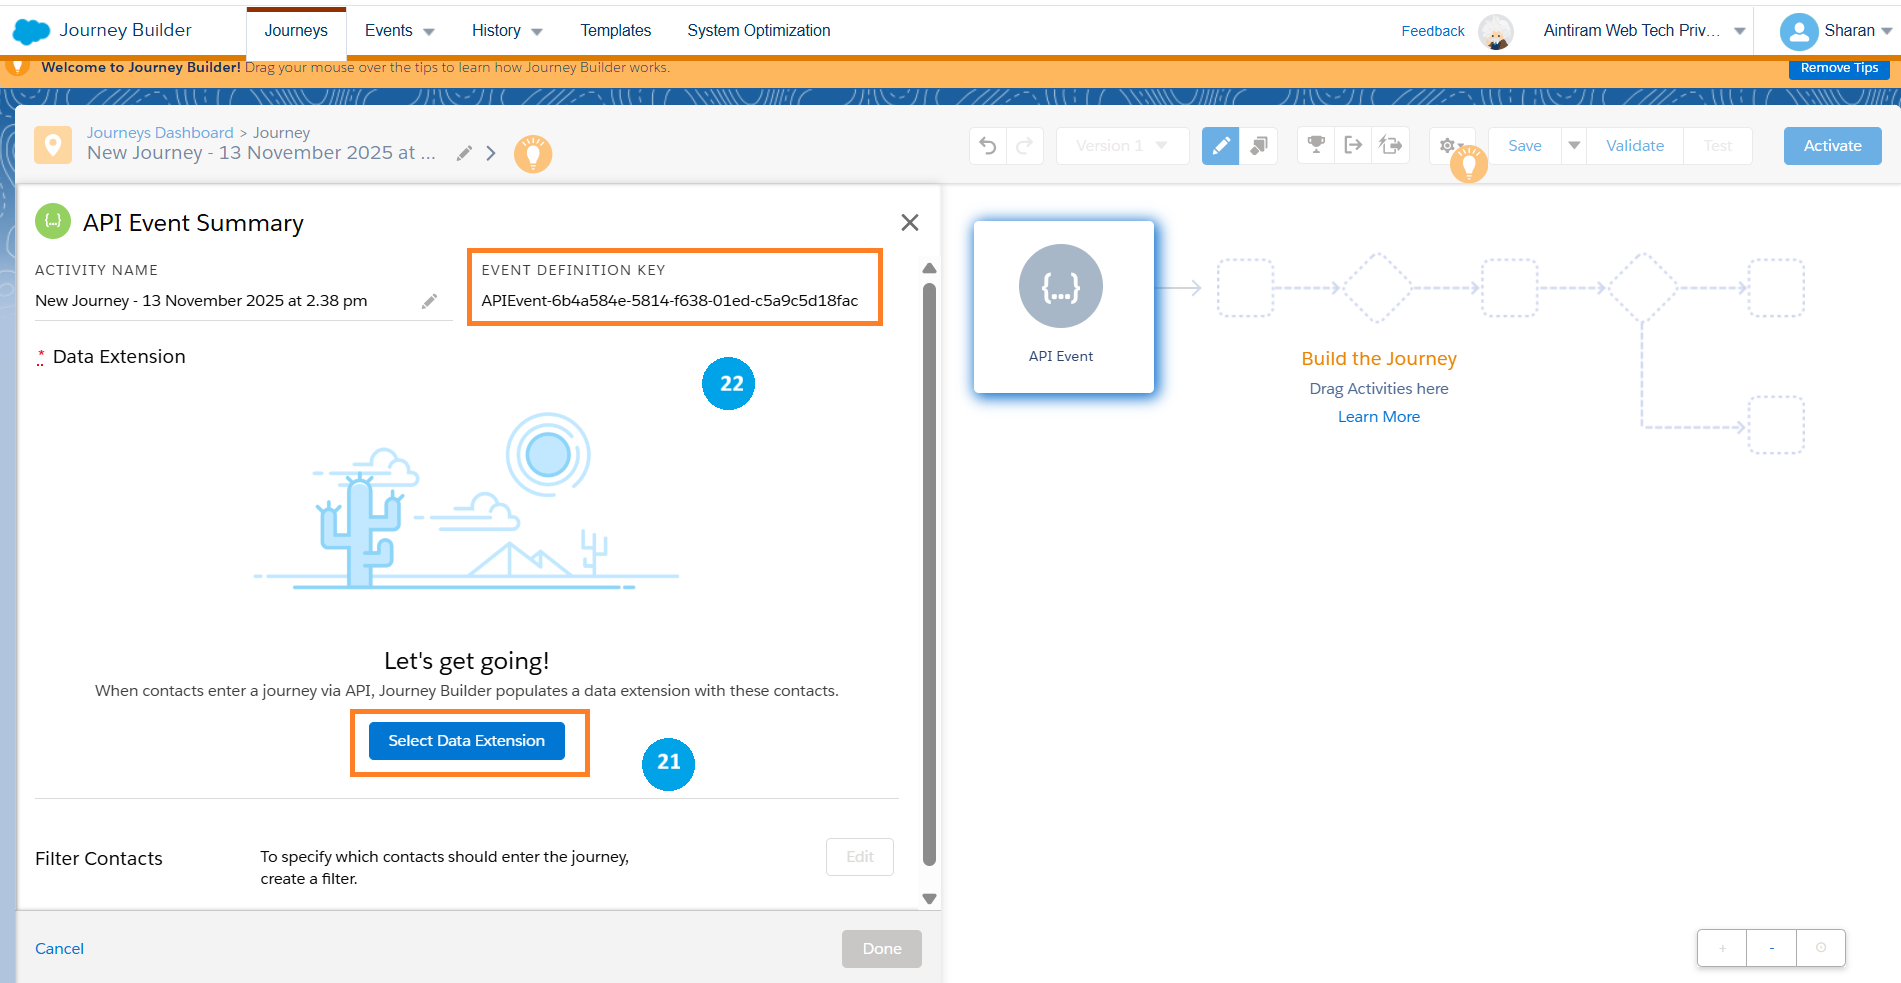
Data extension→ We can set the data extension which has the sendable data in it. That is contact information (21).
API Call→ When an external system (e.g. CRM, E-Commerce Platform or Websites) performs a relevant action (e.g. a new Purchase or a form submission), it will make an API call to the marketing cloud.
Data insertions→ This API call inserts a record to the data extension containing the necessary contact information and personalization data.
Journey Trigger→ Insertion of the record inside the data extension will trigger a journey to start the journey (e.g. start sending an email to the newly purchased user or new user submitted the form).
Event definition key→ The marketing cloud will generate an “event definition key” when you configure an API event. This key is important for correctly targeting the specific journey via API call (22).
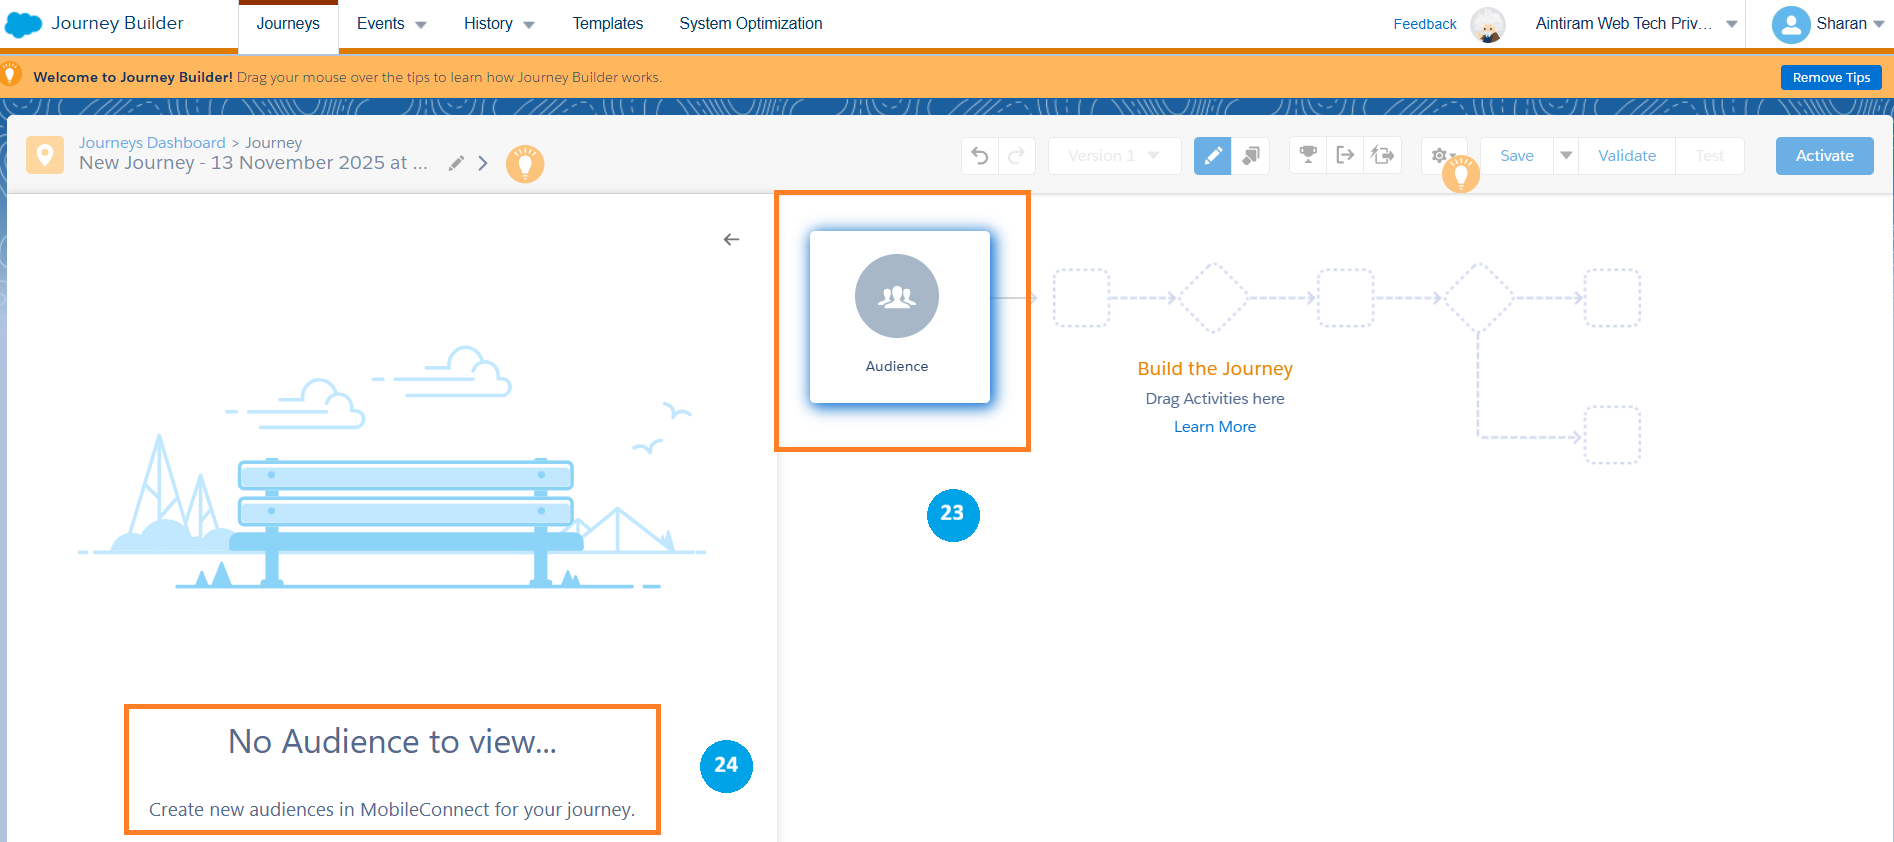
Audience in the Entry Source: This allows us to add our audiences from the contact builder into the journey (23). For these contacts, we need to create a contact in the contact builder or from the mobile connect in the Mobile Studio (24).
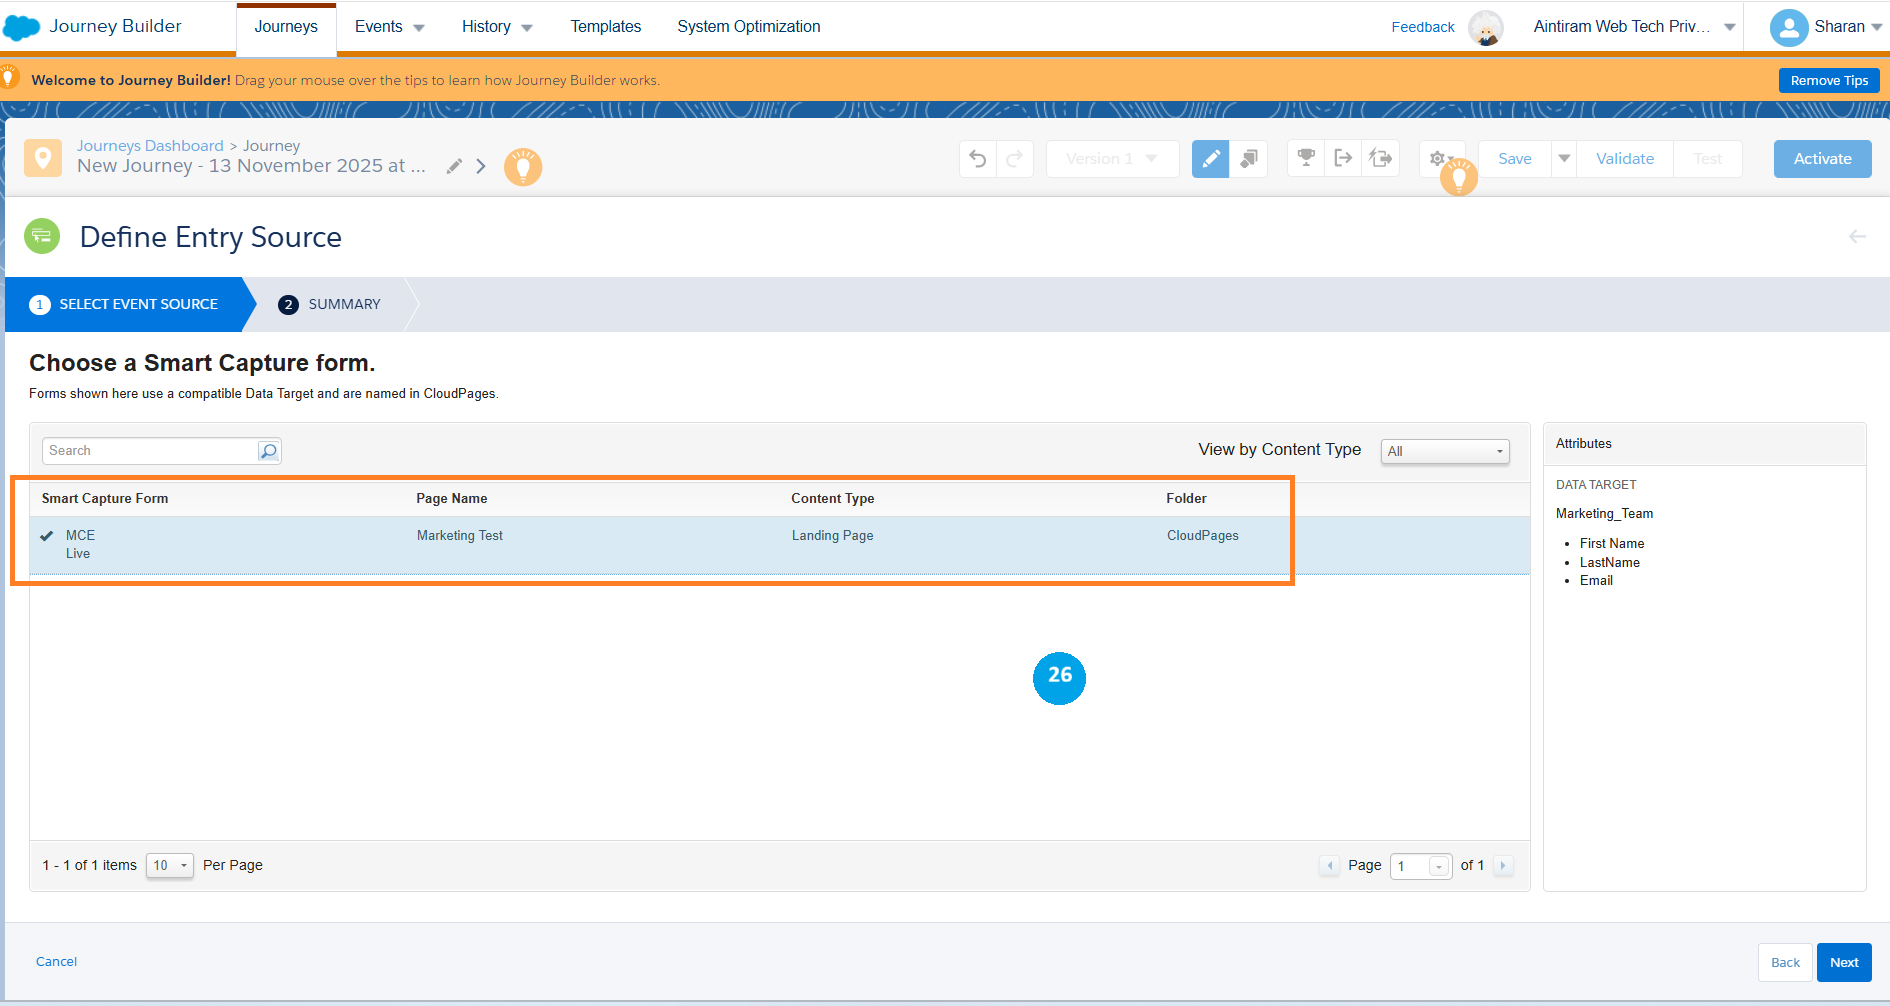
Cloud pages: Cloud pages Entry source allows us to use smart capture cloud pages (25) they have created in our cloud pages to submit a form which will submit that record into our journey builder. As I have no cloud pages created as a smart capture now. If you have it, you can use it as an entry resource for your journey (26).
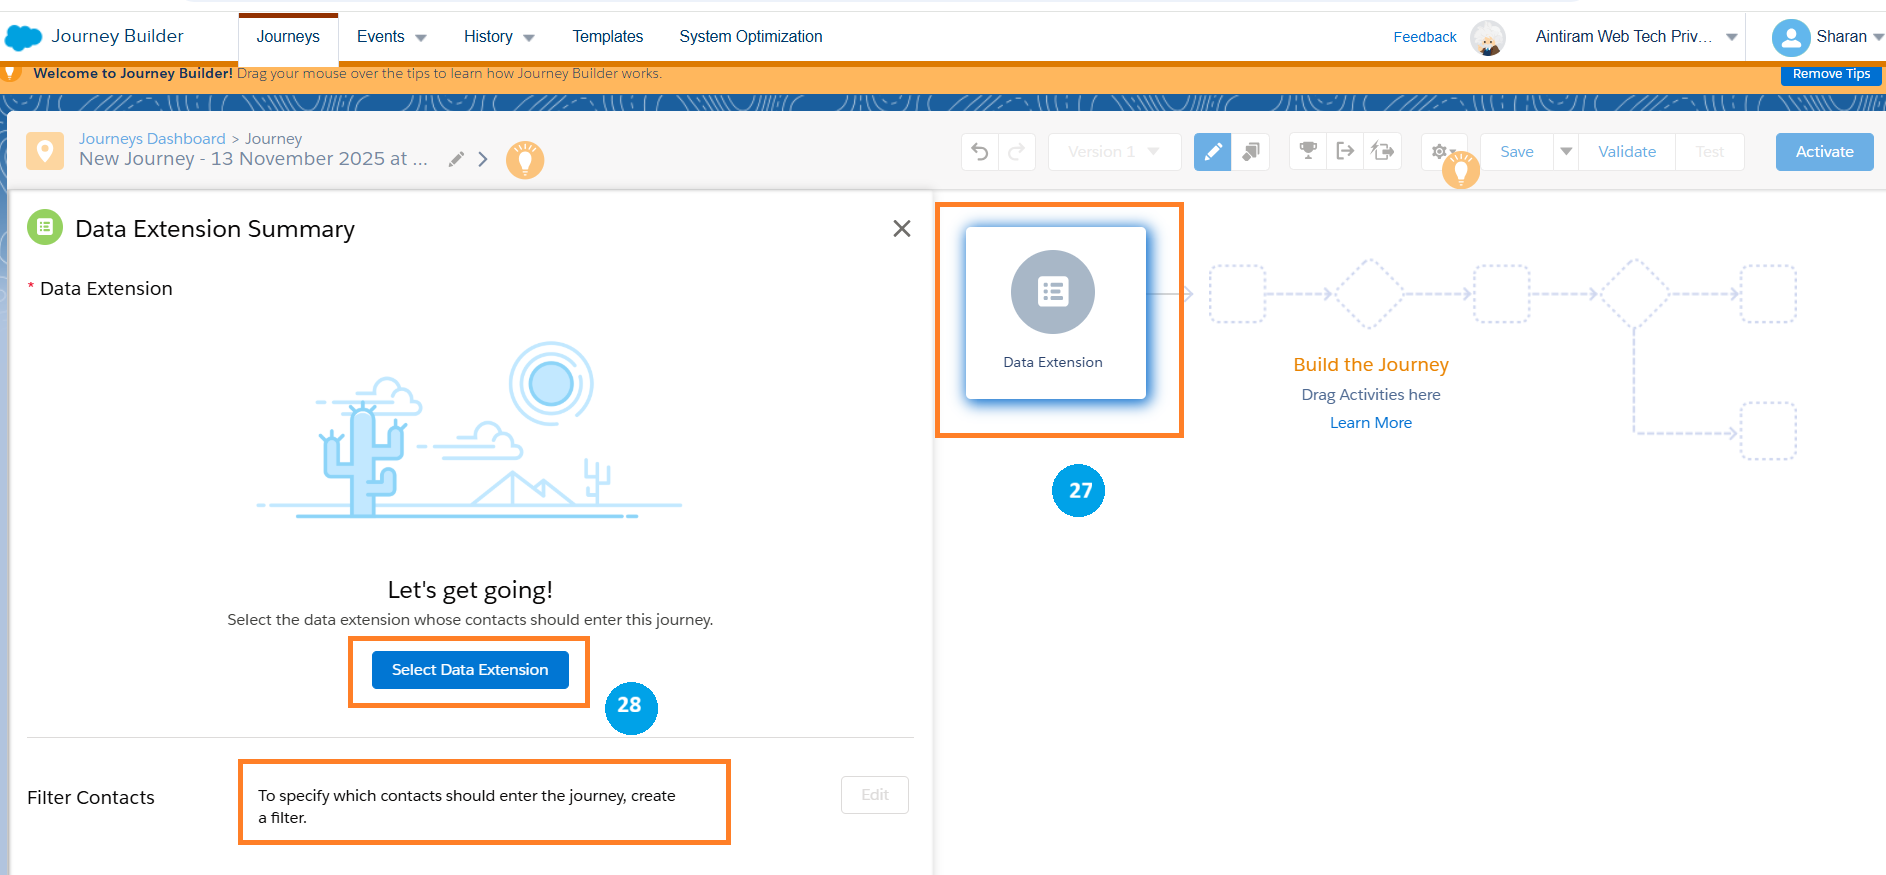
Next, we have a data extension entry source; it is one of the interesting entry sources. We can choose the data extension (27) that is sendable from our marketing cloud to add those subscribers onto our journey. You can also use the filter contacts option to apply a filter (28) to that entry source to only let in the records that apply to your current filter and, finally, once you choose your data extension, you can also choose to refresh it using the automation to relet those records every time that automation runs. This entry source is interesting as it allows for some perfect flexibility by using SQL and Automation Studio to enter your records into your journeys. (No worries for now, let us see in detail how the import in automation studio works in the next upcoming blog.)
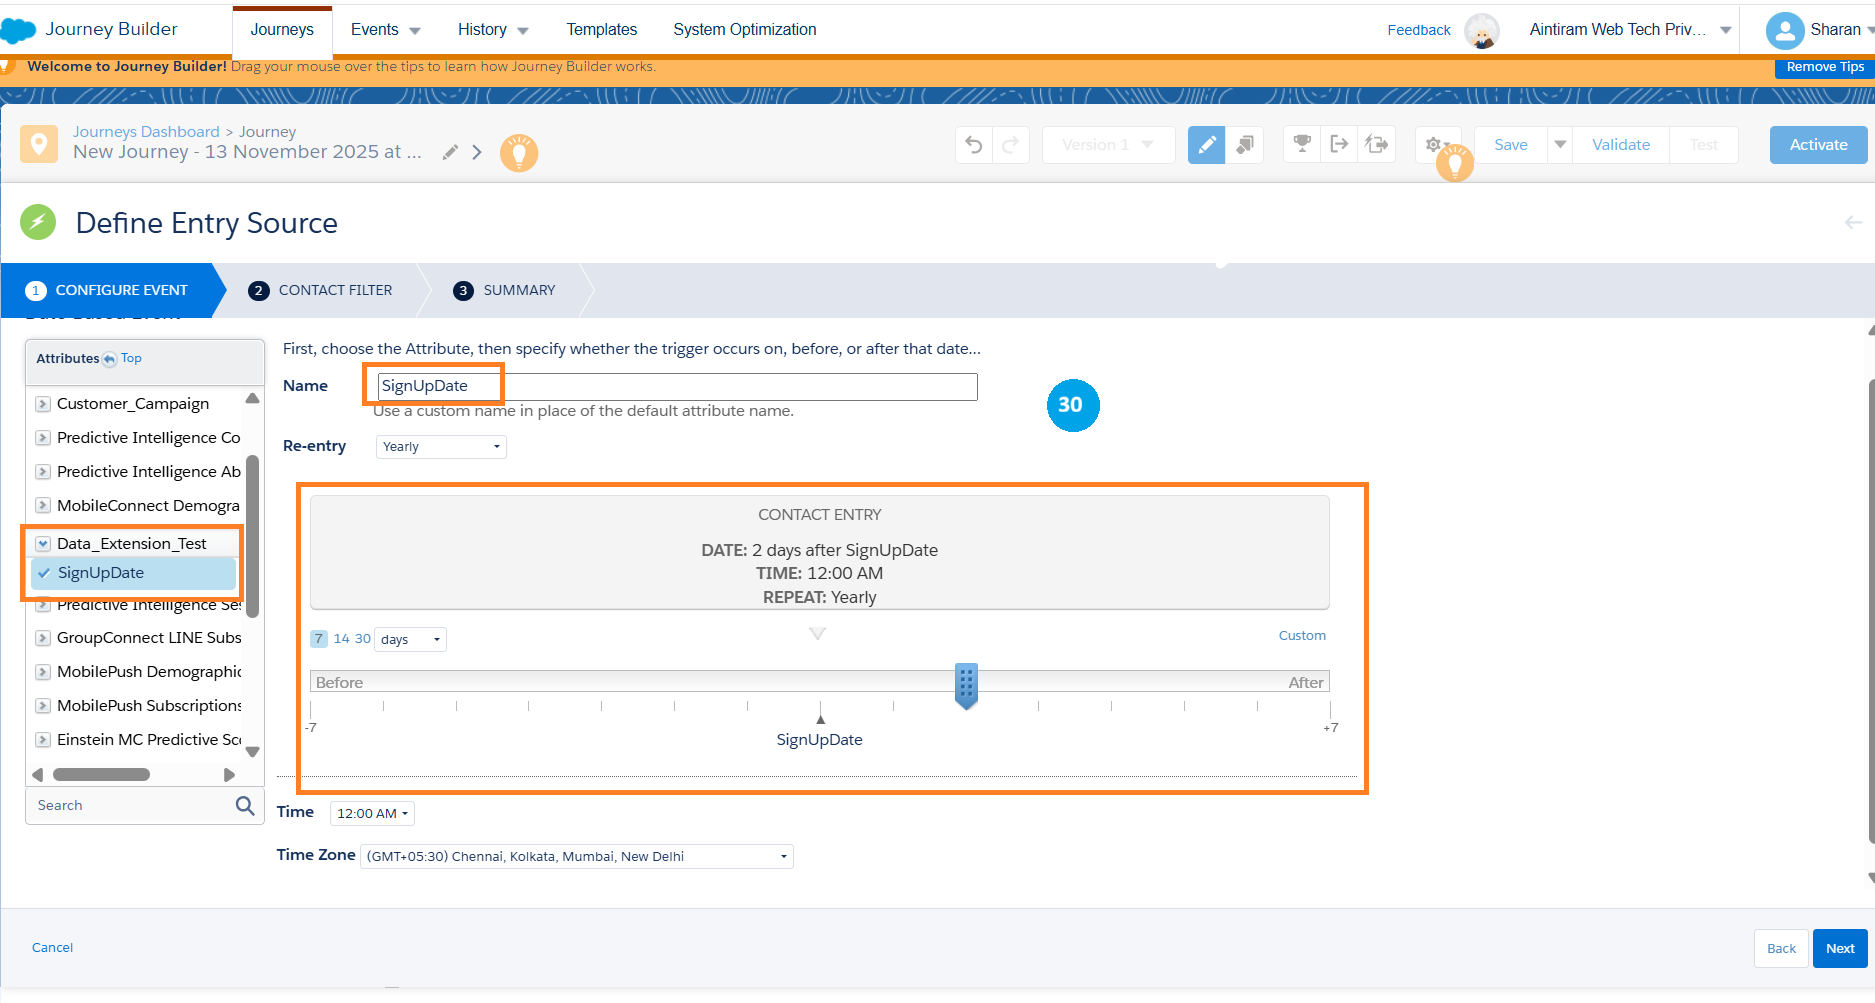
Event Entry source: It will allow us to use a connected data extension to choose a date attribute from the data extension (29) & (30). The same applies for In-app events, Mobile App events and Push Message events.

The inbound chat journey activity allows you to enter new records into your journey based on a WhatsApp inbound chat. This occurs when one of your subscribers sends you a WhatsApp communication (31) which triggers one of your keywords.

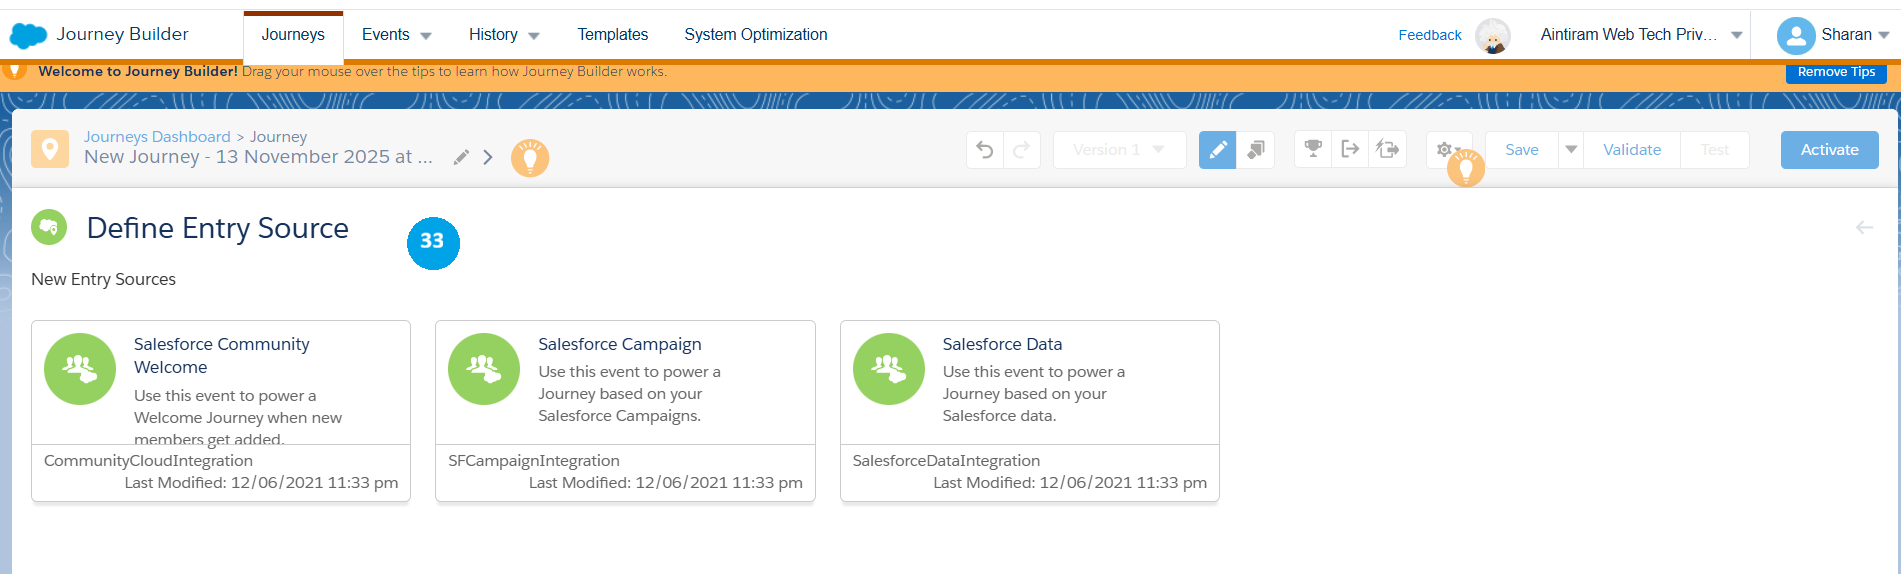
Salesforce data entry source: Salesforce data entry source is used as we have multiple ways to interact with it. To start with, we can use the Salesforce data entry source (32) to specify an object within our Salesforce CRM whenever one of those objects gets modified or created. It adds that record into our journey. We can also use our Salesforce communities using our community cloud integration and, finally, we can also use our campaign member integration to add new subscribers to this journey based on their campaign member activities and with the entry sources all covered. We can define the entry sources (33) (Let's see more about the Salesforce data in our upcoming blog).
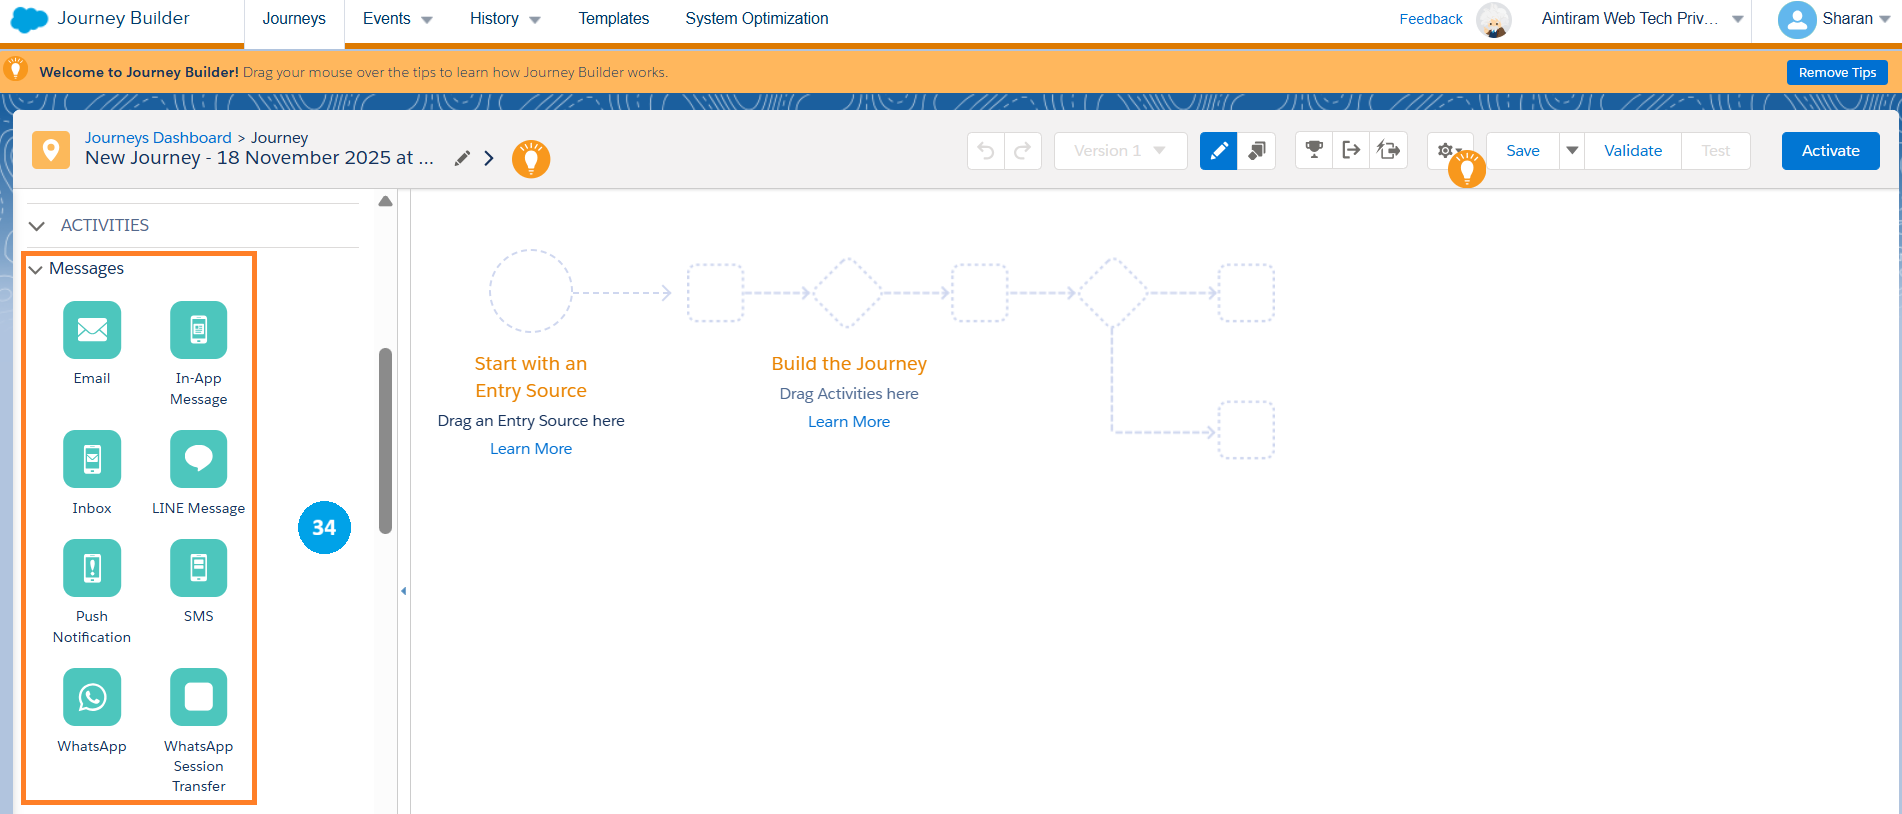
There are different activities available in Journey Builder that are Messages, Advertising Flow control and Customer updates (34).
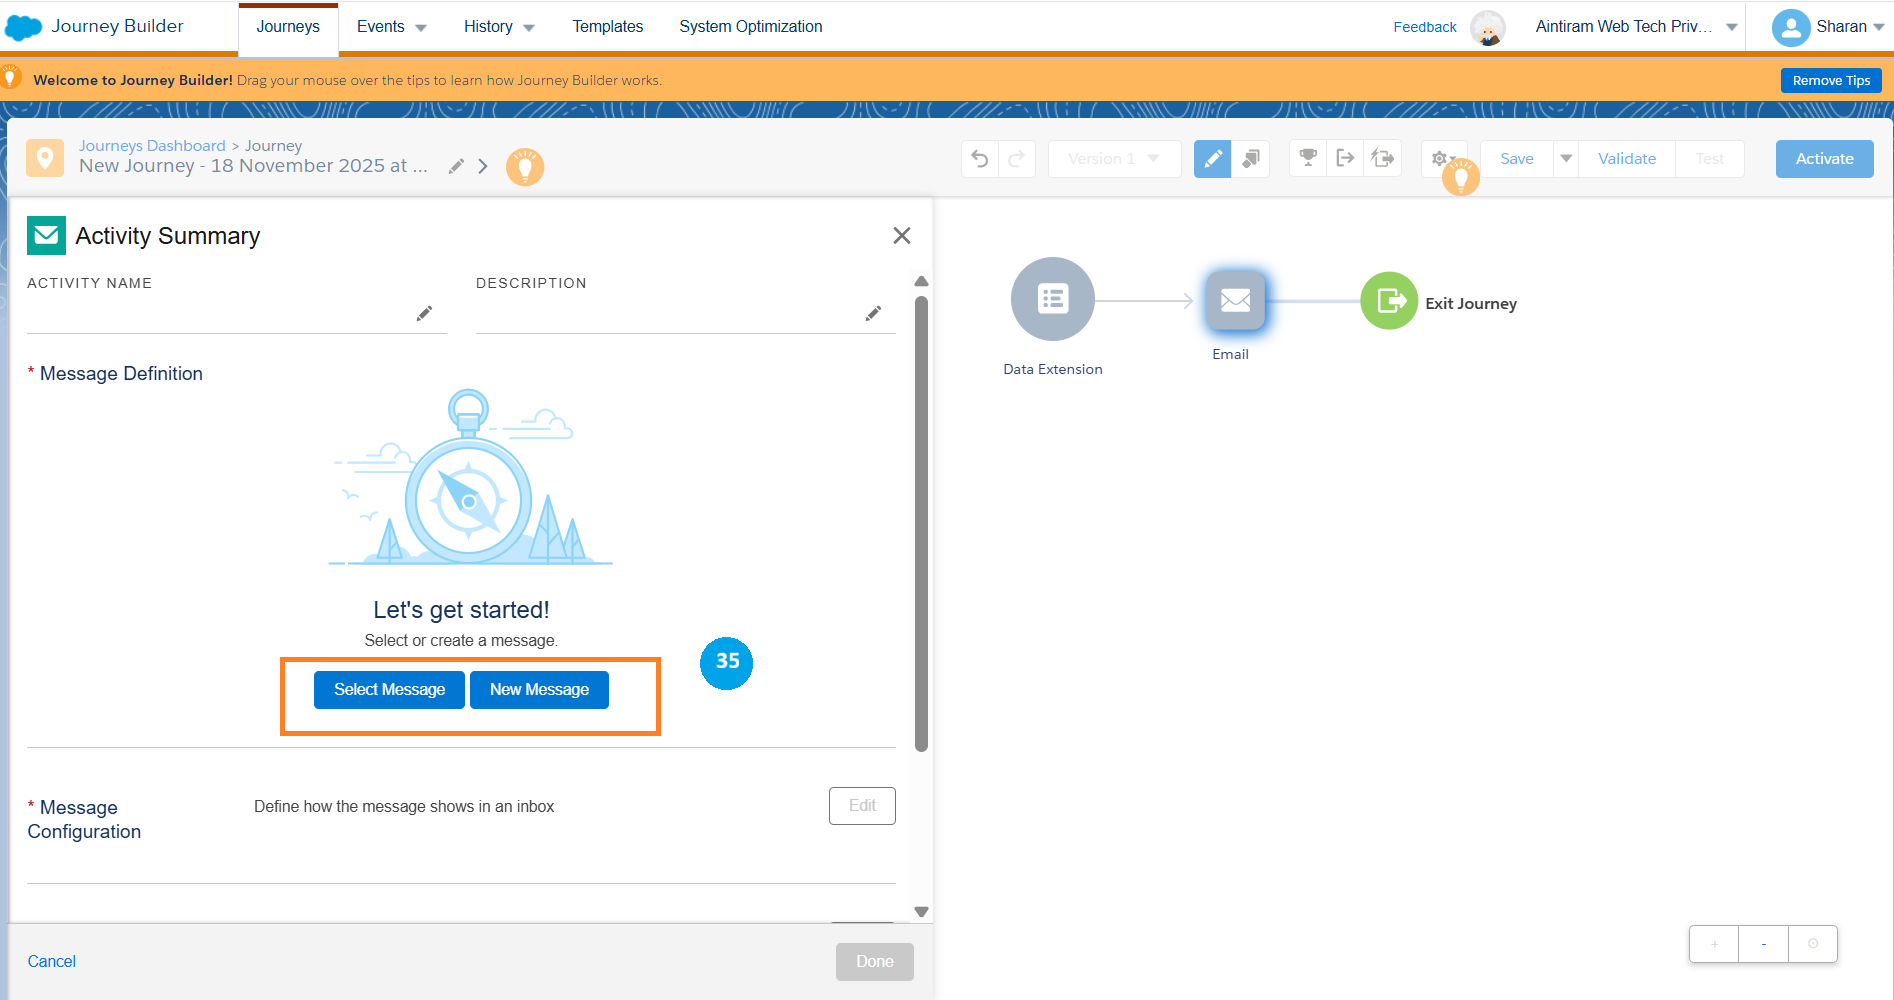
In the Messaging activities, we have Email to send the email to our subscribers who come through our journey. We can choose the message, or we can create a new email message (35). Also, we can edit the message configuration, in which we can define how the message shows in an inbox. By editing the delivery option, you can manage the audience who receives our message, rate of delivery, and data capture. There is an advanced option here you can further customize the email messaging activity. (Let's create a case study in our upcoming blog)
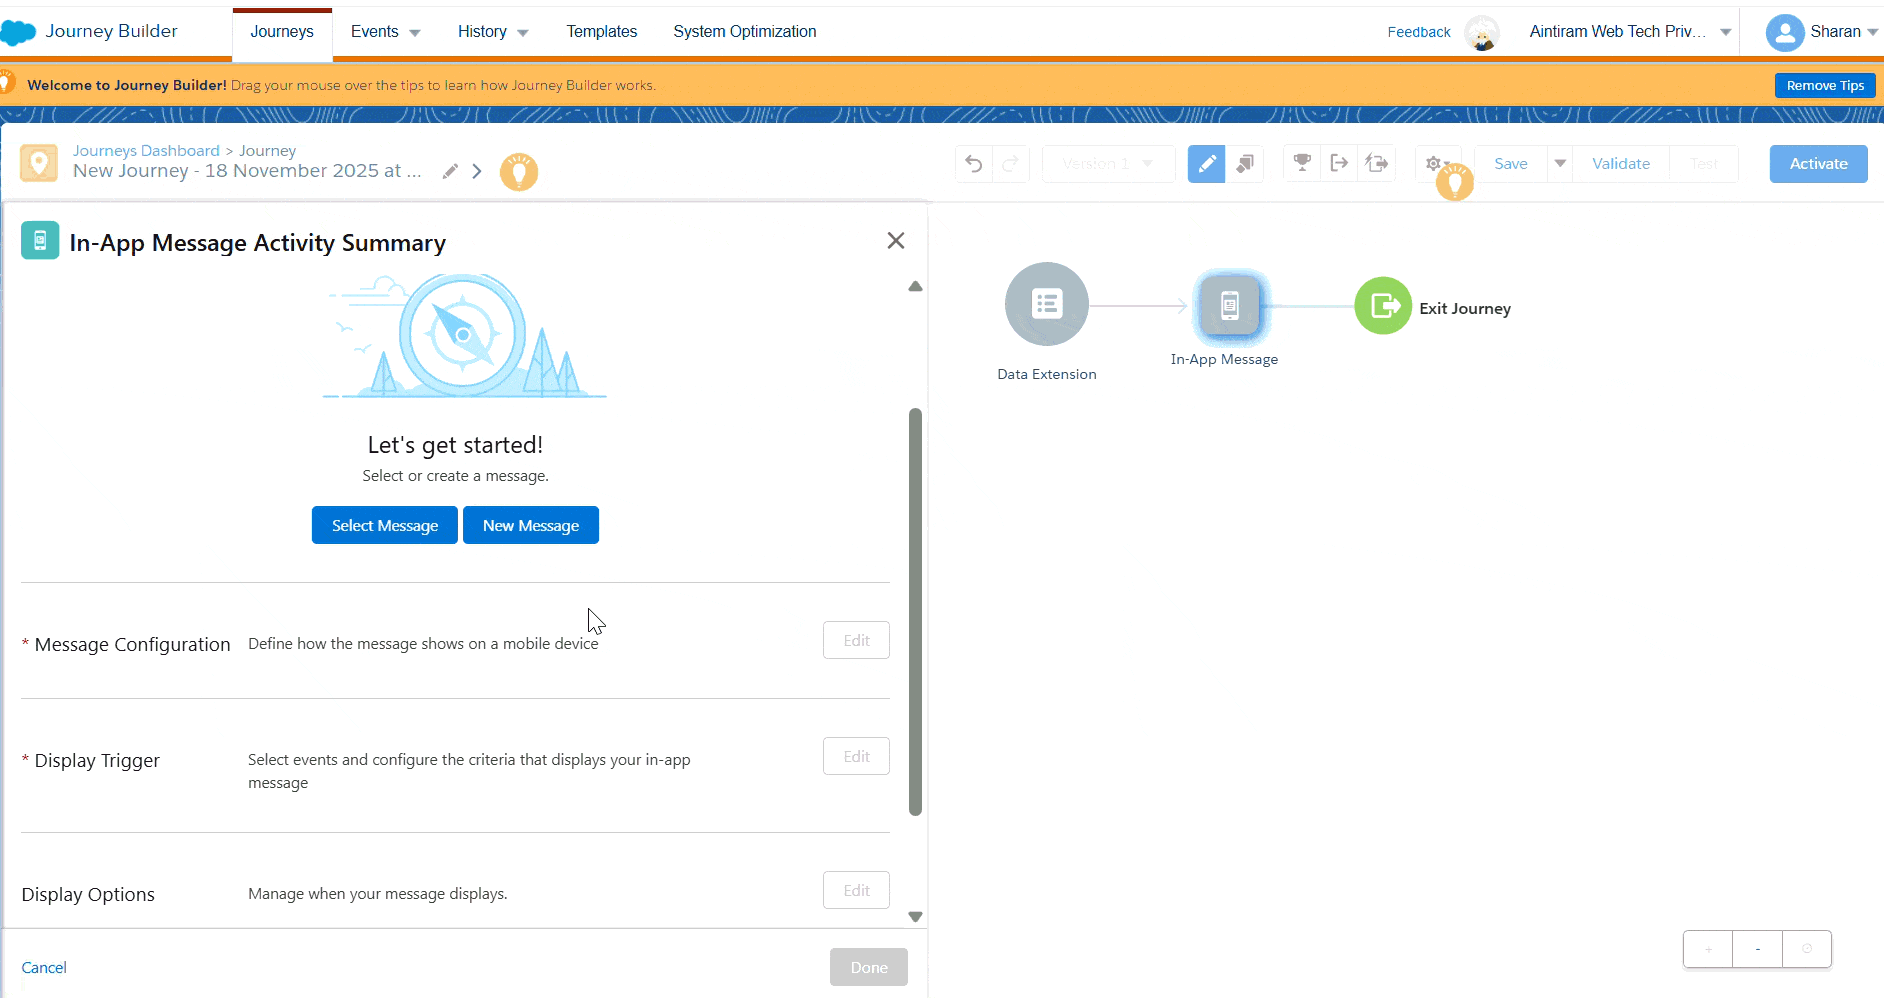
We can also use Mobile app sdk to send In-App Messages, in that we can configure the messages and configure the criteria that display your In-app messages (please see the GIF image below). Inbox message or push notifications to a connected mobile device. We would also use the SMS function to send a long or short code through a mobile connection to our subscribers. We rarely use WhatsApp session transfer and LINE messages. Mostly, we would focus on the email message activity.
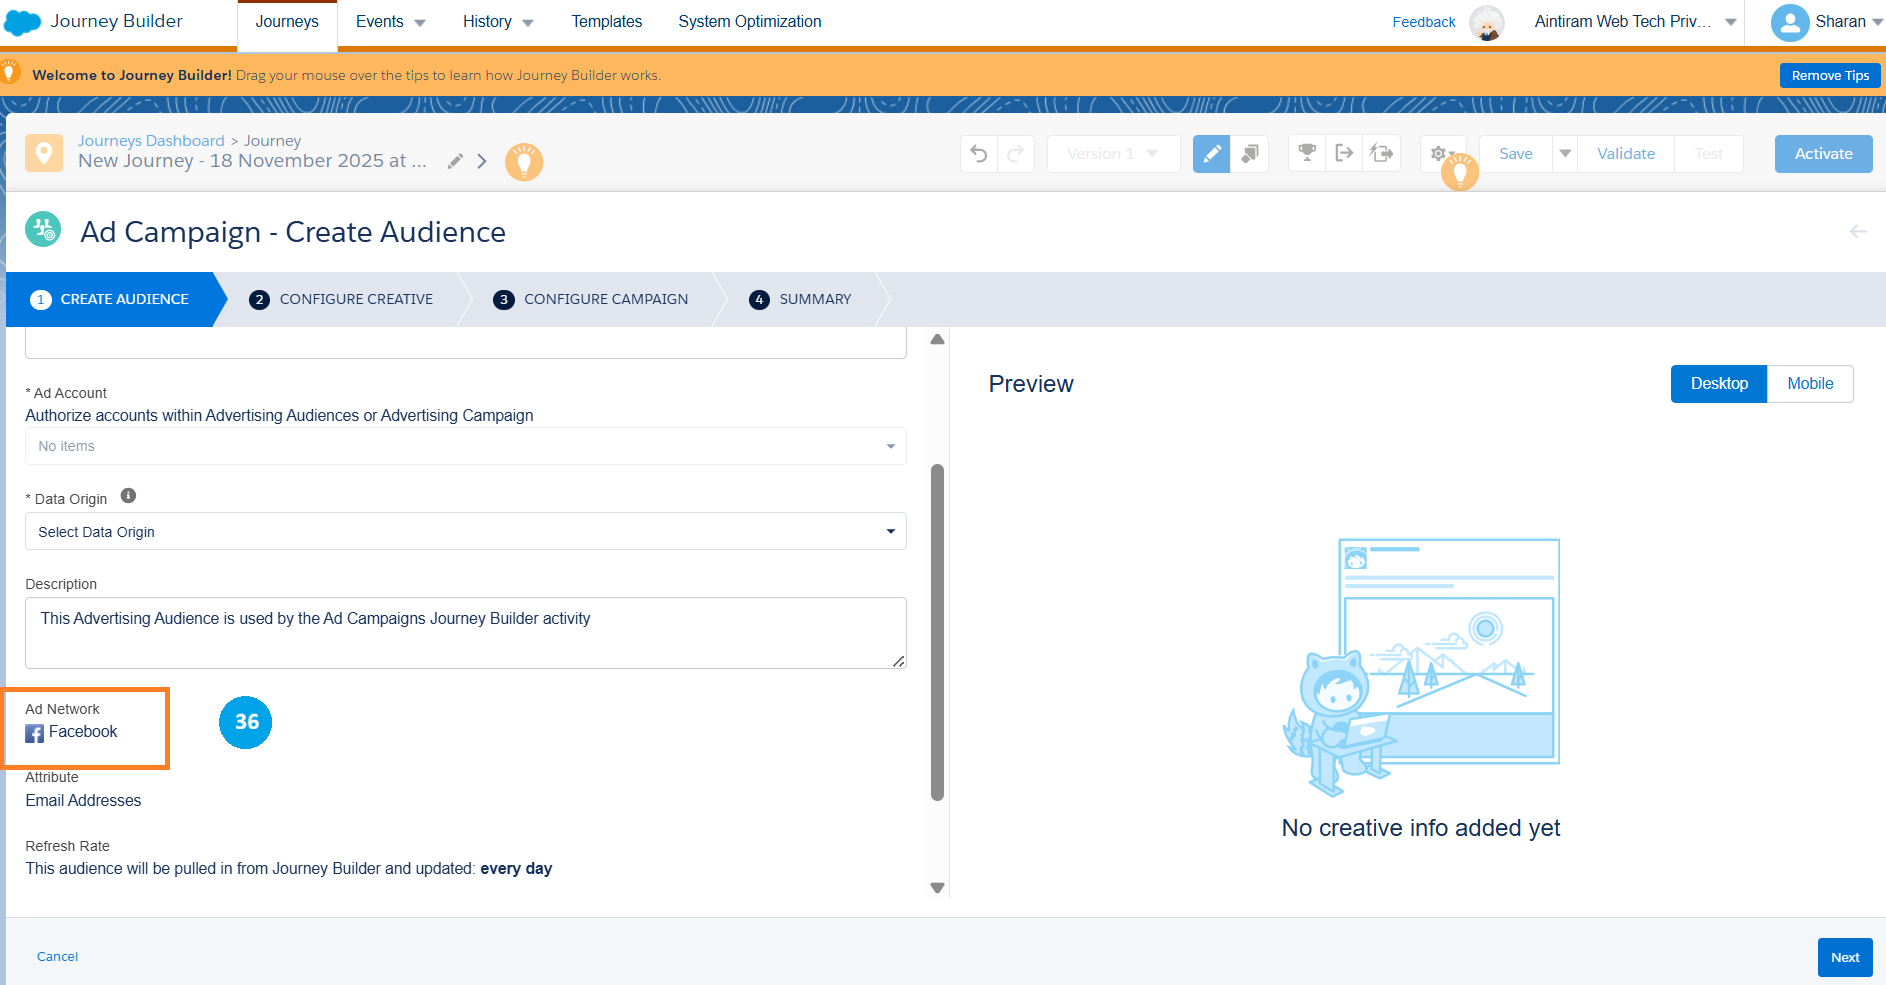
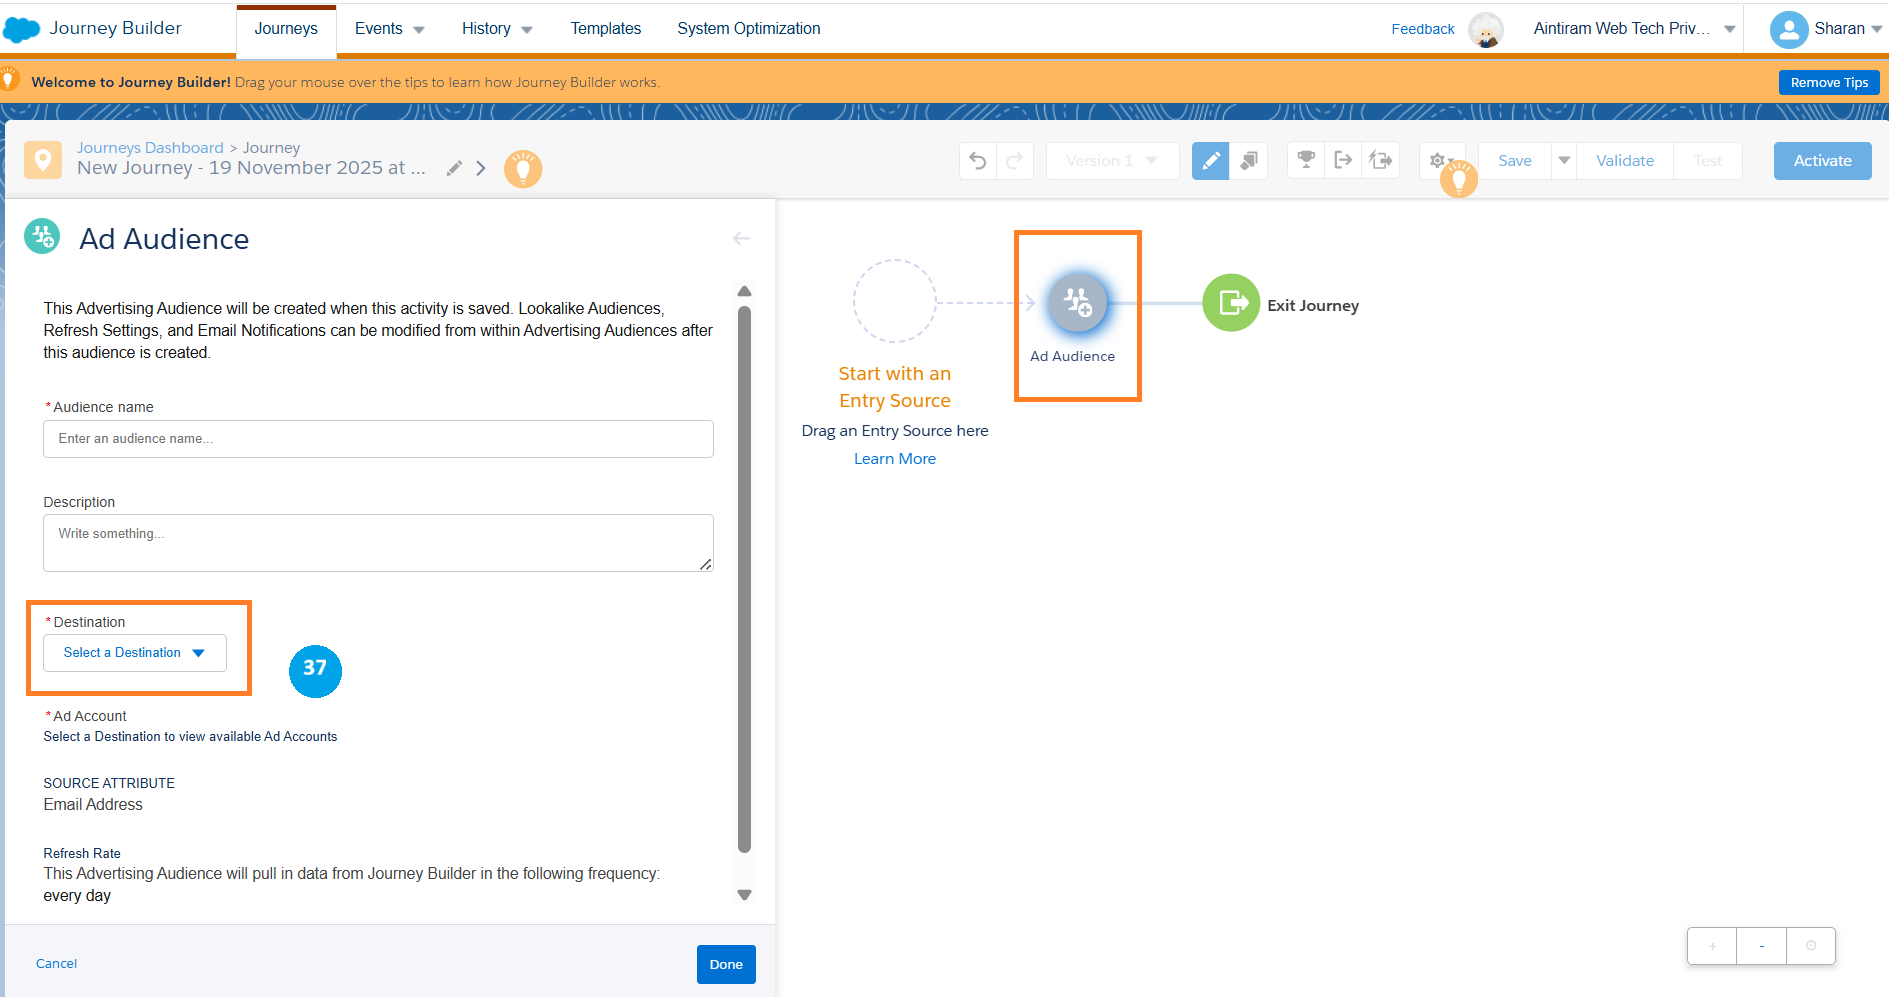
In the Advertising activities, which allow us to connect our journey builder to our advertising audiences, the ad audience activity which allows us to add subscribers who come on this journey to an existing or to a new advertising audience. Which you can then publish to our chosen social media platform. The next one is the ad campaign, which allows us to create an advertising campaign on Facebook (36) and then add those subscribers who come to the journey into that campaign. In the ad audience, we will add the audience from the campaign by choosing the destination (37) data extension to store the prospects. Let's discuss more about these advertising activities in the future.
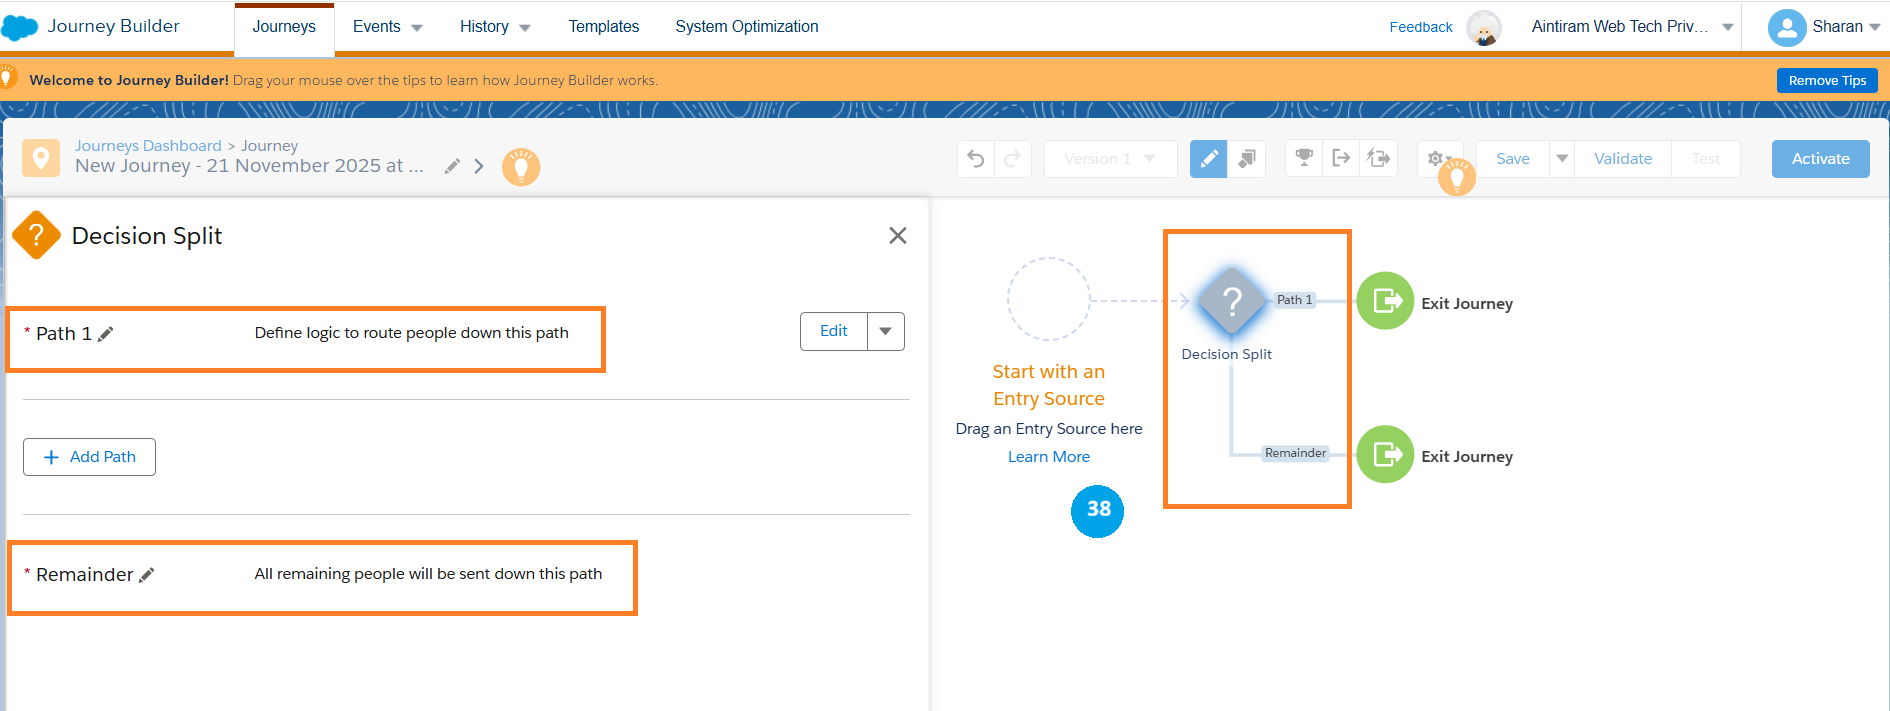
Flow control activities: It is one of the powerful parts of journey builders that allows us to create various paths for our subscribers to go down based on their data and interactions.
To start with, we have a decision split. Now, this split allows us to choose various rules and create various paths for subscribers to go down (38). I can add the criteria for path one, we can add path 2 and so on and so forth, where all subscribers who do not match the previous criteria on the path, else will go down to the remainder path.
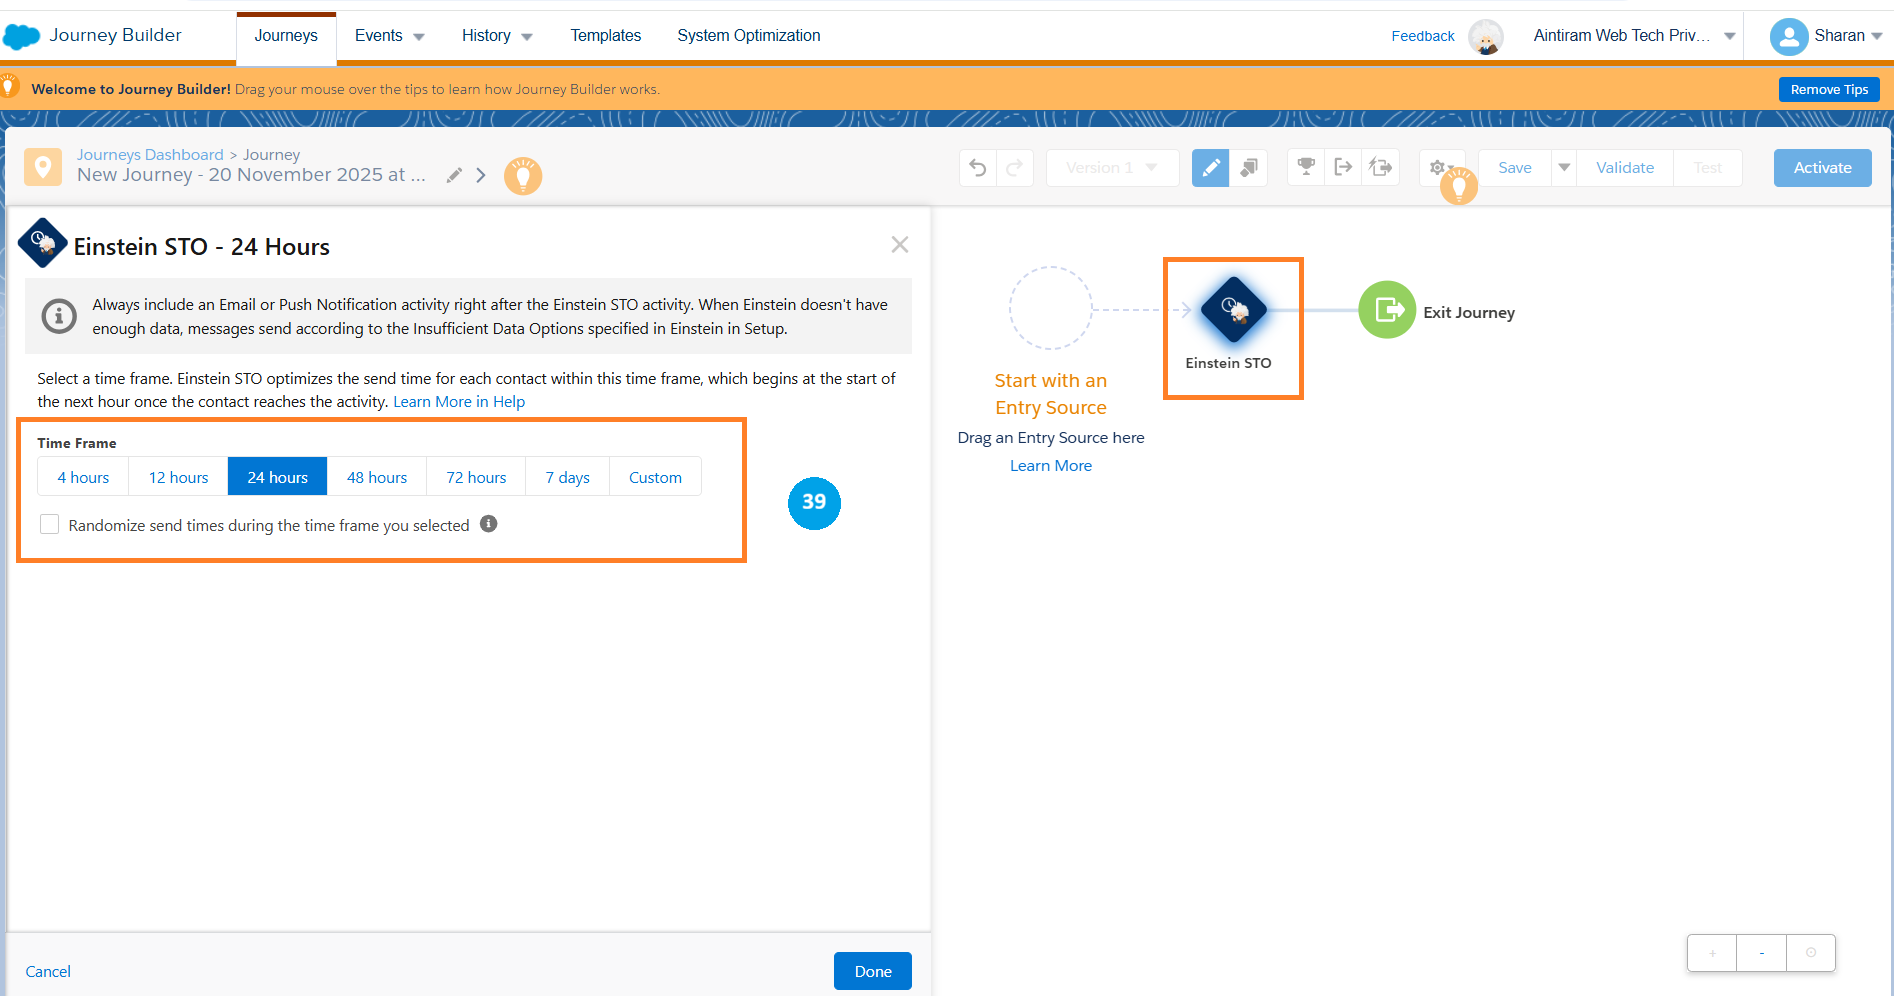
Einstein STO (Einstein Send Time Optimization): In the Einstein STO activity optimizes what time each subscriber should receive that email to have the maximum chance of them to open the email. This works by Salesforce Marketing Cloud indexing the openings from each inbox. When you use this style, it holds the subscriber back until it reaches that day of week or time of day that subscriber is most likely to open your email and then send it (39).
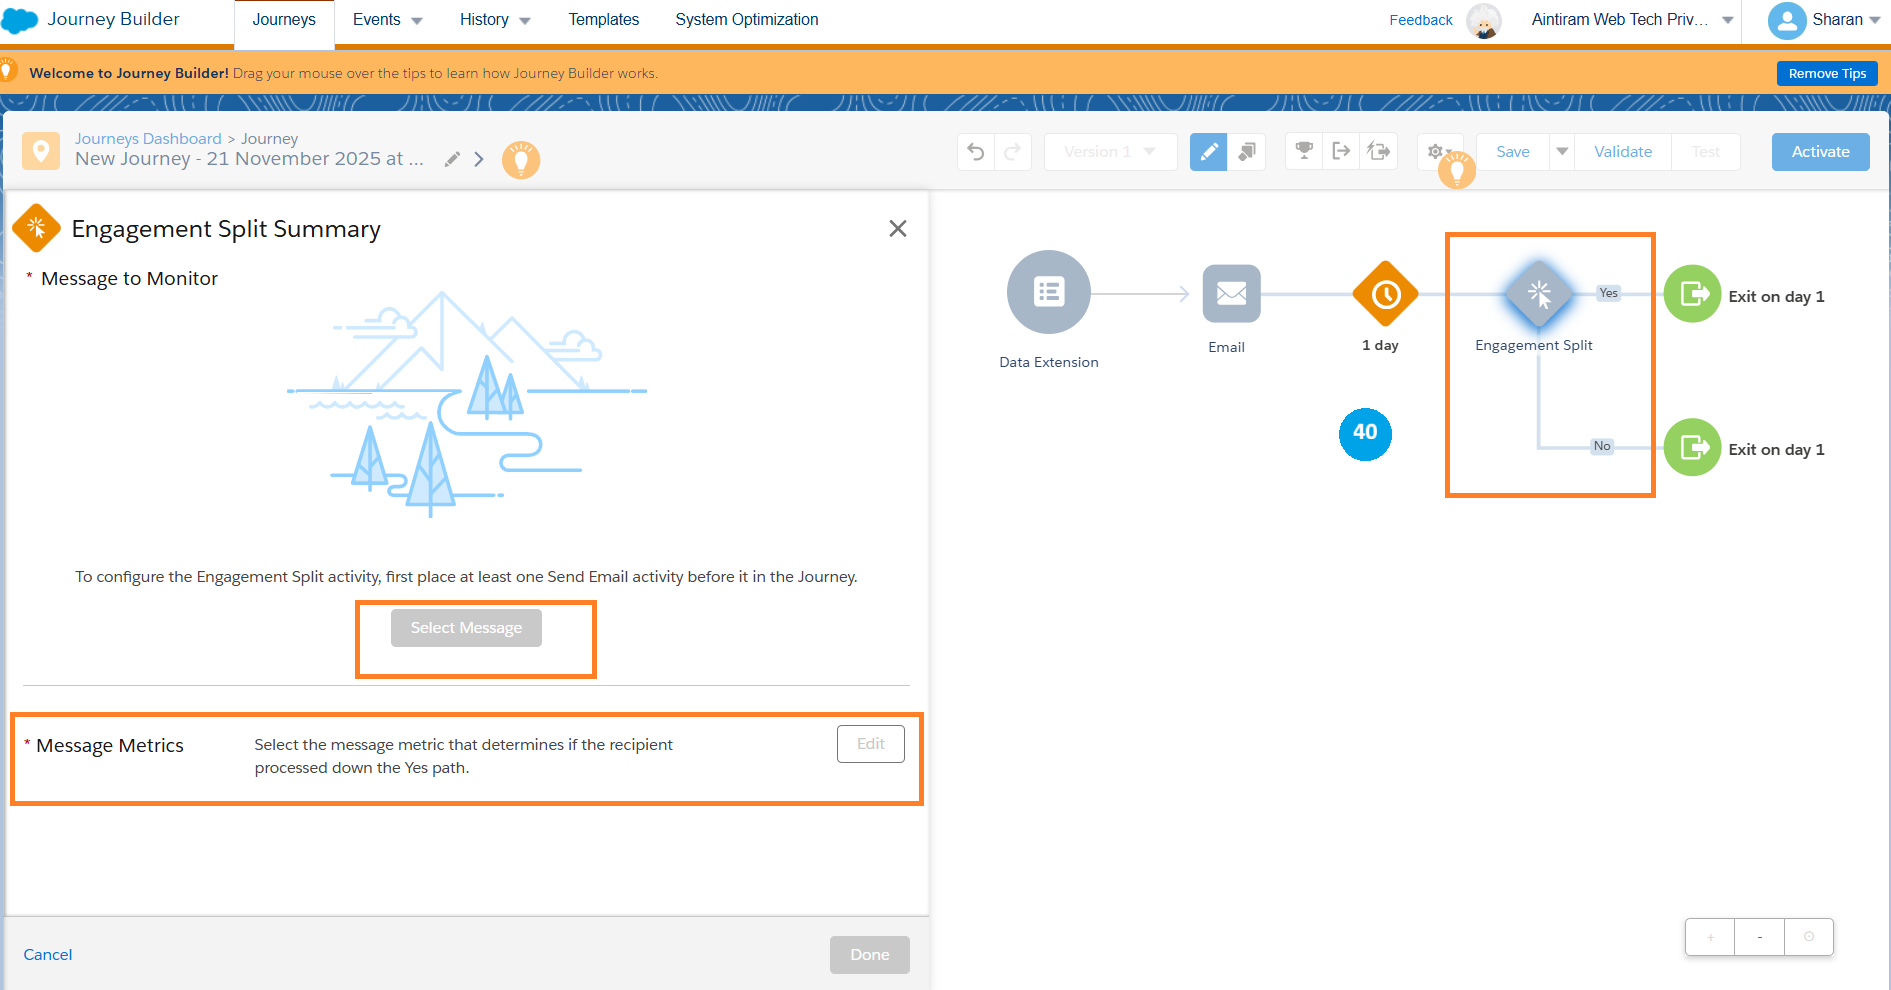
Engagement Split Activity allows you to create different paths based on how your subscribers engage with an email within your journey. You can choose to engage in splits based on opens, clicks, and specific clicks on specific links. For example, you could use the engagement split activity (40) to create a reminder email if your subscribers failed to open or click the original email on your journey.
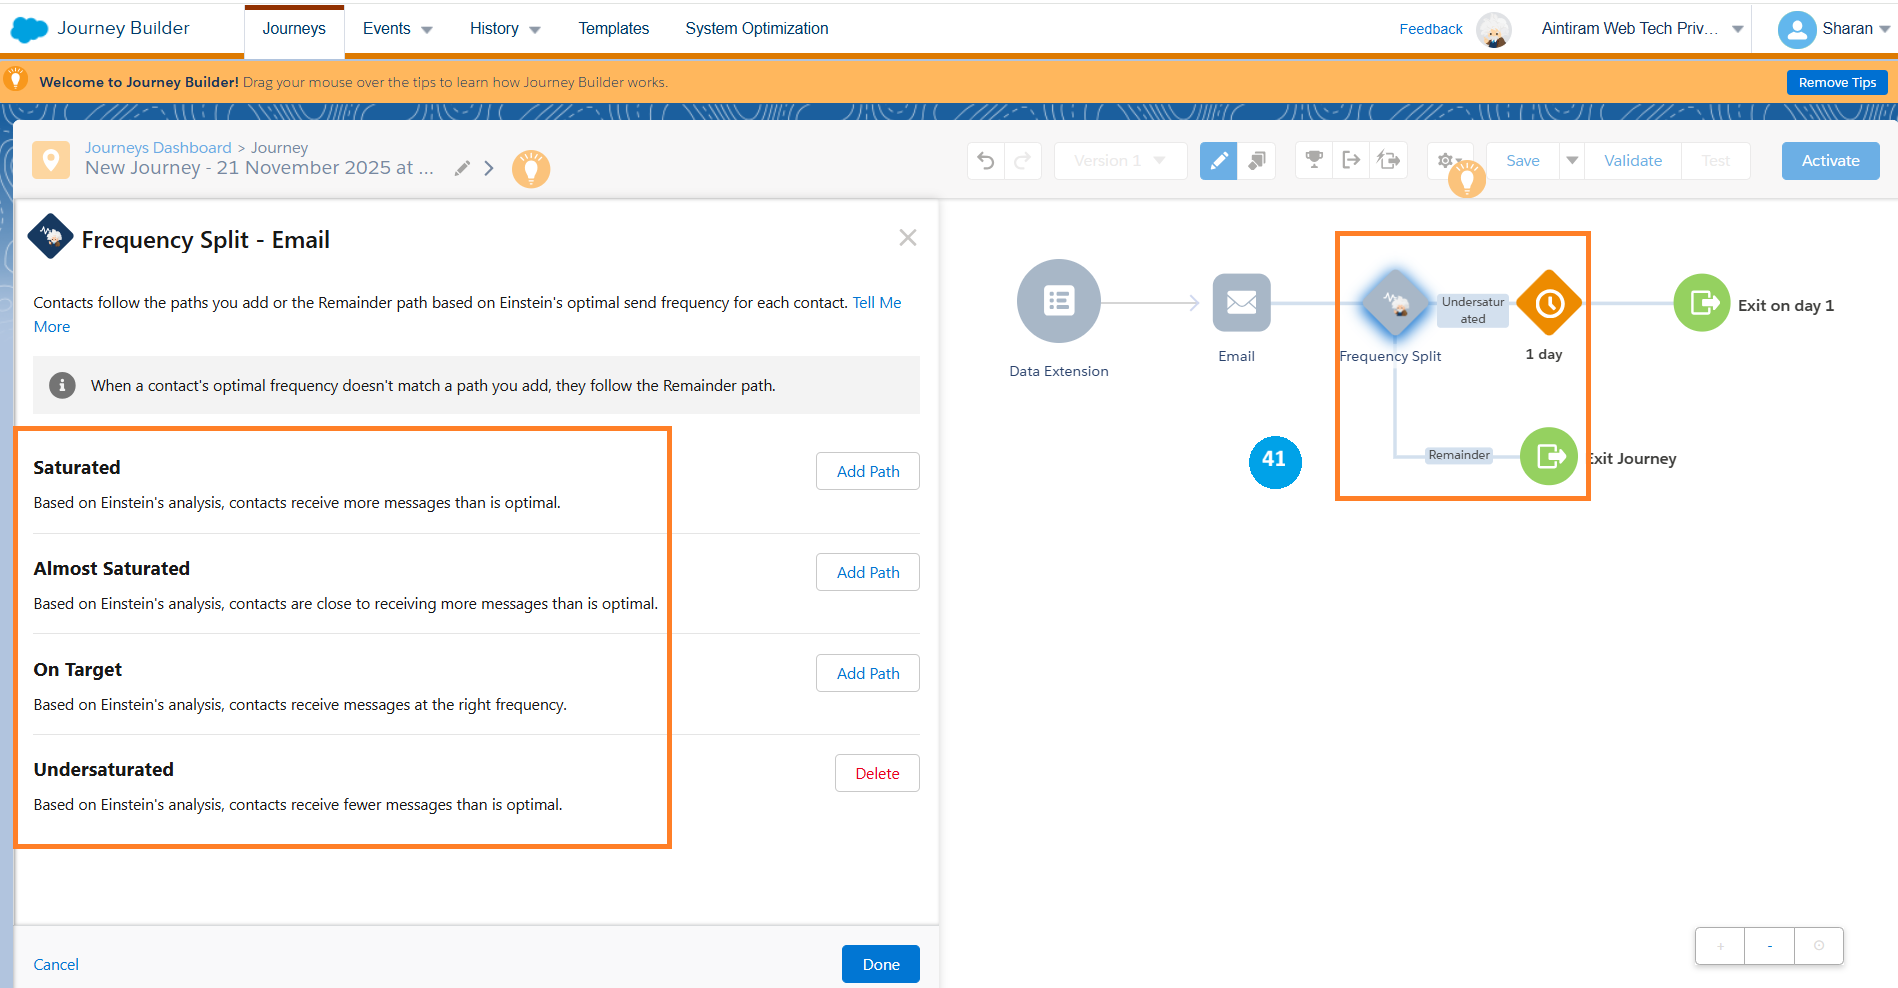
The frequency split activity allows you to tap into the Einstein frequency scoring function in the marketing cloud, creating different paths for various subscriber saturation rates (41). For example, you can use this activity to prevent sending to subscribers who are already oversaturated and only send this activity to those who may be undersaturated.
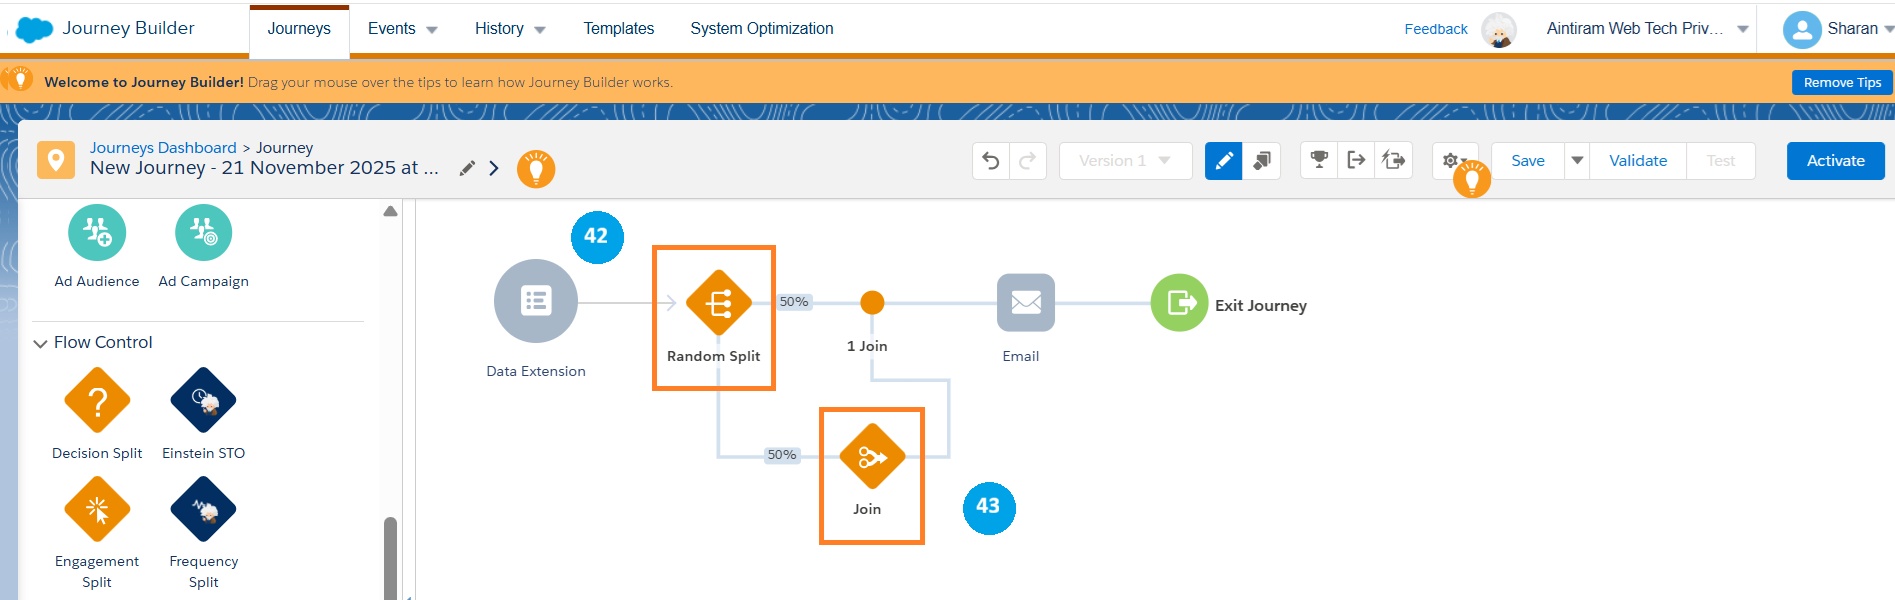
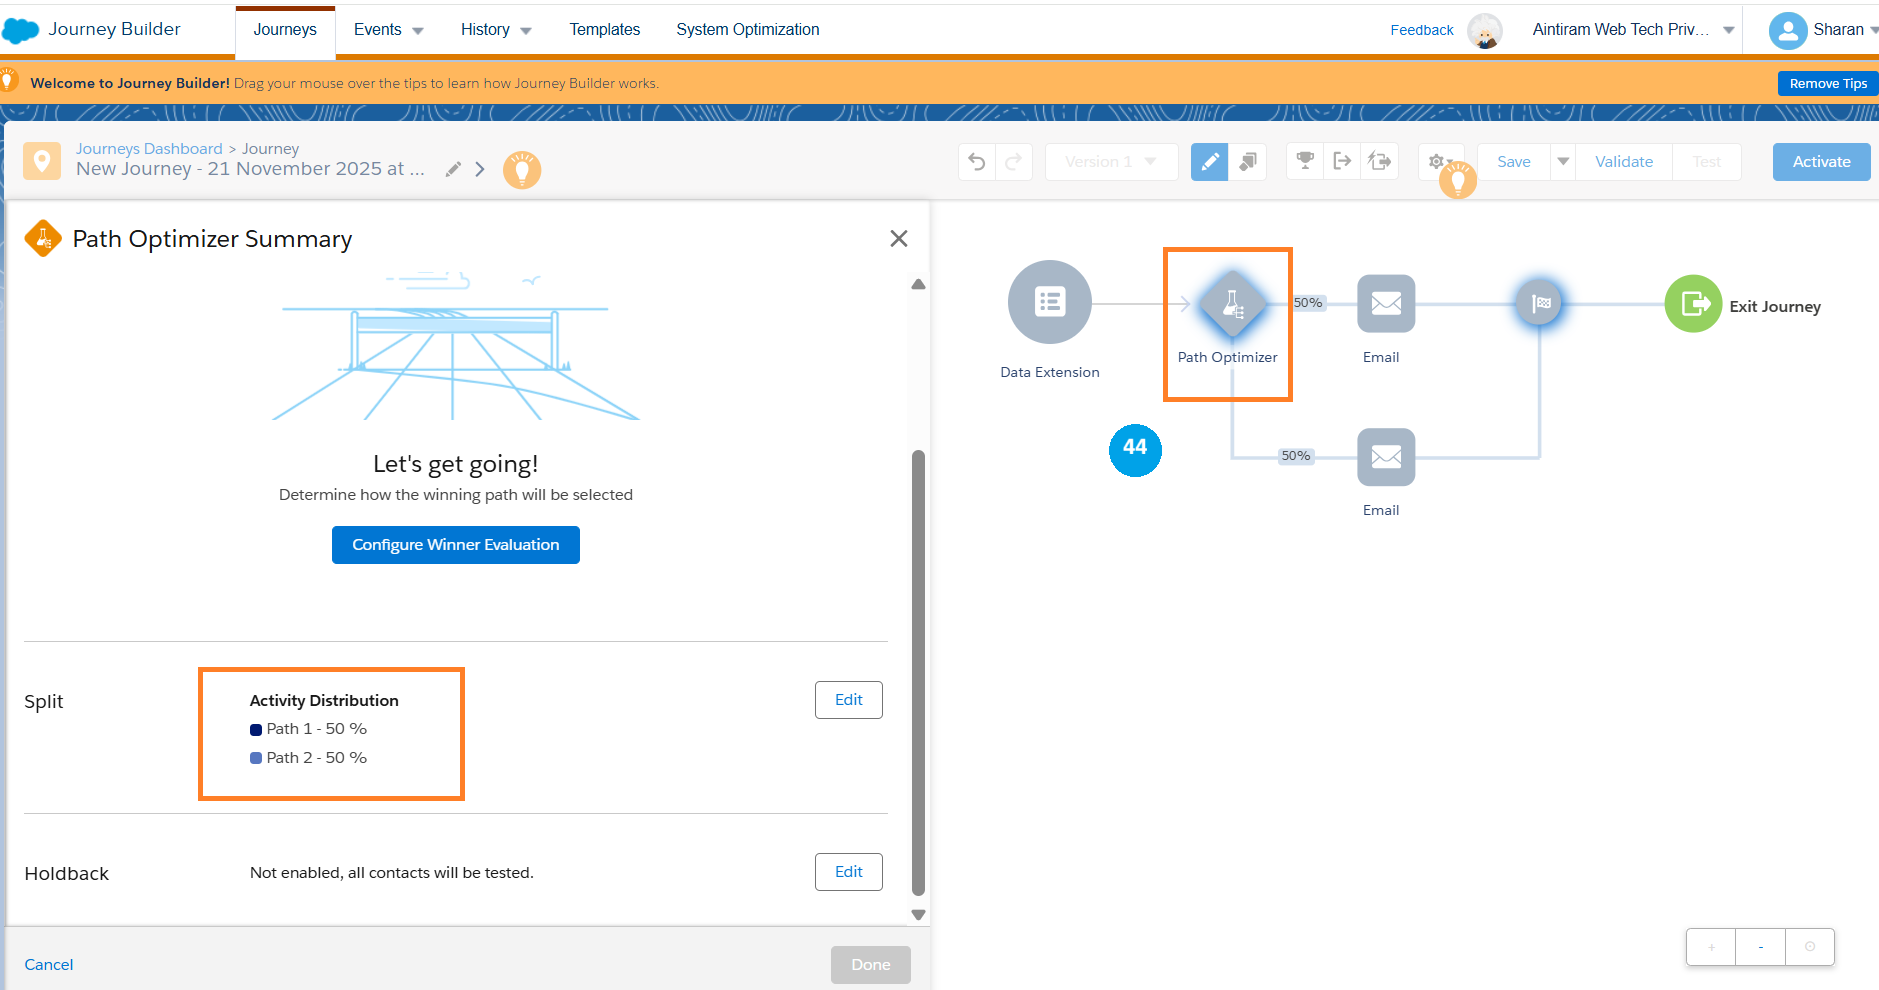
The join activity will allow you to join (43) the paths back together again in your journey builder. For example, if I use my random split activity to split up my paths into two 50% parts (42), then I can use the join activity to join the paths.
Path Optimizer activity: is your built-in A/B testing for journey builder. The path optimizer (44) will allow us to choose two or more paths which you can create yourself. Run your journey and then later on come back in and declare a winning path. Once you do this, the losing path is automatically cut off, and normal subscribers can go down those paths. All remaining subscribers who come along your journey will go through the winning path to ensure you get the maximum performance from your journey.
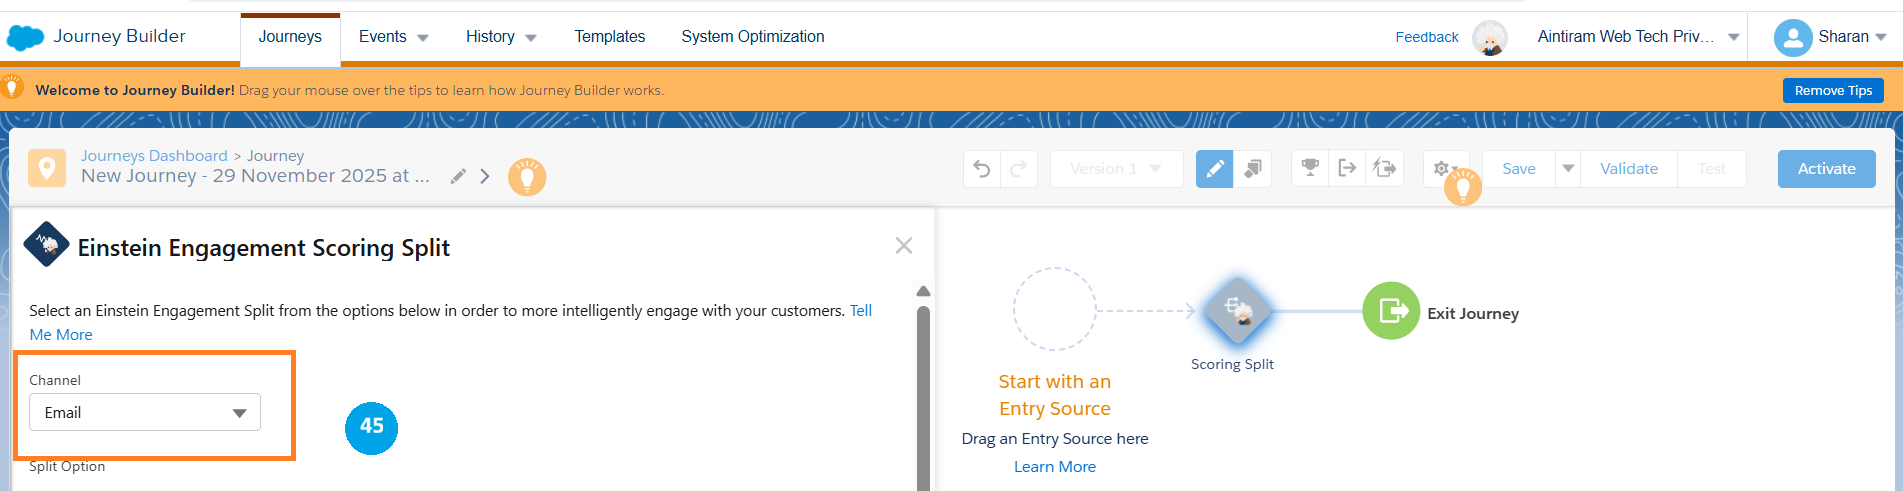
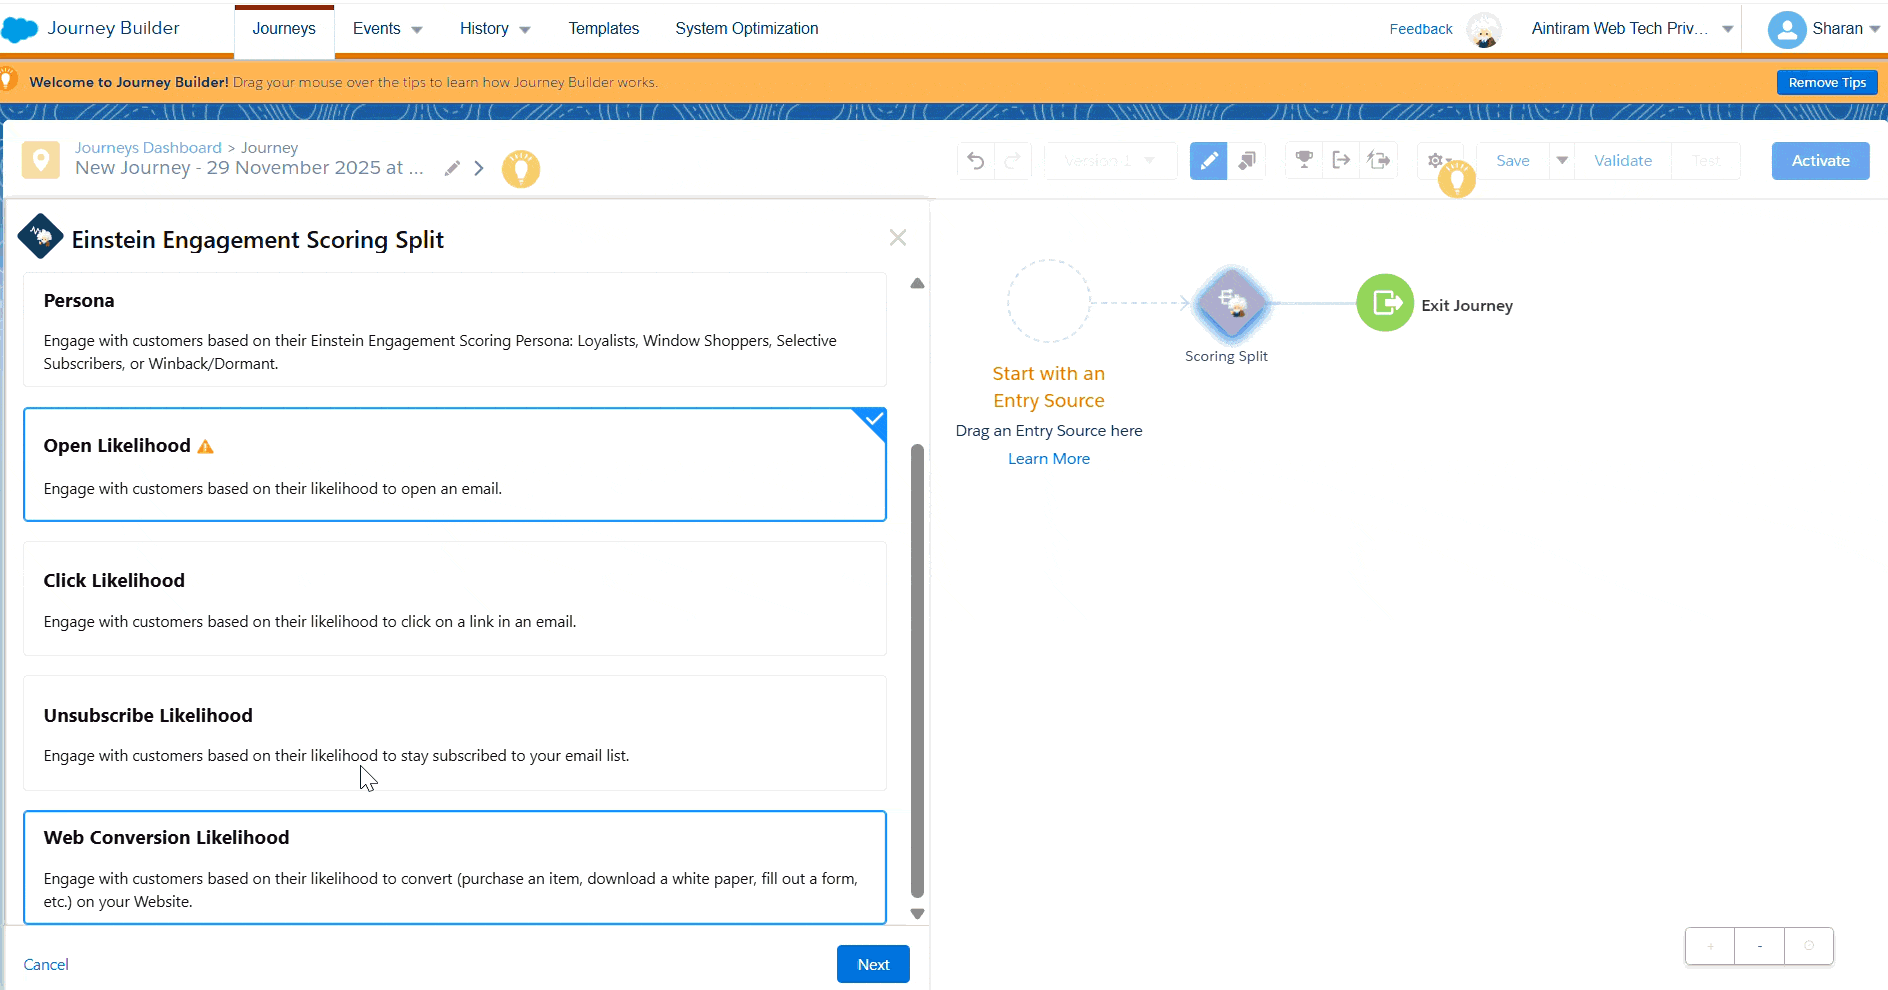
Scoring split: It will work similarly to the frequency split activity; It allows you to tap into Einstein and choose a scoring based on subscriber's likeliness to open, click or unsubscribe from your emails (45). For example, you could use this scoring split activity to create different paths based on their subscriber's likeliness to open or click an email. You can use more engaging subject lines if they are less likely to open or click that email (please see the gif below).
Now we see the wait flow control activities in the journey builder. The below highlighted 6 wait activities below all have different functions (46). For example, the wait by duration will allow you to wait for a specific number of minutes, hours or days before the subscriber goes to the next step and wait by the attribute allows you to choose an attribute from the subscriber’s data and to wait until or for that duration of time. Wait until chat response only functions in line with your WhatsApp chat responses. The wait until date allows you to specify a particular date in your journey, and all subscribers will wait for that spot until that date occurs. The wait until event allows us to specify an API trigger activity. Now all subscribers will wait at that event until an API trigger occurs, and they can proceed. And finally, wait until push engagement will wait for that subscriber until the push engagement occurs for that record.

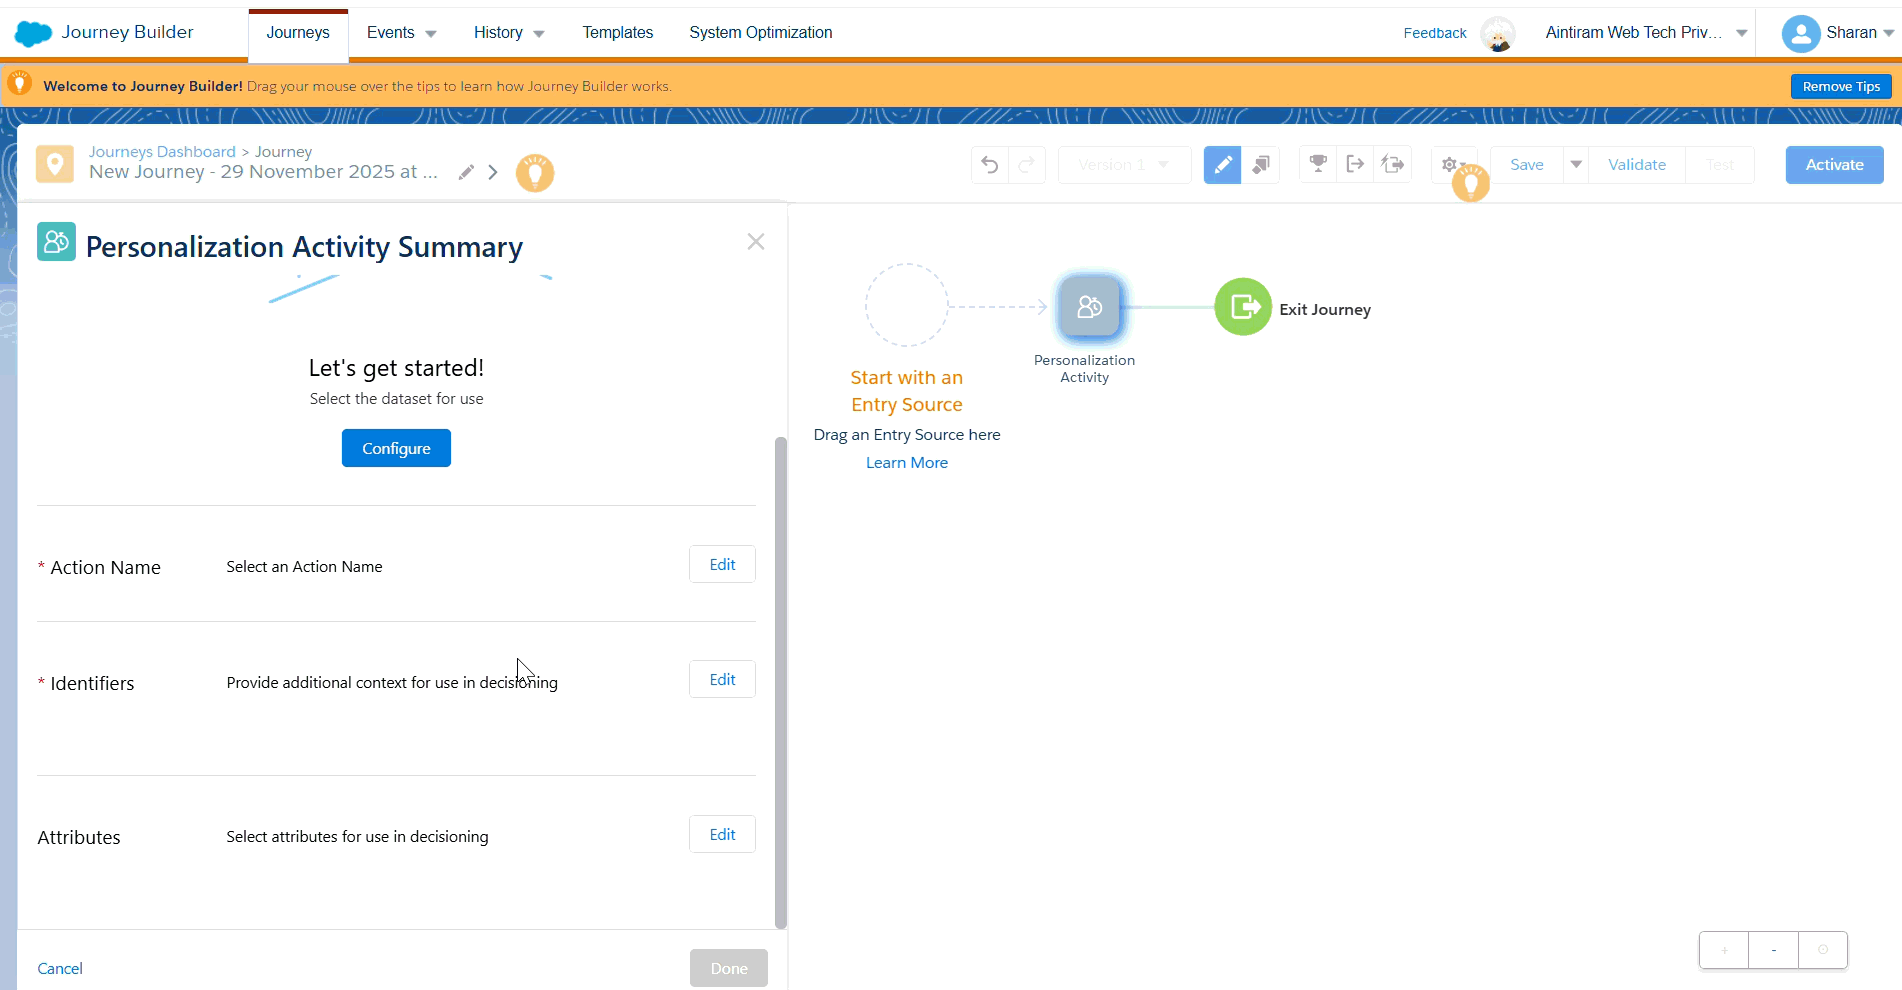
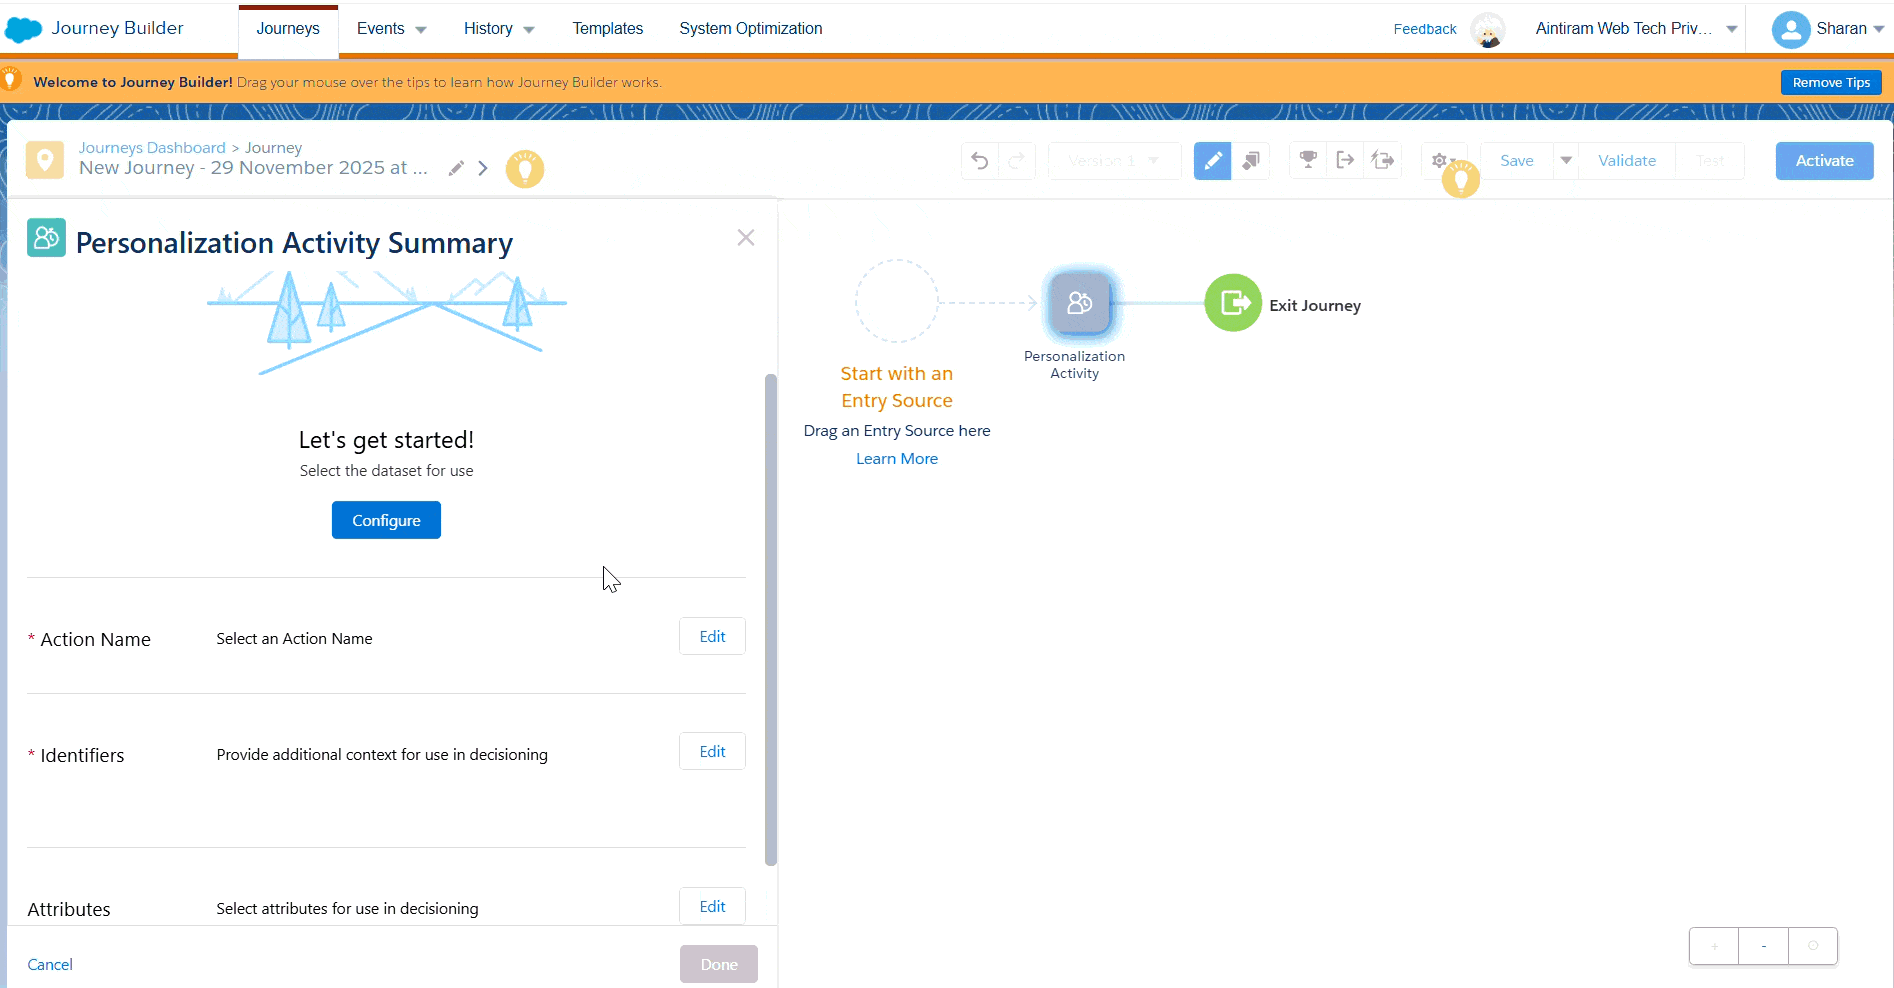
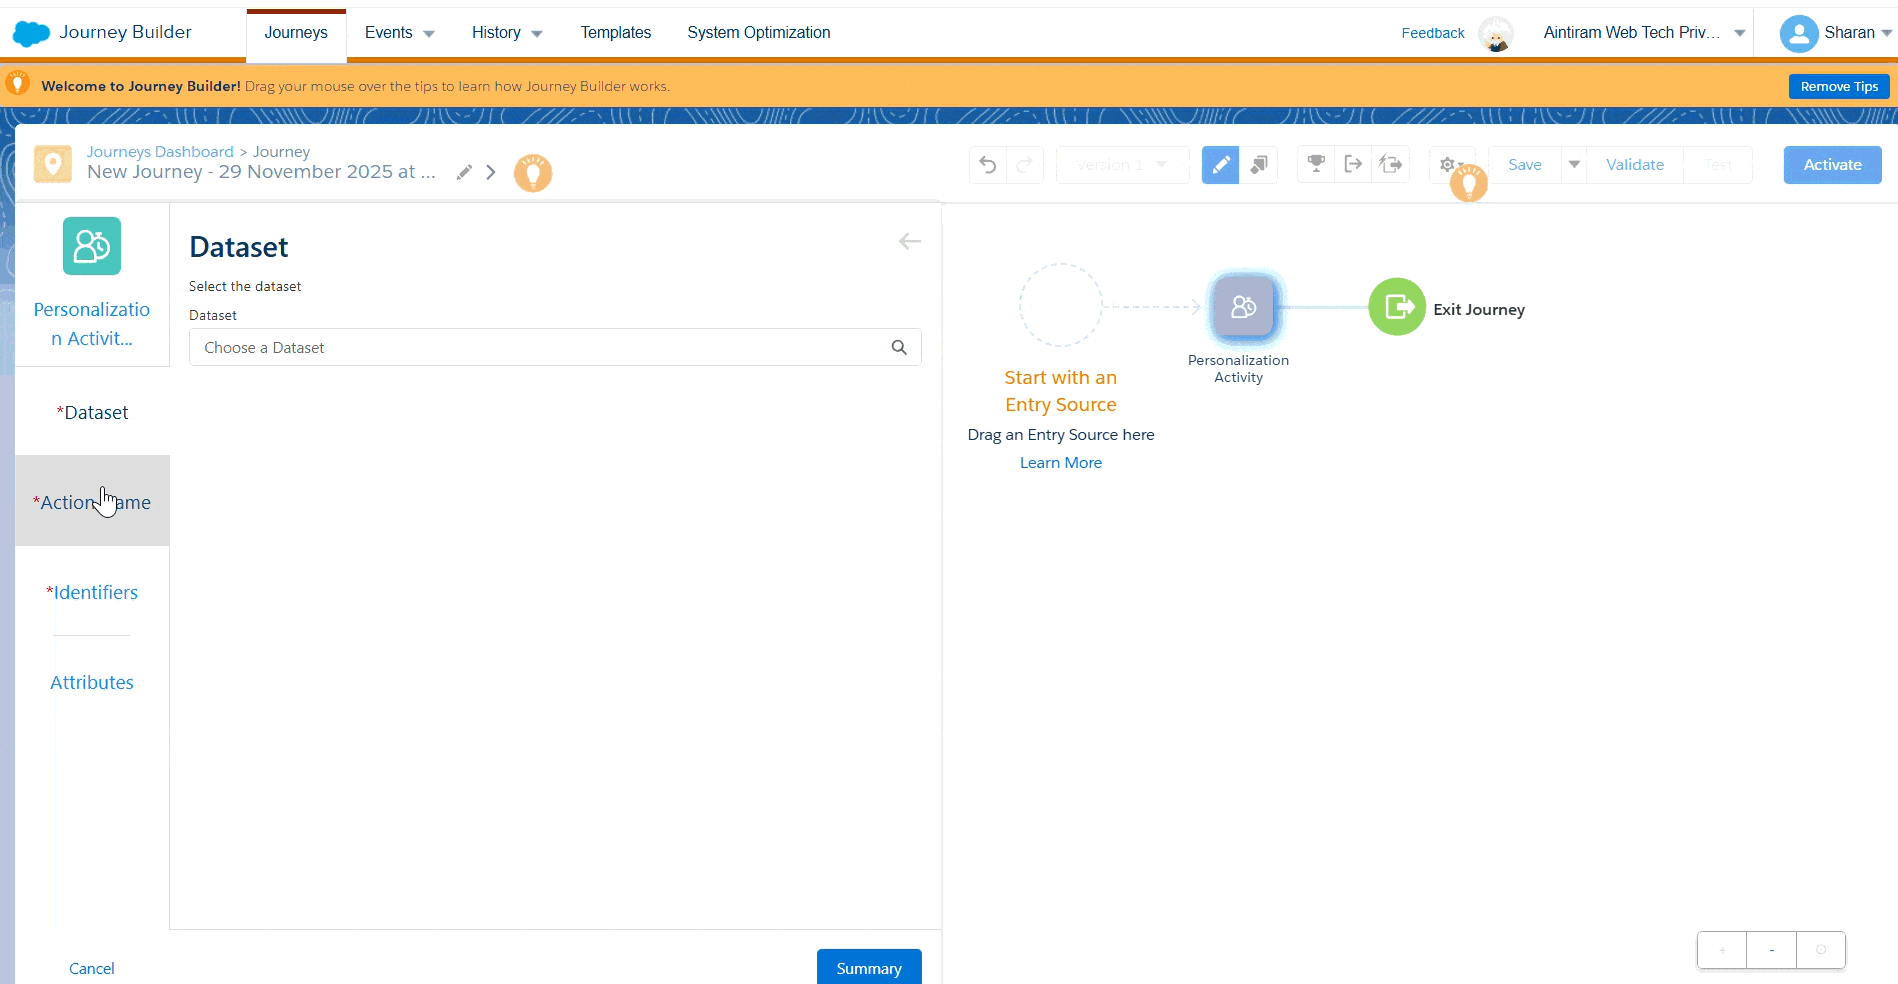
Customer Updates: Our first update activity is the Salesforce personalization activity. This activity allows us to connect to our Salesforce personalization, also known as an interaction studio, and send data from our marketing cloud journey builder into our interaction studio profiles (please see the gif below).
We also have updated contact activity. We can use this activity to update a data extension inside the marketing cloud the attributes of the subscriber as they go through the journey and, finally, always adding new ones. So, make sure you check back on the documentation since you are up-to-date to see what activities you can have access to inside the Journey Builder (Please see the gif images below).
We come to our sales and service cloud activities, which allows us to interact with each of these objects inside our sales and service cloud. For example, we can use the case activity here to create or update an existing case in the service cloud. We can also use the task action to create or modify an existing task against our CRM contact as they go through the journey and there, we have it, that is the introduction and overview of the activities and data entry events in Journey Builder. Now there are other types of data entry and activities, and they are always adding new ones. So, make sure you check back on the documentation since you are up-to-date as to see what activities you can have access inside the Journey Builder (47).
Advantages
- Journey Builders enable you to create customized journeys based on customer behavior, preferences, and data, making interactions more relevant and effective.
- You can communicate with customers across various channels such as email, SMS, push notifications, and social media, ensuring a consistent and unified experience.
- It automates repetitive tasks like sending messages and updating customer data, saving time and allowing marketing teams to focus on strategy.
Conclusion
I hope this blog helps you to understand an introduction to Journey Builder and the components involved while creating the new journey builder. Follow our upcoming blog updates, we will discuss more about the Journey Builder functionalities in detail.