

Building Salesforce-Connected Mobile Apps with React Native
Learn to build mobile apps with Expo & React Native that connect to Salesforce. This guide walks you through setup, integration, and deployment.
By Pasupathiragavan Marimuthu
Senior Salesforce Developer
Building Salesforce-Connected Mobile Apps with Expo/React Native
Introduction
Creating mobile apps that connect seamlessly with Salesforce can unlock powerful business capabilities. With React Native and Expo, developers can build cross-platform apps quickly, while Salesforce provides robust APIs for CRM and enterprise data. This guide walks you through the process of integrating Salesforce with a React Native app using Expo.
By leveraging Expo, developers can streamline the setup and deployment process, eliminating the need for native build configurations. This makes it easier to focus on building features and integrating Salesforce functionality without getting bogged down in platform-specific complexities. With React Native’s rich ecosystem and Expo’s developer-friendly tools, you can rapidly prototype and iterate on mobile apps that work seamlessly across iOS and Android.
Salesforce, on the other hand, offers a powerful suite of APIs - such as the REST API and OAuth 2.0 - that allow secure access to CRM data, user accounts, and custom objects. Integrating these APIs into your React Native app enables real-time data sync, personalized user experiences, and mobile access to enterprise workflows. In this guide, we’ll cover authentication, data fetching, and best practices to ensure your app is secure, scalable, and production-ready.
Why Use React Native with Salesforce?
Choosing React Native with Expo to build Salesforce-connected mobile apps offers a powerful combination of speed, flexibility, and scalability. It enables developers to deliver enterprise-grade mobile experiences while leveraging Salesforce’s robust backend capabilities.
Cross-platform efficiency: Write once, deploy everywhere. React Native allows you to maintain a single codebase for both iOS and Android, reducing development time and ensuring consistent user experiences across platforms.
Fast development with Expo: Expo simplifies the setup, testing, and deployment process. It removes the need for native build tools, making it easier to focus on building features and integrating Salesforce functionality.
Salesforce API integration: Tap into Salesforce’s powerful REST and GraphQL APIs to access CRM data, automate workflows, and enable real-time updates. This empowers your mobile app to deliver dynamic, personalized, and data-driven experiences.
Step 1: Set Up Your Development Environment
Before diving into development, make sure your environment is properly configured. This ensures a smooth experience when building, testing, and deploying your Salesforce-connected mobile app using Expo and React Native.
Prerequisites:
Salesforce Developer Account: Sign up for a free account at https://developer.salesforce.com/signup. This gives you access to Salesforce APIs, a developer environment, and tools needed for integration.
Node.js and npm: These are essential for managing packages and running your development tools. You can download them from https://nodejs.org/.
Expo CLI: Install Expo globally using the following command:
npm install -g expo-cli Step 2: Create a New Expo Project
Once your environment is ready, the next step is to create your Expo project. This will serve as the foundation for your Salesforce-connected mobile app. Start by initializing a new Expo project using one of the following commands:
expo init salesforce-mobile-app
or
npx create-expo-app --template
When prompted, choose a blank template if you want full control over the app structure, or select a template with navigation if you plan to implement screen transitions and routing early on.
Navigate into your project directory using:
cd salesforce-mobile-app Then start the development server:
expo start
or
npm start
Expo will launch a local development server and provide a QR code to preview your app instantly on a physical device using the Expo Go app.
Step 3: Configure Salesforce Connected App
To securely connect your mobile app to Salesforce, you need to implement OAuth 2.0 authentication. This ensures that users can log in and access Salesforce data without exposing sensitive credentials.
Steps to Set Up Authentication:
Create a Connected App in Salesforce:
Log in to your Salesforce environment.
Navigate to Setup → Apps → External Client Apps → External Client App Manager.
Click New External Client App.
Fill in basic info and enable OAuth settings.

Set the Callback URL (e.g., exp://127.0.0.1:19000).
Select required OAuth scopes like Access and manage your data (api) and Perform requests on your behalf at any time (refresh_token, offline_access).
Note the Client ID and Client Secret:
After saving, Salesforce will generate a Consumer Key (Client ID) and Consumer Secret. You’ll use these in your app to initiate the OAuth flow.
Implement OAuth Flow in React Native:
Use libraries like expo-auth-session or react-native-app-auth to handle the OAuth flow.
Redirect users to Salesforce’s login page, then capture the access token upon successful login.
After successful login, Salesforce will redirect back with an authorization code.
Exchange this code for an access token and refresh token.
Store tokens securely using expo-secure-store or similar libraries to maintain session and enable authenticated API calls.
This setup allows your app to authenticate users and access Salesforce data securely.
Install expo-auth-session or react-native-app-auth using following command:
npm install expo-auth-session
or
npm install react-native-app-auth
Step 4: React Native Implementation
To build a fully functional Salesforce-connected mobile app using React Native and Expo, you’ll need to implement secure authentication, fetch data from Salesforce APIs, and display it in your app’s UI. This section walks you through the complete flow—from login to data rendering.
Implement Salesforce OAuth Login
Start by integrating OAuth 2.0 using expo-auth-session. This allows users to log in securely and grants your app access to Salesforce data.
import * as AuthSession from 'expo-auth-session';

const discovery = {
	authorizationEndpoint: 'https://login.salesforce.com/services/oauth2/authorize',
	tokenEndpoint: 'https://login.salesforce.com/services/oauth2/token',
};

const redirectUri = AuthSession.makeRedirectUri();
const authRequestConfig = {
	clientId: '<YOURCONSUMERKEY>',
	redirectUri,
	scopes: ['api', 'refresh_token'],
	responseType: 'token',
};
const [request, response, promptAsync] = AuthSession.useAuthRequest(authRequestConfig, discovery);
Note: Replace <YOURCONSUMERKEY> with your actual Salesforce connected app Consumer Key.
Trigger login and handle the response:
useEffect(() => {
	if (response?.type === 'success') {
		const { access_token } = response.params;
		SecureStore.setItemAsync('salesforce_token', access_token);
	}
}, [response]);
Fetch Data from Salesforce API
Once authenticated, use the access token to make API calls to Salesforce’s REST endpoints.
const fetchSalesforceData = async () => {
	const token = await SecureStore.getItemAsync('salesforce_token');
	const response = await fetch('https://yourInstance.salesforce.com/services/data/v58.0/query?q=SELECT+Id+Name+Phone+FROM+Account', {
		headers: {
			Authorization: `Bearer ${token}`,
			'Content-Type': 'application/json',
		},
	});
	const data = await response.json();
	console.log('Salesforce Data:', data);
};
Note: Replace yourInstance.salesforce.com with your actual Salesforce instance URL.
Display Data in Your App UI
Use React Native components to render the fetched data. For example, to display a list of accounts:
const [accounts, setAccounts] = useState([]);

useEffect(() => {
	fetchSalesforceData().then(data => setAccounts(data.records));
}, []);

return (
	<FlatList
		data={accounts}
		keyExtractor={(item) => item.Id}
		renderItem={({ item }) => (
			<View style={styles.card}>
				<Text style={styles.title}>{item.Name}</Text>
				<Text>{item.Phone}</Text>
			</View>
		)}
	/>
 );
Step 5: Test and Deploy
After implementing authentication, data fetching, and UI rendering, it's time to test your app and prepare it for production deployment.
Test Your App
Use Expo Go to test your app instantly on physical devices. Simply scan the QR code shown in the terminal after running:
expo start You can also test on specific platforms using:
npm run android
npm run ios
npm run web
Make sure to test login, data fetching, error handling, and UI responsiveness—on both Android and iOS devices before deploy to production.
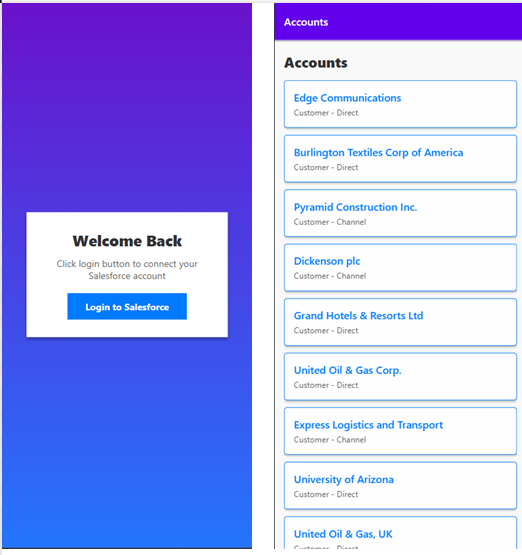
App Screens
Build for Production
When you're ready to publish your app, use EAS Build (Expo Application Services) to generate standalone binaries for app stores.
Build for Android:
eas build --platform android Build for iOS:
eas build --platform ios Before building, ensure you’ve:
Configured your eas.json file with appropriate build profiles.
Set up app icons, splash screens, and permissions in app.json.
Registered your app with Google Play Console and Apple Developer Portal for store submission.
Security & Optimization Tips
Minify and optimize your code for performance.
Use secure storage for tokens and sensitive data.
Monitor API usage and handle rate limits gracefully.
Consider integrating crash reporting and analytics tools like Sentry or Firebase.
Conclusion
With Expo and React Native, connecting to Salesforce becomes a streamlined process. You can authenticate users, fetch CRM data, and build powerful mobile experiences - all with a modern JavaScript stack. By leveraging Salesforce’s robust APIs and React Native’s cross-platform capabilities, developers can deliver enterprise-grade mobile apps faster and more efficiently. Whether you're building internal tools for sales teams or customer-facing apps, this integration empowers you to bring real-time CRM functionality directly to users' fingertips.
As you continue to refine your app, consider adding features like push notifications, offline data sync, and custom UI components to enhance usability and engagement. With the right architecture and tools, your Salesforce-connected mobile app can become a vital part of your business ecosystem. Bringing Salesforce to your users’ fingertips—anytime, anywhere!