

Embedding Domo Dashboards Inside Salesforce
Learn how to embed Domo dashboards in Salesforce using Visualforce pages. Step-by-step setup for secure and seamless data visualization.
By Anandhakumar Thangasamy
Senior Salesforce Developer
Embedding Domo Dashboards Inside Salesforce
Introduction
Consider a large scale business which has huge client database and its operations running in the multiple platforms such as Salesforce CRM, Snowflake data warehouse, and other third-party applications like ERP systems, marketing automation tools and etc., It is always difficult to maintain and visualize all these operations in a single view. Here we have Domo for the same purpose, this is an application used to build a reports/dashboards combining the data tables from the various systems as mentioned. To know more about Domo visit here.
Domo inside Salesforce
Consider we have built a dashboard in Domo which connects Salesforce, Snowflake and ERP systems data and displays a Sales performance metrics. As a Sales manager who is using Salesforce frequently for their business operations and needs to view this dashboard in Domo sometime then they need to navigate to multiple systems frequently. This is when we are in need to implement the integration between Salesforce and Domo to avoid this navigation and visualize the Domo need within Salesforce. Below are the detailed implementation steps,
Architecture
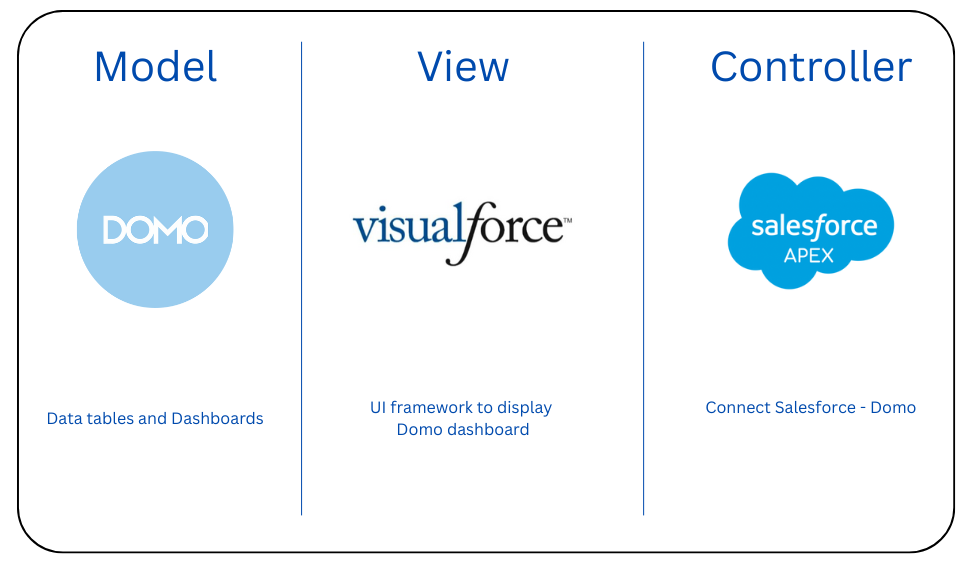
Here we are going to use Visualforce as a framework which is a html page provided by Salesforce to display the dashboard which is built already in Domo application by using the Salesforce Apex as a server side controller that is used to connect Salesforce and Domo.
Domo Configuration
- Setup a data tables inside a Domo to connect the multiple data sources.
- Design a card/dashboard in Domo by using the data tables that are configured.
- Set up a client and note down the below values from Domo,
- Go to https://developer.domo.com/new-client
- Provide the Name and Select the Application Scope to include Data, Audit, Dashboard and User.
- Submit and note down Client Id and Client Secret
- Embed the dashboard by following the below steps,
- Open the dashboard that needs to be displayed in Domo.
- Select Share Menu icon and choose Embed Dashboard option.
- Enable the Embed Option and set Private/Public based on the need.
- Note down the Embed Id.

Salesforce Configuration
- Create the below Apex Class which has the implementation of the connection to Domo to get the embed id of the dashboard.
public class domoEmbedController {
   private final String client_id = '[ ENTER YOUR CLIENT ID HERE ]';
   private final String client_secret = '[ ENTER YOUR CLIENT SECRET HERE ]';
   public String embed_id { get{return '[ ENTER YOUR EMBED ID HERE ]';}}
   public String embed_type { get{return '[ DECLARE "card" OR "dashboard" HERE ]';}}
   public String embedToken {get;set;}

   // constructor
   public domoEmbedController() {
       HttpRequest req = new HttpRequest();
       req.setEndpoint('https://api.domo.com/oauth/token?grant_type=client_credentials&scope=data%20audit%20user%20dashboard');
       req.setMethod('POST');
       Blob headerValue = Blob.valueOf(client_id + ':' + client_secret);
       String authorizationHeader = 'Basic ' +
       EncodingUtil.base64Encode(headerValue);
       req.setHeader('Authorization', authorizationHeader);
       Http http = new Http();
       HttpResponse res = http.send(req);
       Map<String, Object> resMap =(Map<String, Object>)JSON.deserializeUntyped(res.getBody());
       String token = String.valueOf(resMap.get('access_token'));
       system.debug(res.getStatusCode() + ': ' + res.getStatus());
       HttpRequest req2 = new HttpRequest();
       if(embed_type!='card')
           req2.setEndpoint('https://api.domo.com/v1/stories/embed/auth');
       else
           req2.setEndpoint('https://api.domo.com/v1/cards/embed/auth');
       req2.setMethod('POST');
       req2.setHeader('Authorization', 'bearer ' + token);
       req2.setHeader('Content-Type', 'application/json');
       String payload = '{"sessionLength": 1440, "authorizations" :[{"token" : "' + embed_id + '","permissions" : ["READ", "FILTER", "EXPORT"]}]}';
       req2.setBody(payload);
       http = new Http();
       HttpResponse res2 = http.send(req2);
       system.debug(res2.getStatusCode() + ': ' + res2.getStatus());
       system.debug(res2.getBody());
       resMap = (Map<String, Object>)JSON.deserializeUntyped(res2.getBody());
       embedToken = String.valueOf(resMap.get('authentication'));
   }
}- Replace the below variables in the apex class,
- client_id = 'copied client id'
- client_secret = 'copied client secret'
- embed_id = 'copied embed id'
- embed_type = 'dashboard'
- Create a Remote Site Settings with domo api domain by following the below step,
- Remote Site Name: Domo API
- Remote Site URL: https://api.domo.com
- Active: Checked
- Create the below Visualforce page,
<apex:page controller="domoEmbedController" showHeader="false" cache="false">
     <apex:outputPanel rendered="{!embedToken!=null}">
       <form id="embedform" action="https://public.domo.com/{!IF(embed_type='card','cards','embed/pages')}/{!embed_id}" method="post">
           <input type="hidden" name="embedToken" value="{!embedToken}"/>
       </form>
       <script>
           document.getElementById("embedform").submit();
       </script>
   </apex:outputPanel>
</apex:page>- Now you can add the Visualforce page into the lightning pages wherever you want that will display the Domo dashboards inside Salesforce.
Conclusion
Connecting Domo with Salesforce helps businesses to visualize the data in the form of charts/dashboards from the multiple business systems such as Salesforce, Snowflake and ERP applications, etc., without navigating from the Salesforce. This will increase the user productivity and also empowers decision-makers with real-time, data driven insights. Smart decisions come from smart integrations.