

Salesforce Deployment: A Simple Guide
Explore key Salesforce deployment options like Change Sets, CLI, DevOps Center, and ANT Migration Tool to move updates seamlessly between orgs.
By Pradeepa Singaravelan
Associate Salesforce Developer
Salesforce Deployment: A Simple Guide
I wrote this blog to help everyone understand the different deployment processes in Salesforce. When I first started learning about deployments, I spent a lot of time to searching through various sites and documents to understand the process. That’s why I decided to write this blog to make it easier to understand the deployment process.
Deployment is a common process in all technologies to move components from one environment to another. In Salesforce, it is same moving the components from one org to another, such as from a Sandbox to a Production org.
Salesforce offers several deployment methods to meet different project requirements, team skill levels, and automation needs. These methods range from simple, point-and-click tools like Change Sets to advanced, Command Line tools such as the ANT Migration Tool and Salesforce CLI (Command Line Interface).
Let's dive in, we will explore the various deployment tools and how they work.
Deployment tools
Salesforce offers different deployments tools to perform the deployments, and each tool has its own unique features. We will look at them one by one in detail. The tools are:
Change set
ANT- Migration tool
Workbench
Salesforce CLI
Salesforce DevOps Center
1. Change Set
A Change Set allows a Salesforce organization to send customizations from a Sandbox to a Production Org. In Salesforce, Change Sets are group of components that can be deployed from a Sandbox to Production. This out-of-the-box deployment tool is provided by Salesforce through a user-friendly interface. Note that Change Sets are not available in Developer Edition organizations.

What is Outbound Change Set: You want to send a change set from the Source organization to the target organization. This is called an outgoing change set.
What is Inbound Change Set: A change set that comes from the source Salesforce org to the target Salesforce org is called an inbound change set.
How to use Change Set to Deploy the Components?
Step 1: Create the Change set in Source org.

Step 2: Enter name to Create the Change set.

Step 3: In the Change Set Components section, add your components and select the type of component you want to deploy. For example, if you are deploying a Flow, choose Flow as the component type and then select the specific Flow you want to deploy

Step 4: Click the Upload button and Select to Org to Deployed the Component.

Note: Our modifications are now complete in the Change set, but we must link to the sandbox and production before deploying them to production or another sandbox. After logging in to the target organization and looking for the Deployments setting, choose the name of the source sandbox and press the edit button. After that, choose the "allow inbound changes" checked and press the "Save" button. This is only one-time activity to make Deployment Connections.
Step 5: Log in the target org, Enter the Inbound Change set in Quick find box.
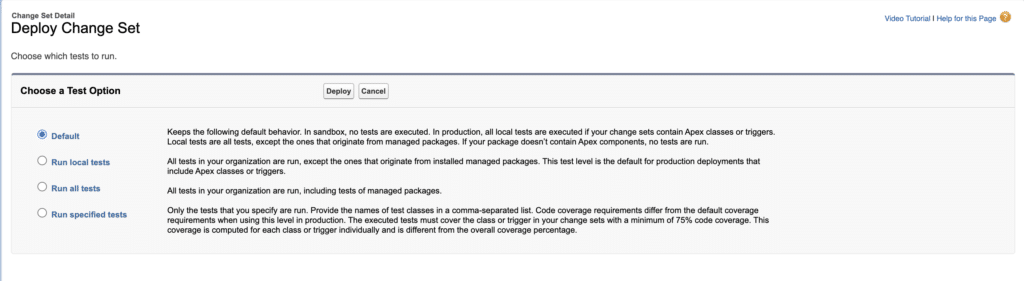
Step 6 : Select the your Change set, Click the Validation button to validate the changes.
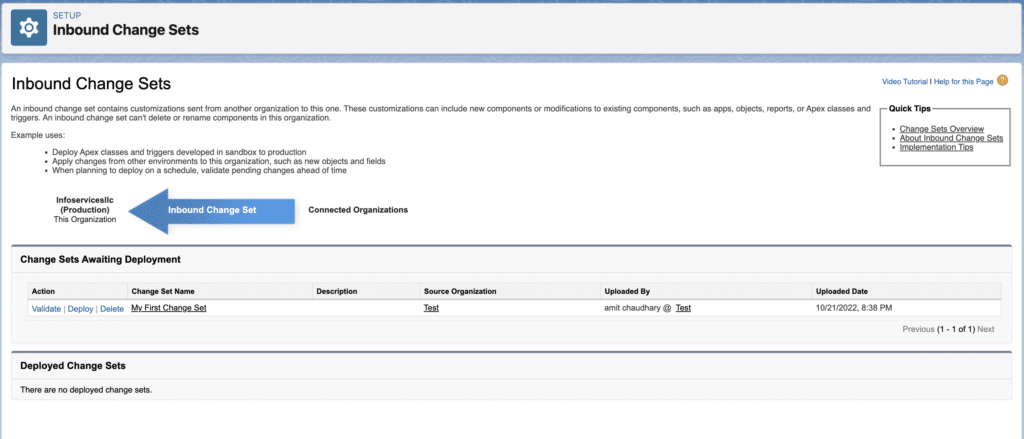
Step 7: Next click the Deploy button to Deployed the change set to your target Org.
Step 8: The component was successfully deployed to the target org, and the status was shown in the deployment history.

Advantages
- Change Sets are very easy to use for administrators and non-developers who need to deploy changes without knowing code or using command-line tools.
- You don’t need to install extra software or set up complex connections. Change Sets work directly between connected Salesforce orgs, like a sandbox and a production org.
- Since Change Sets are a built-in Salesforce feature, they are free to use, which is a big advantage compared to paid third-party DevOps tools.
Disadvantages
- Manually selecting and adding each component to a Change Set can be slow, especially for large or complex deployments.
- Once a Change Set is deployed, the changes are committed and cannot be rolled back automatically.
- Change Set deployments are treated as a single transaction. If one component fails to deploy, the entire deployment is rolled back, with no option for partial deployment.
- Change Sets are not available in Developer Edition orgs.
2. ANT Migration
ANT Migration is a command-line tool used to retrieve and deploy components from a source org to a target org. Components can include Apex classes and test classes, Objects, LWC components, Visualforce pages, Custom Metadata, and more.
How to use ANT to Deploy the Components?
Step 1: Download ANT from below URL :- https://ant.apache.org/bindownload.cgi or your already downloaded open the file.
Step 2: Add your package.xml file to the codepkg folder, then select the package.xml file to include the components (as shown in the image below).

Step 3: Click the build file and add the source org username and Security token.

Step 4: Open your terminal, or press Windows + R and enter cmd.
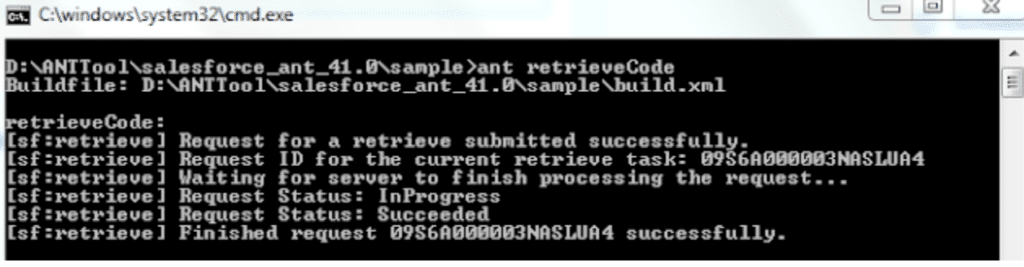
Step 5: First retrieved component from source org. retrieve the Code from Source Salesforce org and execute below command.
Step 6: Open the build file and update the target org username and security token.

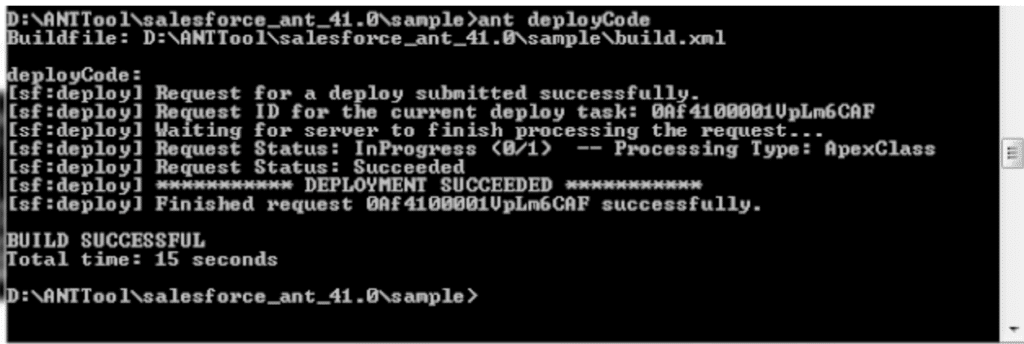
Step 7: Now go back to the terminal and deploy the code to the target Salesforce org and execute below command.
Step 8: Log in to your target org to check the deployment status and confirm that the components were deployed successfully.
Advantages
- The ANT Migration Tool retrieves metadata from your Salesforce org in the form of XML files and downloads it locally to your computer. This makes it easier to deploy components to the target org.
- Change set does not allow you to delete any metadata component from target org. But using ANT migration tool you can delete the components from target org.
- Some components are not supported to be migrated using change sets but you can migrate them using ANT migration tool.
- It can also be run from command prompt using some specific commands for calling APIs.
Disadvantages
- The package.xml must be manually maintained when adding or removing components.
- Failed deployments cannot be undone automatically; a manual rollback is required.
- Large metadata deployments are slower and less optimized than modern CI/CD tools.
- Dependent components are not included automatically; missing dependencies can cause deployment failures.
3. Workbench
Workbench is a web-based tool provided by Salesforce (but maintained by the community, not officially supported by Salesforce) that allows administrators and developers to interact with Salesforce orgs through the Salesforce APIs. Workbench main used for data import and export, and deployed the metadata such as Objects, Apex classes, and more.
How to use Workbench to Deploy the Components?
Step 1: Open the Workbench in your Brower. Click the migration tab, and select the Deploy.

Step 2: Click Choose File and Upload you package.xml files

Step 3: In the Test Level, choose the RunAllTestsInOrg option if you want to run all test classes.

Step 4: Click the Next button the package was successfully deployed in the org.

Advantages
- It’s a web-based tool just open the browser and log in.
- It works with REST, SOAP, Bulk, and Metadata APIs, making it easier to test integrations and API responses.
- You can quickly retrieve components such as Apex, Objects, and Fields. Small metadata changes can be deployed without setting up ANT or SFDX.
Disadvantages
- It’s web-based, entering production credentials can be risky if not authorized by your company.
- It’s Salesforce community-maintained, not a Salesforce product.
- It is not suitable for large or complex deployments.
- It does not provide automation, version control, or rollback capabilities.
4. Salesforce CLI (Command Line Interface)
Salesforce CLI (Command Line Interface), often called SFDX CLI, is a developer tool from Salesforce that allows you to interact with Salesforce orgs directly using the command line to deploy components to one environments to another. It is designed to simplify development, deployment, and automation tasks in Salesforce.
How to use the CLI to Deployed the Components?
Step 1:Dowload the CLI from following Link: https://developer.salesforce.com/tools/salesforcecli, or you already downloaded do the below steps.
Step 2: Open your terminal, or press Windows + R and enter cmd.
Step 3: Create project folder enter the terminal page sfdx force:project:create -n "(FolderName)" --manifest.

Step 4: Authorize Salesforce org : sfdx auth:web:login --alias (Retrieve org Name).
Step 5: Authorize your org by entering your username and password.
Step 6: Select the folder where you created the project in your local files, open it, then select the manifest folder and enter your retrieved component package.

Step 7: Enter this Commend to Retrieve the component sf project retrieve start --manifest manifest/package.xml -o Test (replace the Org alias name).
Step 8: Next, create a new folder, authorize your target org, and use this command to deploy the components to the target org: sf project deploy start --manifest manifest/package.xml -o Test --test-level = NoTestRun.

Advantages
- The command-line interface (CLI) uses less memory compared to a GUI. GUIs consume more memory and can slow down your computer, while CLI uses minimal memory, keeping your system fast.
- CLI is text-based, so it works well even on low-resolution screens.
- Installing Windows is not required in order to use CLI.CLI is supported by every operating system.
- Commands executed in CLI are saved in the history, allowing you to reuse them with the up/down arrow keys.
- Developers can perform multiple operations quickly without navigating through the Salesforce UI.
- Run Apex tests and retrieve logs directly from the CLI, which is helpful for continuous integration.
Disadvantages
- For new users, CLI can be confusing. Beginners may not understand how CLI works or what commands to type.
- Typing incorrect commands, even with minor typos, can delete files or move them to the wrong location. Accidentally deleting a file can cause problems, especially if it contains important information.
- Learning commands is a lengthy process. If you don’t use them regularly, it’s easy to forget most commands.
- Errors and outputs are text-based, so users need to carefully read logs and messages to understand issues. Mistyped commands or incorrect parameters can lead to failed operations or deployment errors.
5. Salesforce DevOps Center
Salesforce DevOps Center is a tool built by Salesforce to help teams manage and deploy changes from sandbox to production orgs more easily. Instead of handling everything manually with Change Sets or complex scripts, DevOps Center provides a user-friendly interface within Salesforce to track, test, and move changes. It also integrates with Git for version control, allowing you to maintain a history of every change.

Advantages
- Automates parts of the deployment process, reducing manual work.
- Integrates with GitHub to safely store and manage changes.
- Provides a user-friendly interface for admins and allows developers to connect with CI/CD.
- Brings admins, developers, and testers together on a single platform.
Disadvantages
- As relatively new Salesforce tool, some features are limited compared to third-party DevOps solutions.
- Admins or team members new to DevOps may need time to understand the workflow and tools.
- Managing complex relationships between metadata components can be challenging.
Conclusion
I hope this blog helps you learn about the different deployment tools in Salesforce, how they work, and how to use them to move components from one environment to another. We will also discuss the advantages and disadvantages, and this blog will help you choose the right tool depending on your organization's specific needs. Stay tune for our upcoming blogs.