

How to Create a Multilingual Form Using Salesforce Pardot
Learn how to build a dynamic, multilingual lead generation form in Salesforce Pardot using JavaScript and the i18n internationalization format.
By Surya Vijayakumar
Salesforce Developer
Create a Multilingual Form in Salesforce Pardot (Account Engagement)
Business Requirement
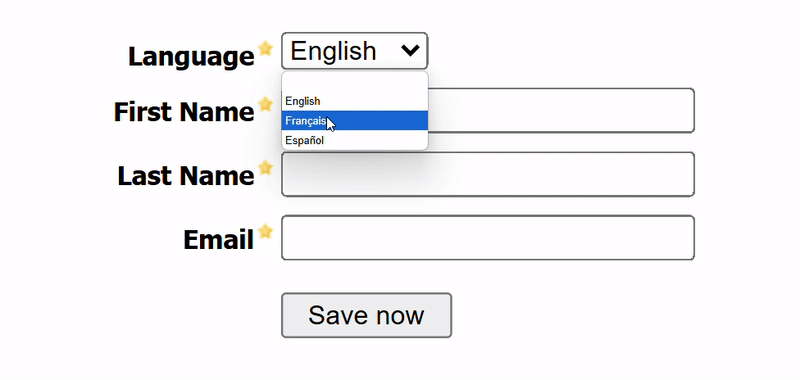
A company wants to capture leads using a web form that supports multiple languages. The form must dynamically update all field labels and button text based on the user's selected language. The form includes the following fields:
- Language (Dropdown:- English, Spanish, French)
- First Name
- Last Name
When a user selects a language from the dropdown, the form should instantly update its content in that language, without reloading the page.
Expected Outcome
Solution Overview
Salesforce Pardot (Account Engagement or MCAE) makes it possible to build a multilingual, dynamic form using a custom Layout Template and embedded JavaScript. We have achieved this using below steps:
Key Features Implemented
- Language dropdown for user selection
- Real-time translation of form content
- Custom Layout Template with embedded JavaScript
- Use of [[i18n.language]] for translatable fields
Step-by-Step Implementation
Step 1: Create a Custom Layout Template
This template allows us to include JavaScript that dynamically updates the form content based on language selection.
App Launcher ➡️ Content ➡️ Layout Templates ➡️ + Add Layout Template
- Fill in the required details (name, folder, etc.)
- In the Layout tab, add the following script inside the or before the closing
Add the JavaScript Form
Define the languages the form will support
<!DOCTYPE html>
<html>
  <head>
    <base href="http://www3.lenoxsoft.com" />
    <meta charset="utf-8" />
    <meta name="viewport" content="width=device-width, initial-scale=1" />
    <meta http-equiv="Content-Type" content="text/html; charset=utf-8" />
    <meta name="description" content="%%description%%" />
    <title>%%title%%</title>

    <script src="https://cdn.jsdelivr.net/npm/handlebars@latest/dist/handlebars.js"></script>
    <script>
      const languages = {
        lang: {
          en: "English",
          fr: "Français",
          es: "Español",
        },
      };
Add the translations
Next, we have all of the translations,
 const translations = {
      'en': {
        i18n: {
          firstname: "First Name",
          lastname: "Last Name",
          email: "Email",
          submit: "Save now",
          language: "Language",
          formErrors: "Please correct the errors below:",
          fieldError: "This field is required",
          thankyou: "Thanks for submitting!"
        }
      },
      'fr': {
        i18n: {
          firstname: "Prénom",
          lastname: "Nom de famille",
          email: "Email",
          submit: "Enregistrer",
          language: "Langue",
          formErrors: "Corrigez les erreurs ci-dessous:",
          fieldError: "Ce champ est obligatoire",
          thankyou: "Merci d'avoir soumis"
        }
      },
      'es': {
        i18n: {
          firstname: "Primer nombre",
          lastname: "Apellido",
          email: "Correo electrónico",
          submit: "Guardar ahora",
          language: "Idioma",
          formErrors: "Por favor corrija los siguientes errores:",
          fieldError: "Este campo es obligatorio",
          thankyou: "Gracias por enviar"
        }
      }
    };
Add the main functionality to apply the translations you defined
function i18nForm(prospectLang) {
      document.addEventListener("DOMContentLoaded", function(event) {
        const brO = '{', brC = '}';
        let formErrors = document.querySelector('#pardot-form p.errors');
        console.log('formErrors1::'+ formErrors);
        console.log('formErrors2::'+ JSON.stringify(formErrors));

        if (formErrors != null) {
          document.querySelector('#pardot-form p.errors').innerHTML = `[[i18n.formErrors]]`;
          [...document.querySelectorAll('#pardot-form p.error.no-label')].forEach(node => {
            node.innerHTML = `[[i18n.fieldError]]`;
          });
        }

        let notYou = document.querySelector('.email span.description');
        console.log('notYou::'+ notYou);

        if (notYou != null) {
          let origHtml = notYou.innerHTML;
          notYou.innerHTML = origHtml.replace('Not', '[[i18n.notYou]]').replace('Click Here', '[[i18n.notYouClickHere]]');
        }

        const originalHtml = document.querySelector('#pardot-form').innerHTML
          .replace(/\[\[/g, `${brO + brO}`).replace(/\]\]/g, `${brC + brC}`);
          console.log('originalHtml:::'+ originalHtml);


        const processTemplate = Handlebars.compile(originalHtml);
        console.log('processTemplate:::'+ processTemplate);


        const browserLang = window.navigator.language.substr(0, 2);
        console.log('browserLang:::'+ browserLang);

        let formLangCode = '';
        let currentLangVal = '';

        const pardotLanguages = {};
        const langNodes = document.querySelectorAll('.langChoice select option');
        console.log('langNodes1:::'+ langNodes);
        console.log('langNodes2:::'+ JSON.stringify(langNodes));


        langNodes.forEach(option => {
            console.log('Lanoption:::'+ option.value);
            let langKey = option.innerHTML.replace(/\[\[lang\.(.*?)\]\]/, '$1');
            console.log('langKey::'+langKey);

          pardotLanguages[option.value] = langKey;
        });

        langNodes.forEach(option => {
          if (option.selected && option.value !== '') {
            currentLangVal = option.value;
            formLangCode = pardotLanguages[option.value];
          }
        });

        let currentLangCode = formLangCode || prospectLang || browserLang;

        function applyTranslations() {
          let translatedHtml = processTemplate({ ...translations[currentLangCode], ...languages });
          document.querySelector("#pardot-form").innerHTML = translatedHtml;
          document.querySelector('.langChoice select').value = currentLangVal;

          console.log('languageChoice:: '+ document.querySelector('.langChoice select'));


          document.querySelector('.langChoice select').onchange = function () {
            let selectedLang = pardotLanguages[this.value];
            console.log('selectedLang::'+ selectedLang);

            if (selectedLang in languages.lang) {
              currentLangCode = selectedLang;
              currentLangVal = this.value;
              applyTranslations();
            }
          };
        }

        applyTranslations(); // apply the translations for the first time
      });
    }
    i18nForm();


  %%content%%
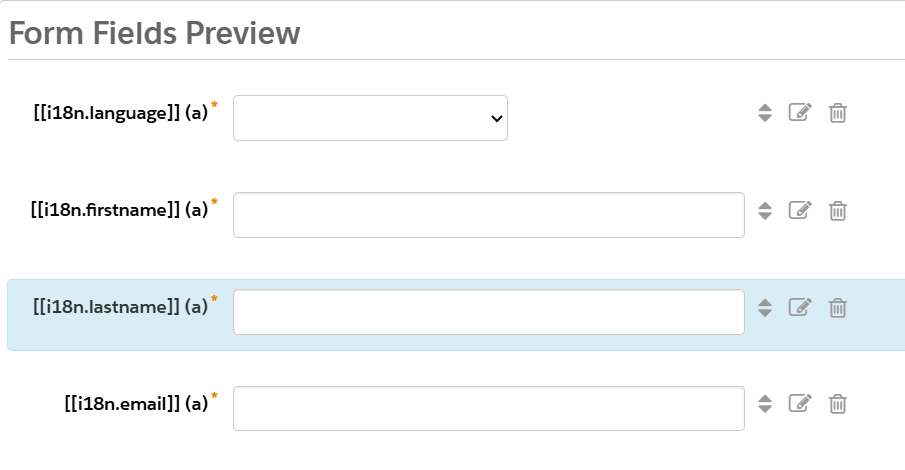
Step 2: Create the form and add fields
Go to Content ➡️ Forms ➡️ + Add Form
- Enter basic form details like form name, campaign, and folder.
- Add the following form fields:
- Language (Dropdown)
- First Name
- Last Name
How to Format Field Names for Translations
While adding each field (like First Name, Last Name, etc.), you should format the label or custom HTML field names using this pattern:
[[i18n.language]], [[i18n.firstName]], [[i18n.lastName]], [[i18n.email]], etc.
Why is [[i18n]] Important?
For Example, let's take a field [[i18n.firstName]] is a placeholder that helps show the right label in the right language.
Instead of writing “First Name” in English, Spanish, and French separately, we use [[i18n.firstName]] so the system can automatically switch the text based on the language the user selects.
- If the user picks English, it shows: First Name
- If the user picks Spanish, it shows: Nombre
- If the user picks French, it shows: Prénom
This makes your form look correct for everyone, no matter what language they speak — and you only need to create the form once.
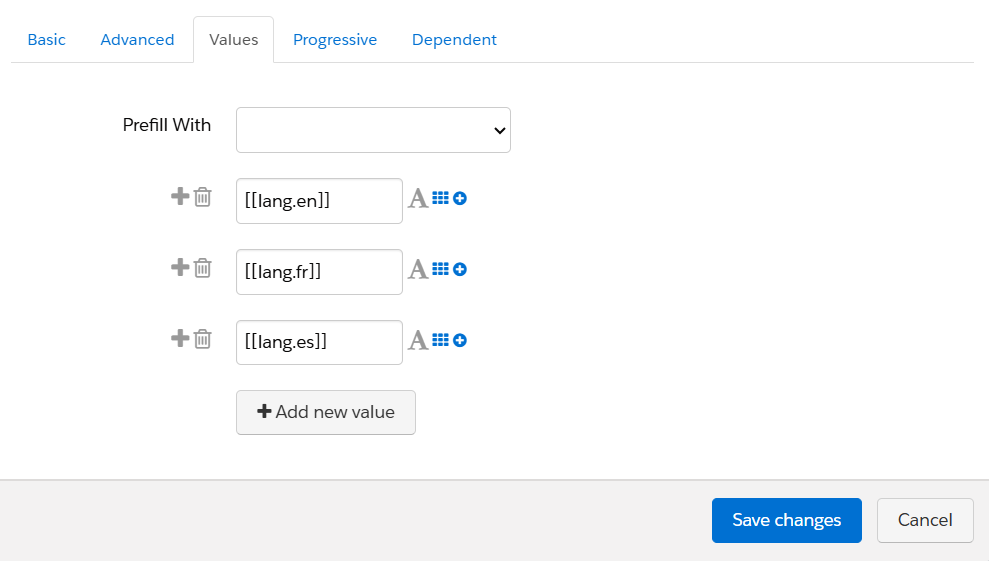
Configure Language Dropdown
- Click on the Language field and go to the Advanced tab.
- Assign an id value (e.g., language) that matches what your JavaScript is listening to.

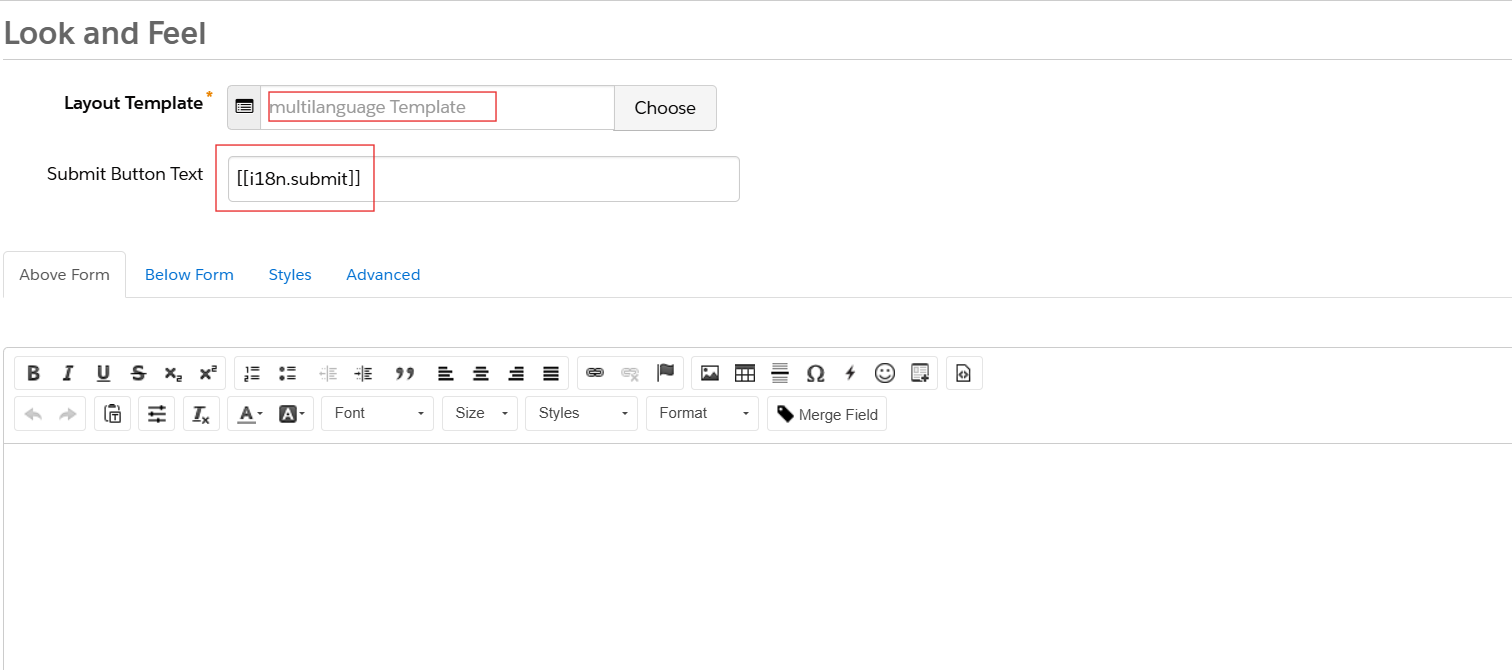
Step 3: Apply Layout Template to Form
- In the Look and Feel step of the form wizard:
- Choose the custom layout template you created.
- Customize the submit button label if needed.
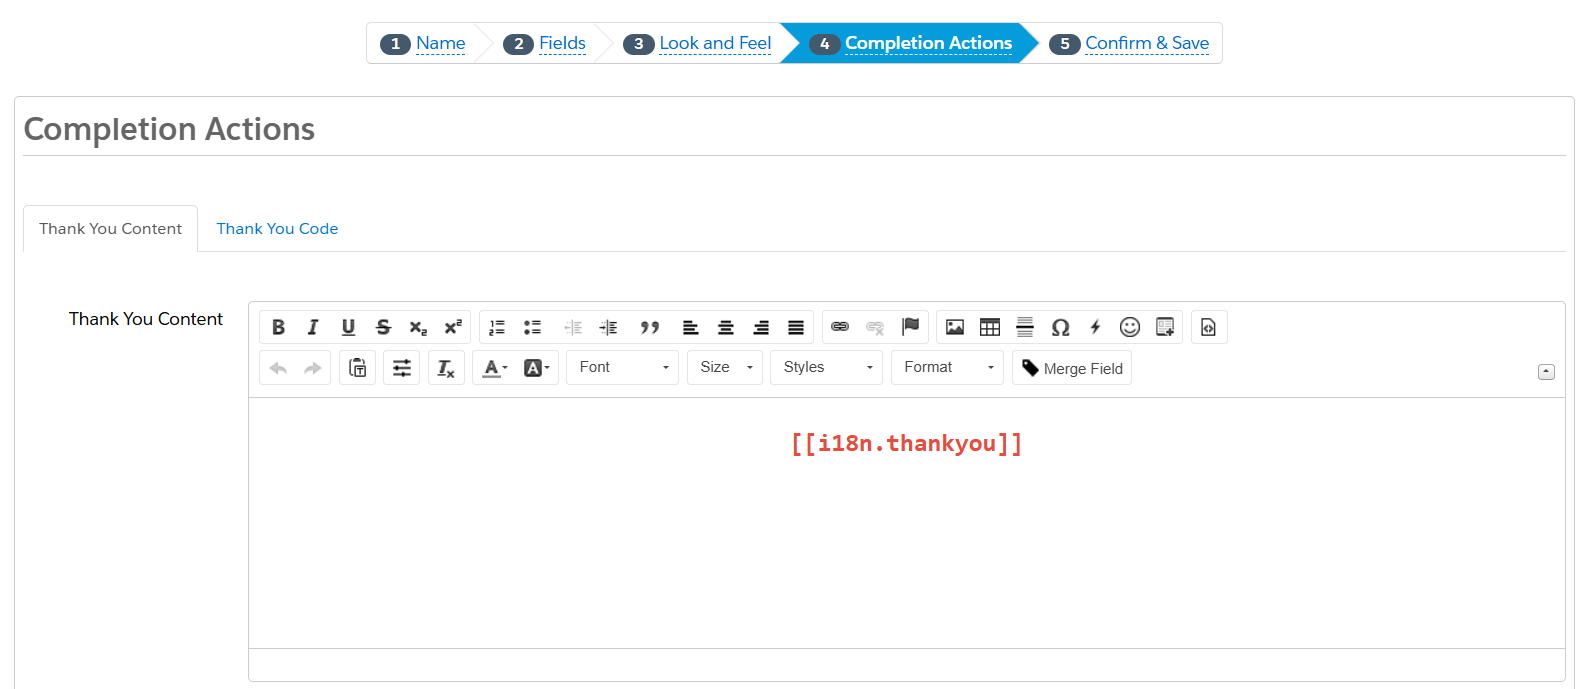
Step 4: Set Thank You Content and Completion Actions
- Add a Thank You Message for successful submissions.
- Configure any Completion Actions like auto-response emails or notifications.
- Click Confirm and Save.
Step 5: Confirm and Save.
Conclusion
- Creating a multilingual form in Salesforce Pardot may initially seem complex, but with the right approach — using layout templates, the [[i18n]] format, and a bit of JavaScript — it becomes easy and powerful.
- In this blog, we walked through how to build a single dynamic form that updates its content based on the user’s selected language. This not only improves the user experience but also helps you connect better with global audiences without creating multiple forms.
- By using [[i18n.firstName]], [[i18n.language]], and similar placeholders, your form can automatically display the correct translations, making it flexible, user-friendly, and ready for international use.
- Now you can collect leads in any language — all from one smart, scalable form in Pardot.