

Steps to Create Record in Salesforce Marketing Cloud
Creating records is the first step to powerful personalization in Marketing Cloud. This blog walks you through all the possible ways to do it in the smart way.
By Surya Vijayakumar
Salesforce Developer
Ways to Create a Record in Salesforce Marketing Cloud
In every business, across every industry, in every department, one thing remains constant to run a business in smooth way that is data. Whether it is a sales, marketing, support, or operations and data powers decision-making, strategy, and customer relationships.
Back in the day, we stored customer details in notebooks or handwritten ledgers. It is old method, right? Now, it is digital world and everyone shifts to Excel sheets, Google Sheets, and now, powerful platforms like Salesforce Marketing Cloud (SFMC) have taken over as the go-to solutions for storing and managing customer data efficiently. In this blog, we will dive deeply and learn how to create a record in Salesforce Marketing Cloud step by step.
📝 Note: If you want know about Data Extensions for creating records, kindly read the blog how to create a Data Extension (like an object) and add fields where explained about creating the records by using the Data Extension. If you are new to the system, highly recommend to go through that first to get hands-on with that will make this part easier to follow and apply in real time.
Sit back, relax & read...
Steps to Create a Single Record
You can create a record in two ways, either by importing multiple records directly from an Excel file or by manually adding a single record. Let’s start by looking at how to create a single record in Salesforce Marketing Cloud.
Log in to the Salesforce Marketing Cloud
Navigate to the https://mc.s12.exacttarget.com/ link (Salesforce Marketing Cloud URL) in your web browser and follow the below steps.
Step 1: Enter Your Credentials
- Enter your Marketing Cloud username
- click Next.
- Enter your Marketing Cloud password.
- Click on the Login button to access the Marketing Cloud dashboard.
- After successful login, you will be directed to the Marketing Cloud dashboard.
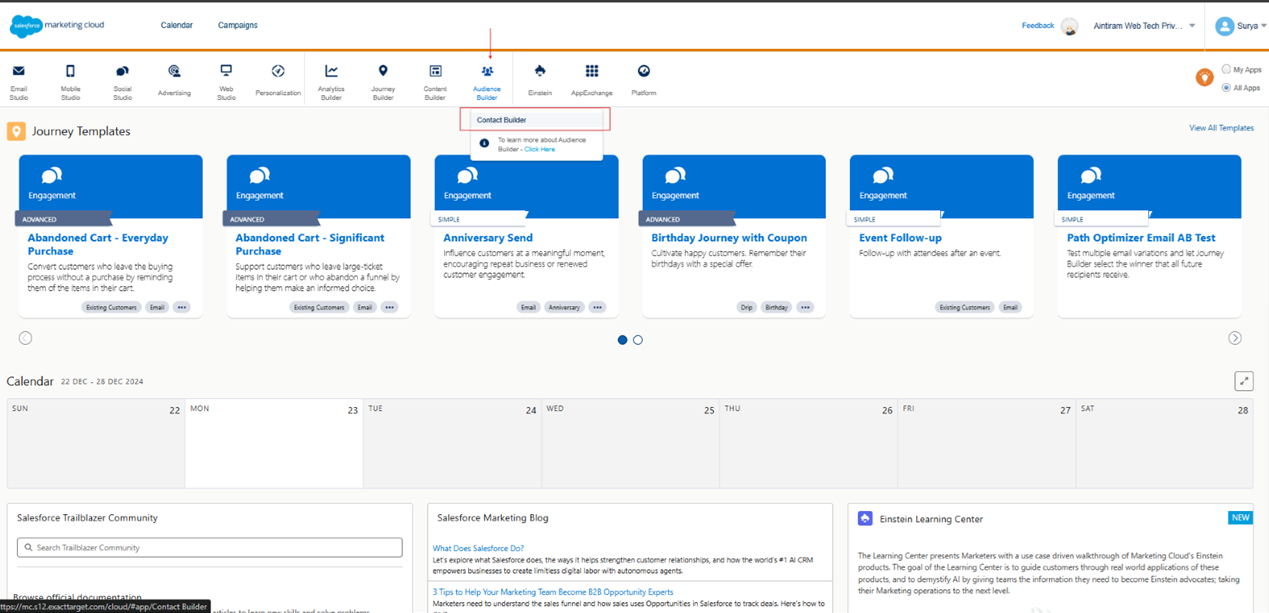
Step 2: Go to Contact Builder
Hover the Audience Builder on the Page and click the Contact Builder
Step 3: Go to Data Extensions
In the Contact Builder, Click the Data Extensions. 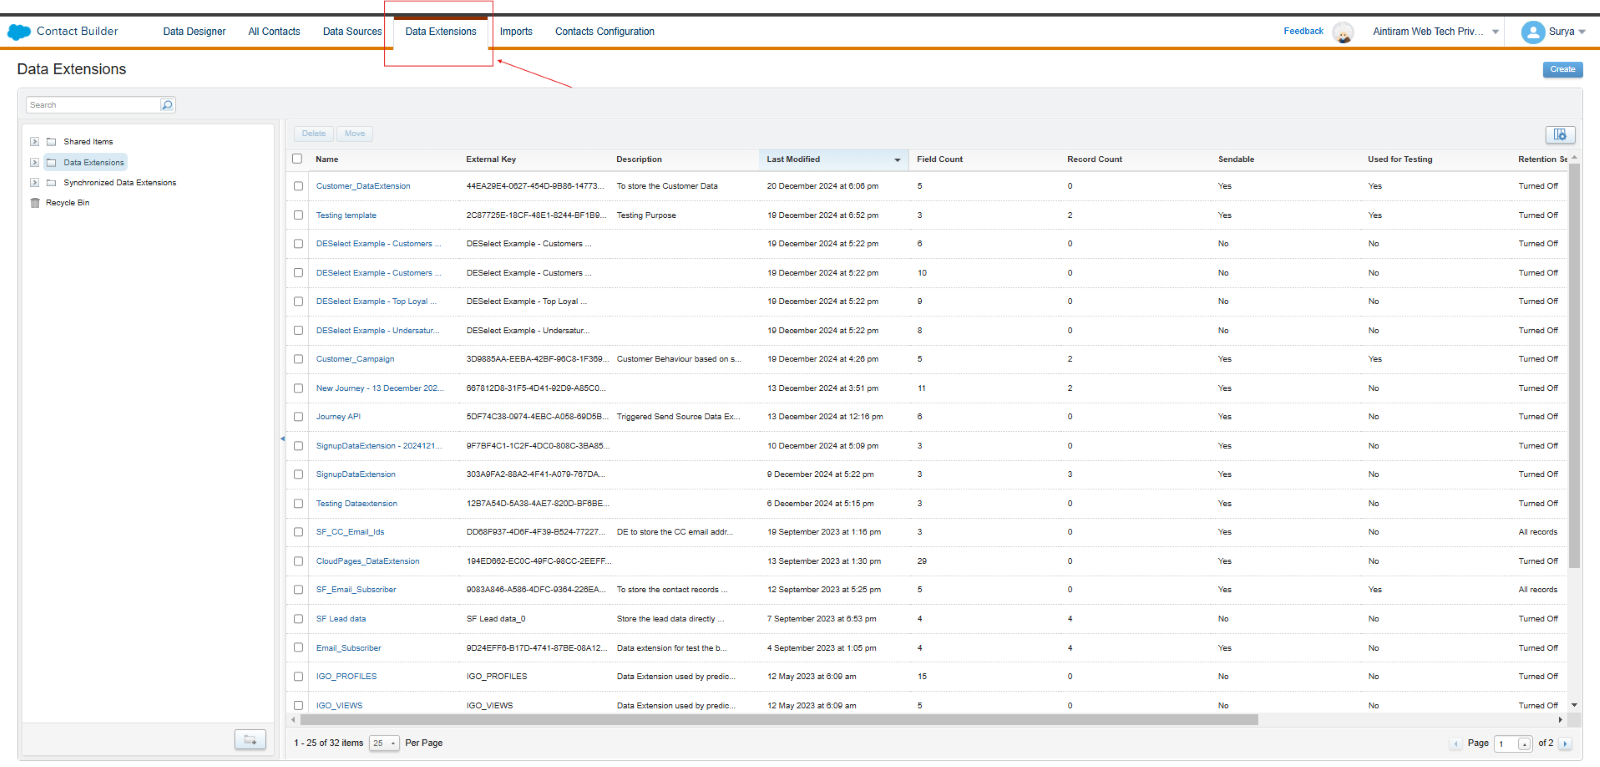
Step 4: Create Data Extension
Create Data Extension for creating the records by using this blog How to create Data Extension in Salesforce Marketing Cloud which explains how to create a Data Extension in Salesforce Marketing Cloud.
Step 5: Create Records
Click your created Data extension for creating the records.
Fill in the values in the specific fields.

Once you fill in all the required fields and click the Save button.

Steps to Create a Bulk Record
This process is similar to creating a single record. However, Salesforce Marketing Cloud offers an Import option that enables you to add multiple records quickly and efficiently to upload records in Salesforce Marketing Cloud.
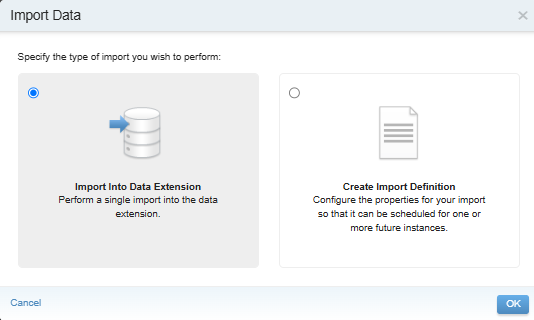
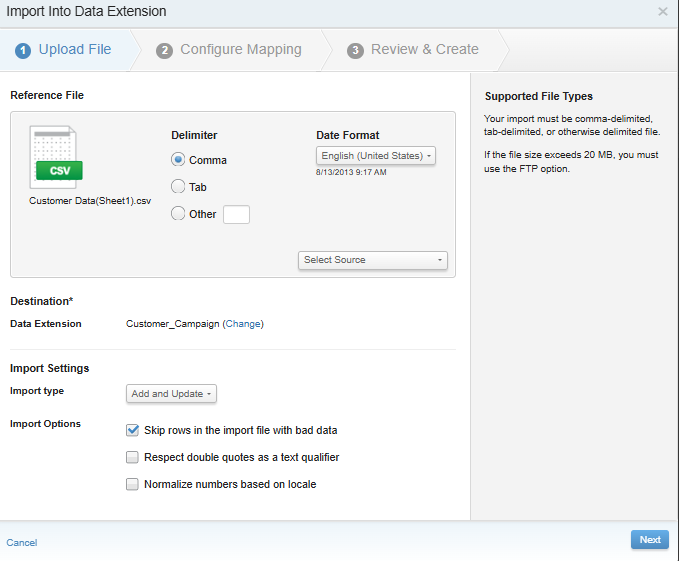
Step 1: Go to Data Extension and click Import button for importing the records.

Step 2: Once you click the Import button, it shows the Import Into Data Extension radio option to create a records in a single import.
Step 3:
- Choose your CSV file and upload it.
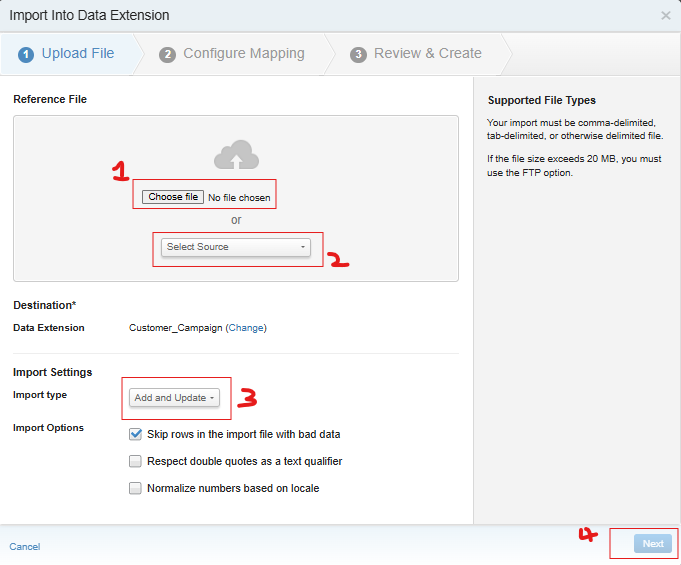
First, select your file.
Next, choose the source.
Finally, specify the action you want to perform. There are four options Add and Update, Add Only, Update Only, and Overwrite.
Click Next
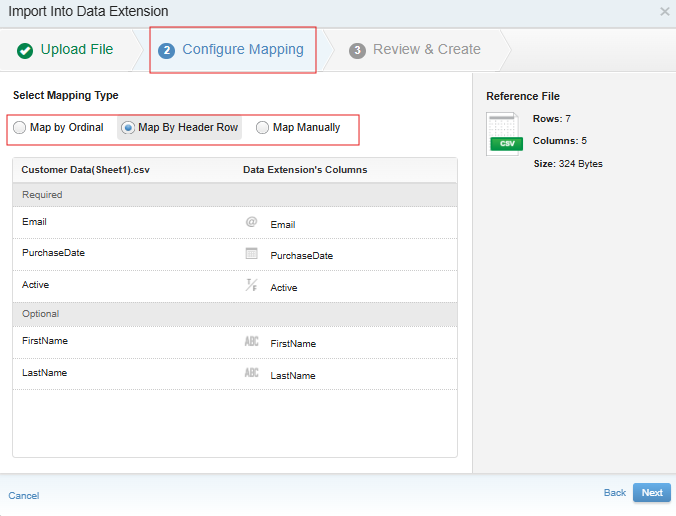
Step 4: Map your fields by using three different types of mapping. Below are the details.
Map by ordinal - Matches data to fields in the data extension based on the column order in the file.
Map by Header Row - Matches data to fields using the column headers in the file that correspond to the data extension field names.
Map Manually - Allows manual selection of file columns to map to specific fields in the data extension.
Step 5: Next go to Review & Create section and review the details.
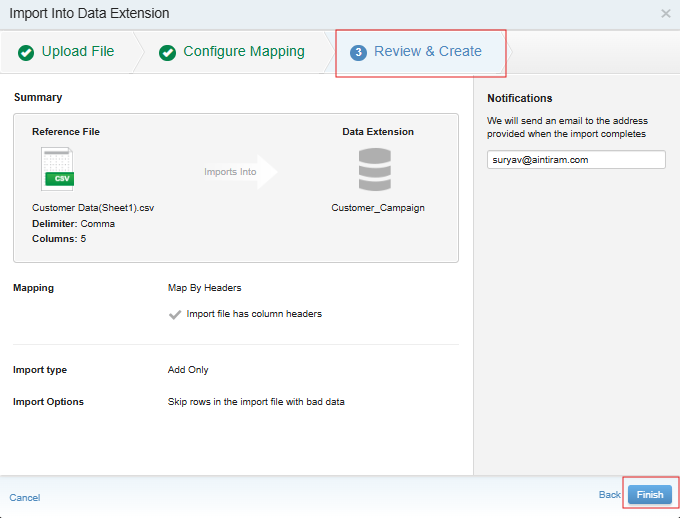
Step 6: Click the Finish button and wait some time. It takes some time to import all the records.
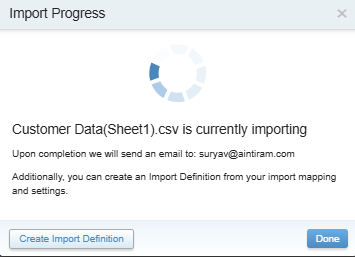
Step 7: Wait a few seconds or refresh the page to verify if you have received the email after adding the record.
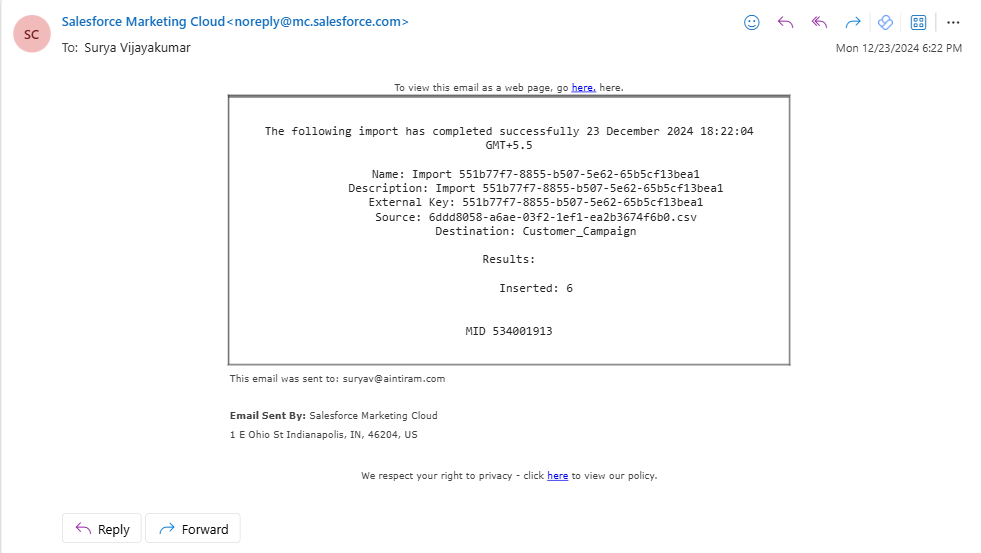
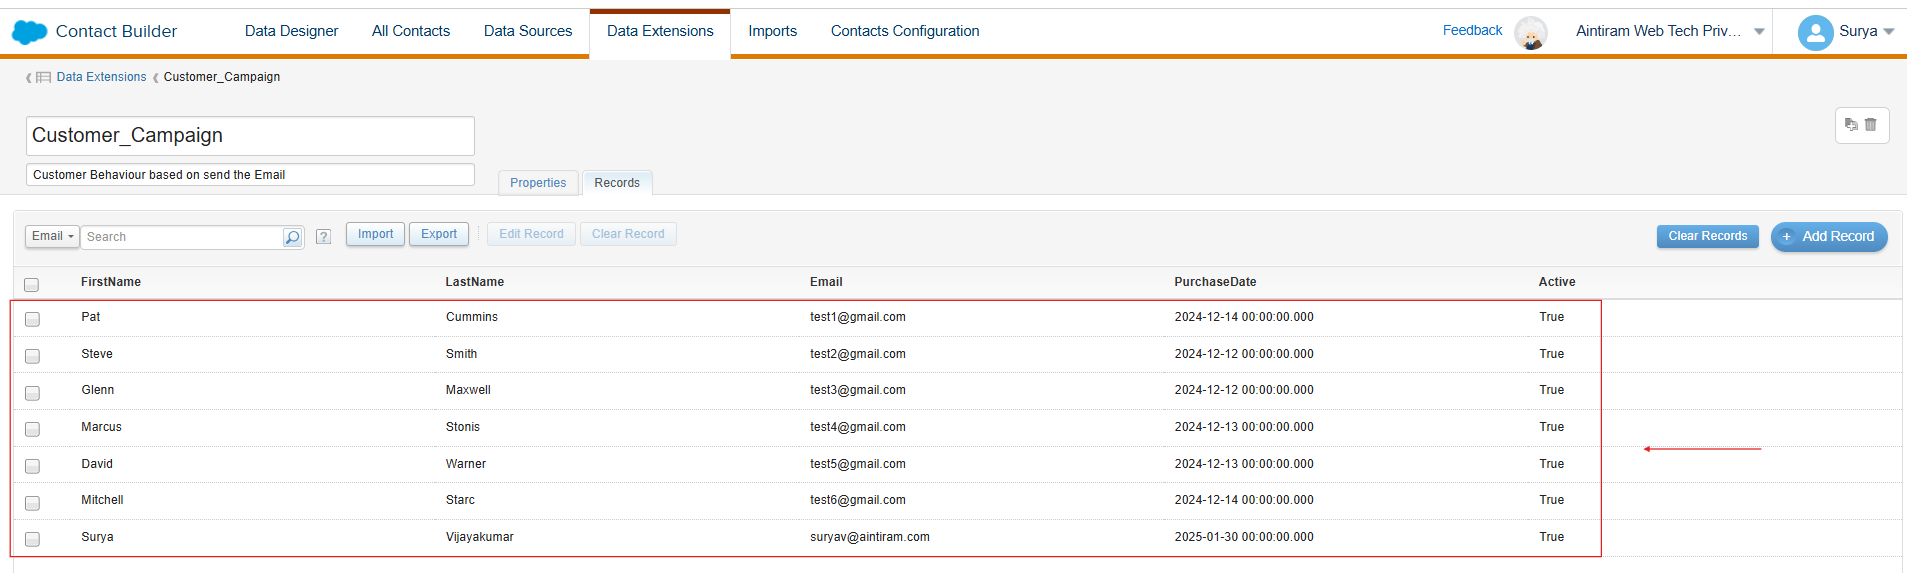
Step 8: Once received the email, refresh the data extension and you could see the uploaded records list.
Conclusion
Hope you got a good idea about creating the records in Salesforce Marketing Cloud using the Data Extension in terms of creating single record by creating manually and creating bulk records by importing the records from files by using the import option in the Data Extension. In Salesforce Marketing Cloud, using the Contact Builder and Data Extensions you can store customer information effectively.
Whether you are doing it one-by-one or in bulk, the process is easy and helps you organize your data to run personalized marketing campaigns smoothly. Make sure your data is clean and mapped correctly and you are all set now to create records on your own. Follow our blog page for future updates related to this & other Marketing Cloud features.